Post by wayne on Dec 27, 2016 21:30:21 GMT -5
RE5 Tourkit history. Factory or Aftermarket?
After a recent exchange on FB I did some research and a reviewed information I already had in an attempt to establish a timeline and history for the tour kit.
Here's what I believe is the story, none of it is speculation unless specifically noted, none of it is drawn from internet sources. The following comes from magazine articles printed back in the day and more recent magazine interviews. Also from notes and emails sent directly to me by people who worked for Suzuki back in the day.
The RE5 motorcycle fully equipped with a swag of touring accessories was envisioned by the manufacturer from early on. Witness to this was the first unveiling of the bike to the world markets. Sam Costanzo (Rotary Recycle) was not only trained as a mechanic at the Japanese Factory school, he acted as a fill-in instructor over a 12 month period. He made multiple trips to Japan and got to know the engineers and R&D guys personally (he reveals this in a VJMC magazine interview, April/May 2007). He was contracted by Suzuki to assist them with the introduction of the RE5 and provided the following paraphrased information:
"Simultaneous showings were held in September 1974 in Belgium, Germany, England, France, Spain and the US. The states had such a big market that there were 6 showings. Rotary Recycle was present at the #2 Hilton Hotel showing in Las Vegas. On display were three RE5s, a yellow, a firemist red and a silver grey "Road King" tourer in full regalia with the fairing and bags."
The first deliveries of the RE5 were delayed until January 1975. However, there's no record of tour kitted bikes being available at this time. In May 1975 an article by motorcycling journalist Bob Anderson appeared in the US Road Rider Magazine. To quote "Suzuki will have a test bike ready.......I was astride a shiny new RE5......the test machine had an additional 60 pounds of Suzuki touring accessories on it.......Yup. Suzuki saddlebags. And fairing. And scoot boot.". Further on Bob comments "What I had on the test machine was the second set to come out of the molds - prototypes."
Bob goes on to mention a number of improvements he envisaged for the touring kit. This was considered "...a long test on the Suzuki Rotary." and the article goes on for 8 pages.
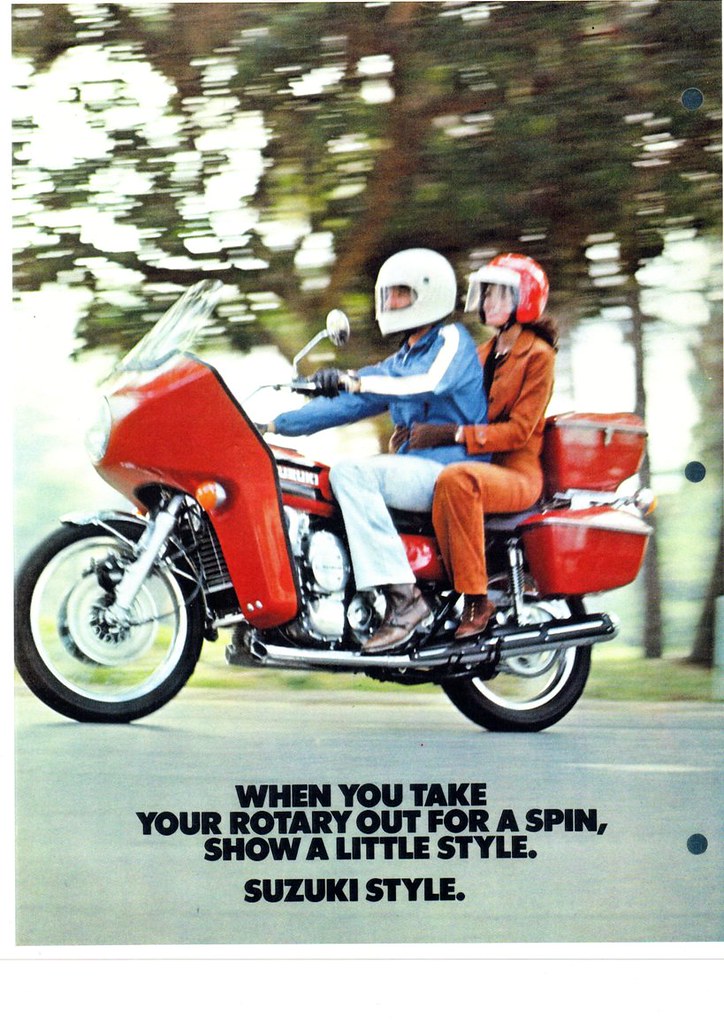
Board member Brian Hudson who was an employee of Suzuki back in the day supplied the dealer brochures featured in the first post of this thread. These are scans of original hard copies that belonged to board member Steven Silvestri and salvaged from the dealership where he worked for 40 years. Note the earliest date on the brochures is December 1st 1975. They detail all of the tour kit accessories and part numbers including dealer prices and RRP's. Note, these are not customer brochures but for dealers in the Suzuki network. The first post also shows front and back views of a customer brochure. According to an interview with Sam Costanzo in the April/May 2007 issue of VJMC magazine (North America) "...Suzuki only made 200 or so of them."
At some point after this, and according to Sam Constanzo in private communications to me, Suzuki supplied the exhaust extensions to all owners of the tour kits. This was to stop the hot gasses from burning the bottoms of the panniers. However, I have no information on how these were supplied, distributed or whether they were free of charge or not.
Now I'm speculating. It seems abundantly clear that the touring version of the RE5 was a factory "vision" for the bike. It's possible that the first tour kit out of the molds was the one shown at the unveiling in September 1974. Given the problems and delays in the initial deliveries, it seems that the tour kit was placed on the back burner. By the first quarter of 1975, Suzuki found time to fit the second tour kit out of the molds to a new RE5 and present it to Road Rider magazine. Who knows what caused the kits to take so long from that early '75 test 'til their formal release in December 1975. I'd say the factory had a number of more serious issues on their mind.
Finally the tour kits hit the Suzuki RE5 dealers (not all dealers were authorised to sell RE5's). I have heard directly from one 1975 customer who bought his bike brand new off the showroom floor of a Suzuki dealer fully equipped with all the touring accessories. Another board member who worked in a dealersip at the time recalls they sold a new bike similarly equipped.
The kits were manufactured in the USA. However, they are not After Market accessories by any means. You could only buy them at a Suzuki Dealer. It's also pretty clear that there was a Suzuki initiated production time line for the tour kits, from the US unveiling, to the motorcycle magazine test of the prototypes to final release late in 1975. As to the contrary argument that says "...they weren't built in the factory", there's quite a lot of every manufacturer's bike that isn't built in the factory. They're subcontracted out. But it doesn't make the finished product any less a factory produced Suzuki or Honda.
By the end of 1975, it was becoming clear that the RE5 was not selling. By 1976 the end was in sight. I would speculate that if the bike had been successful, distribution of the tour kits would have progressed to other markets such as the UK, Europe and Australia. The most common reaction I hear is "...I never saw these fairings in XXXX (insert any country other than USA). This has come to mean for many "the tour kit is not a genuine Suzuki accessory". Clearly it is, refer to the dealer brochures themselves.
And no, it's definitely not a Craig Vetter Windjammer............
Member Brian Hudson contributed the following useful and informative research:
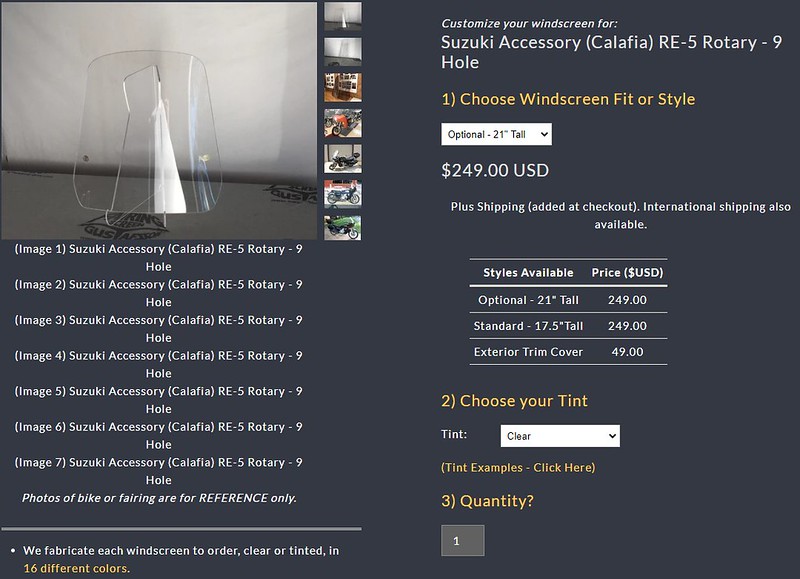
Just some information about the Suzuki Factory accessory fairing. The windshields are available from Gustafsson Plastics in St. Augustine Florida. It was started in 1968 by Leif Gustafsson specializing in all motorcycle wind screens. I spoke with Leif and he is certain the fairings were made by Calafia. They have the pattern for the optional 3 ½ inch taller (21 inch tall) mentioned in the Suzuki accessories papers. They also have the standard 17 ½ inch windshield that came with the fairing and both can be made in any of the colors they have, as well as clear. In addition, they have a pattern for the outer trim at the bottom of the windshield, the texture is not identical but probably better that some of the 40 year old ones out there. (Contact, Zach 904-824-3443 or check out their website.)
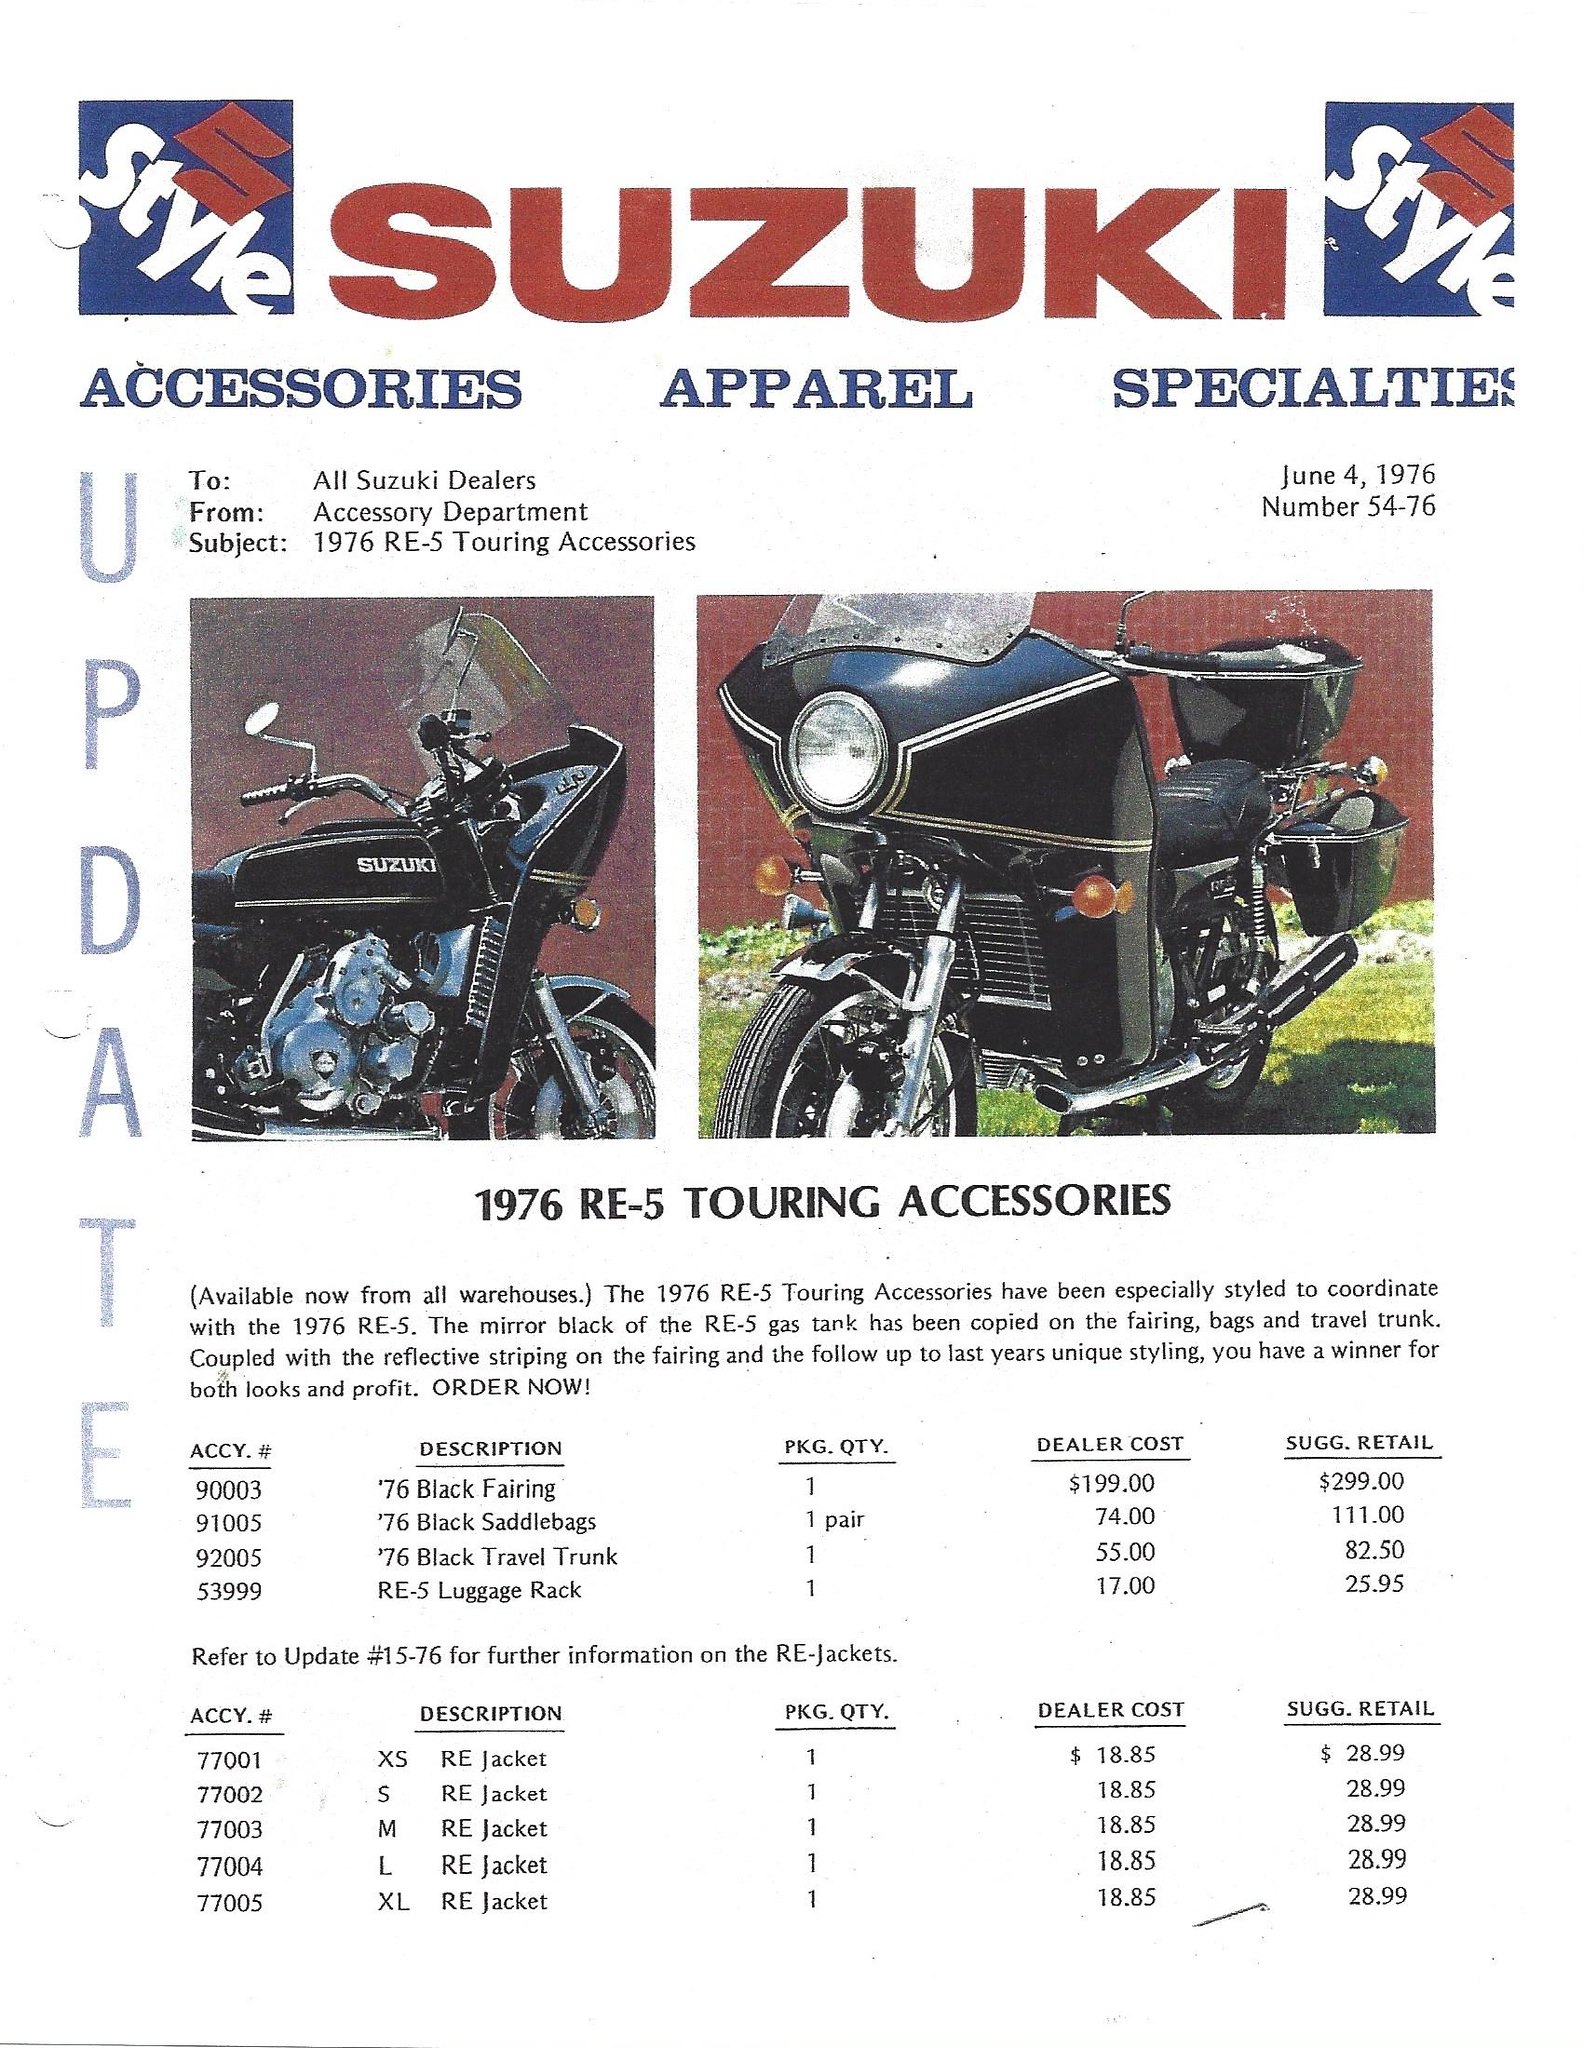
I have the Suzuki Dealer accessory papers with dealer and retail prices. In addition to the Firemist Orange and Blue it shows White and Black also with a date of December 1 1975 which may explain why the magazines didn’t mention the touring kits during their tests. One page is dated June 4 1976 to cover the A model. The gentleman that passed the papers onto me said he remembered there being mounting kits offered for these fairings to fit the first GS 750.
The papers also mention a bracket to relocate the rear turn signals when installing the saddle bags without using the accessory rack. I have one of these brackets which is simply a 1 X ¼ inch flat bar with 90 degree bends at the ends ( 12 ¾ wide X 3 inches rearward at bends) mounts to the license plate holder on tail light. Of the kits I’ve seen, the stock M front turn signals were used to mount the fairing were done by removing the stem and a 2 inch long X 3/8 coarse thread bolt with a hole drilled thru the center for the wire to pass through and a 5/8 long crude spacer. All the hardware and brackets I’ve seen for the touring kits have been in inch dimensions as per U.S. production would indicate.
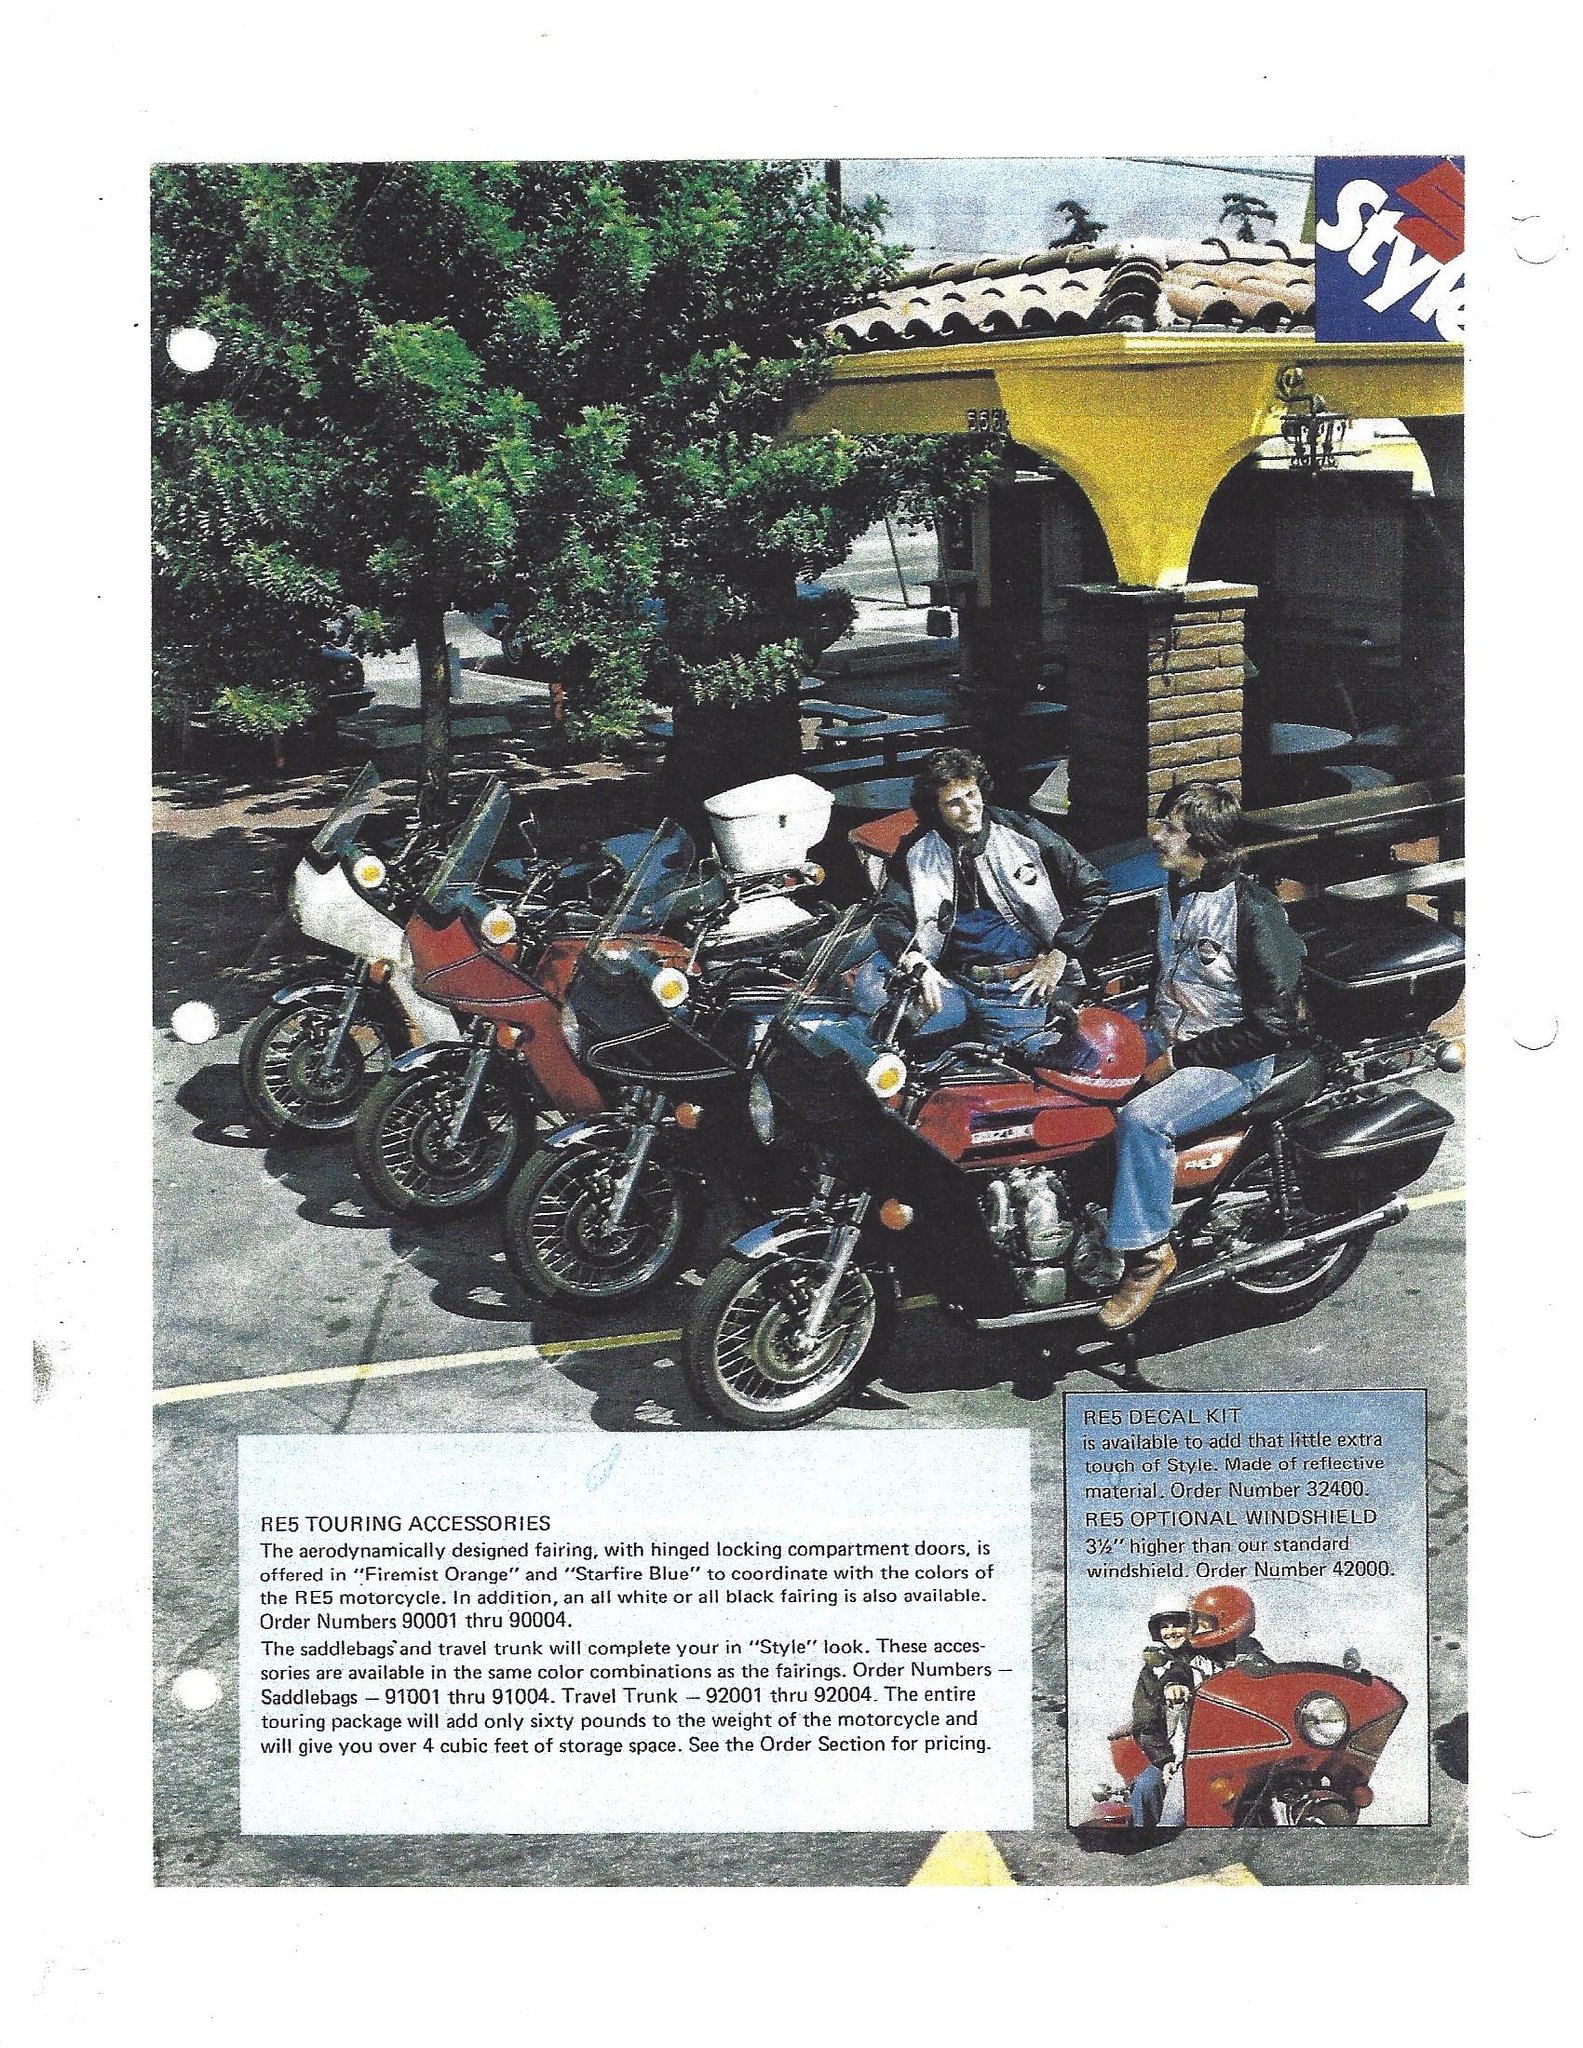
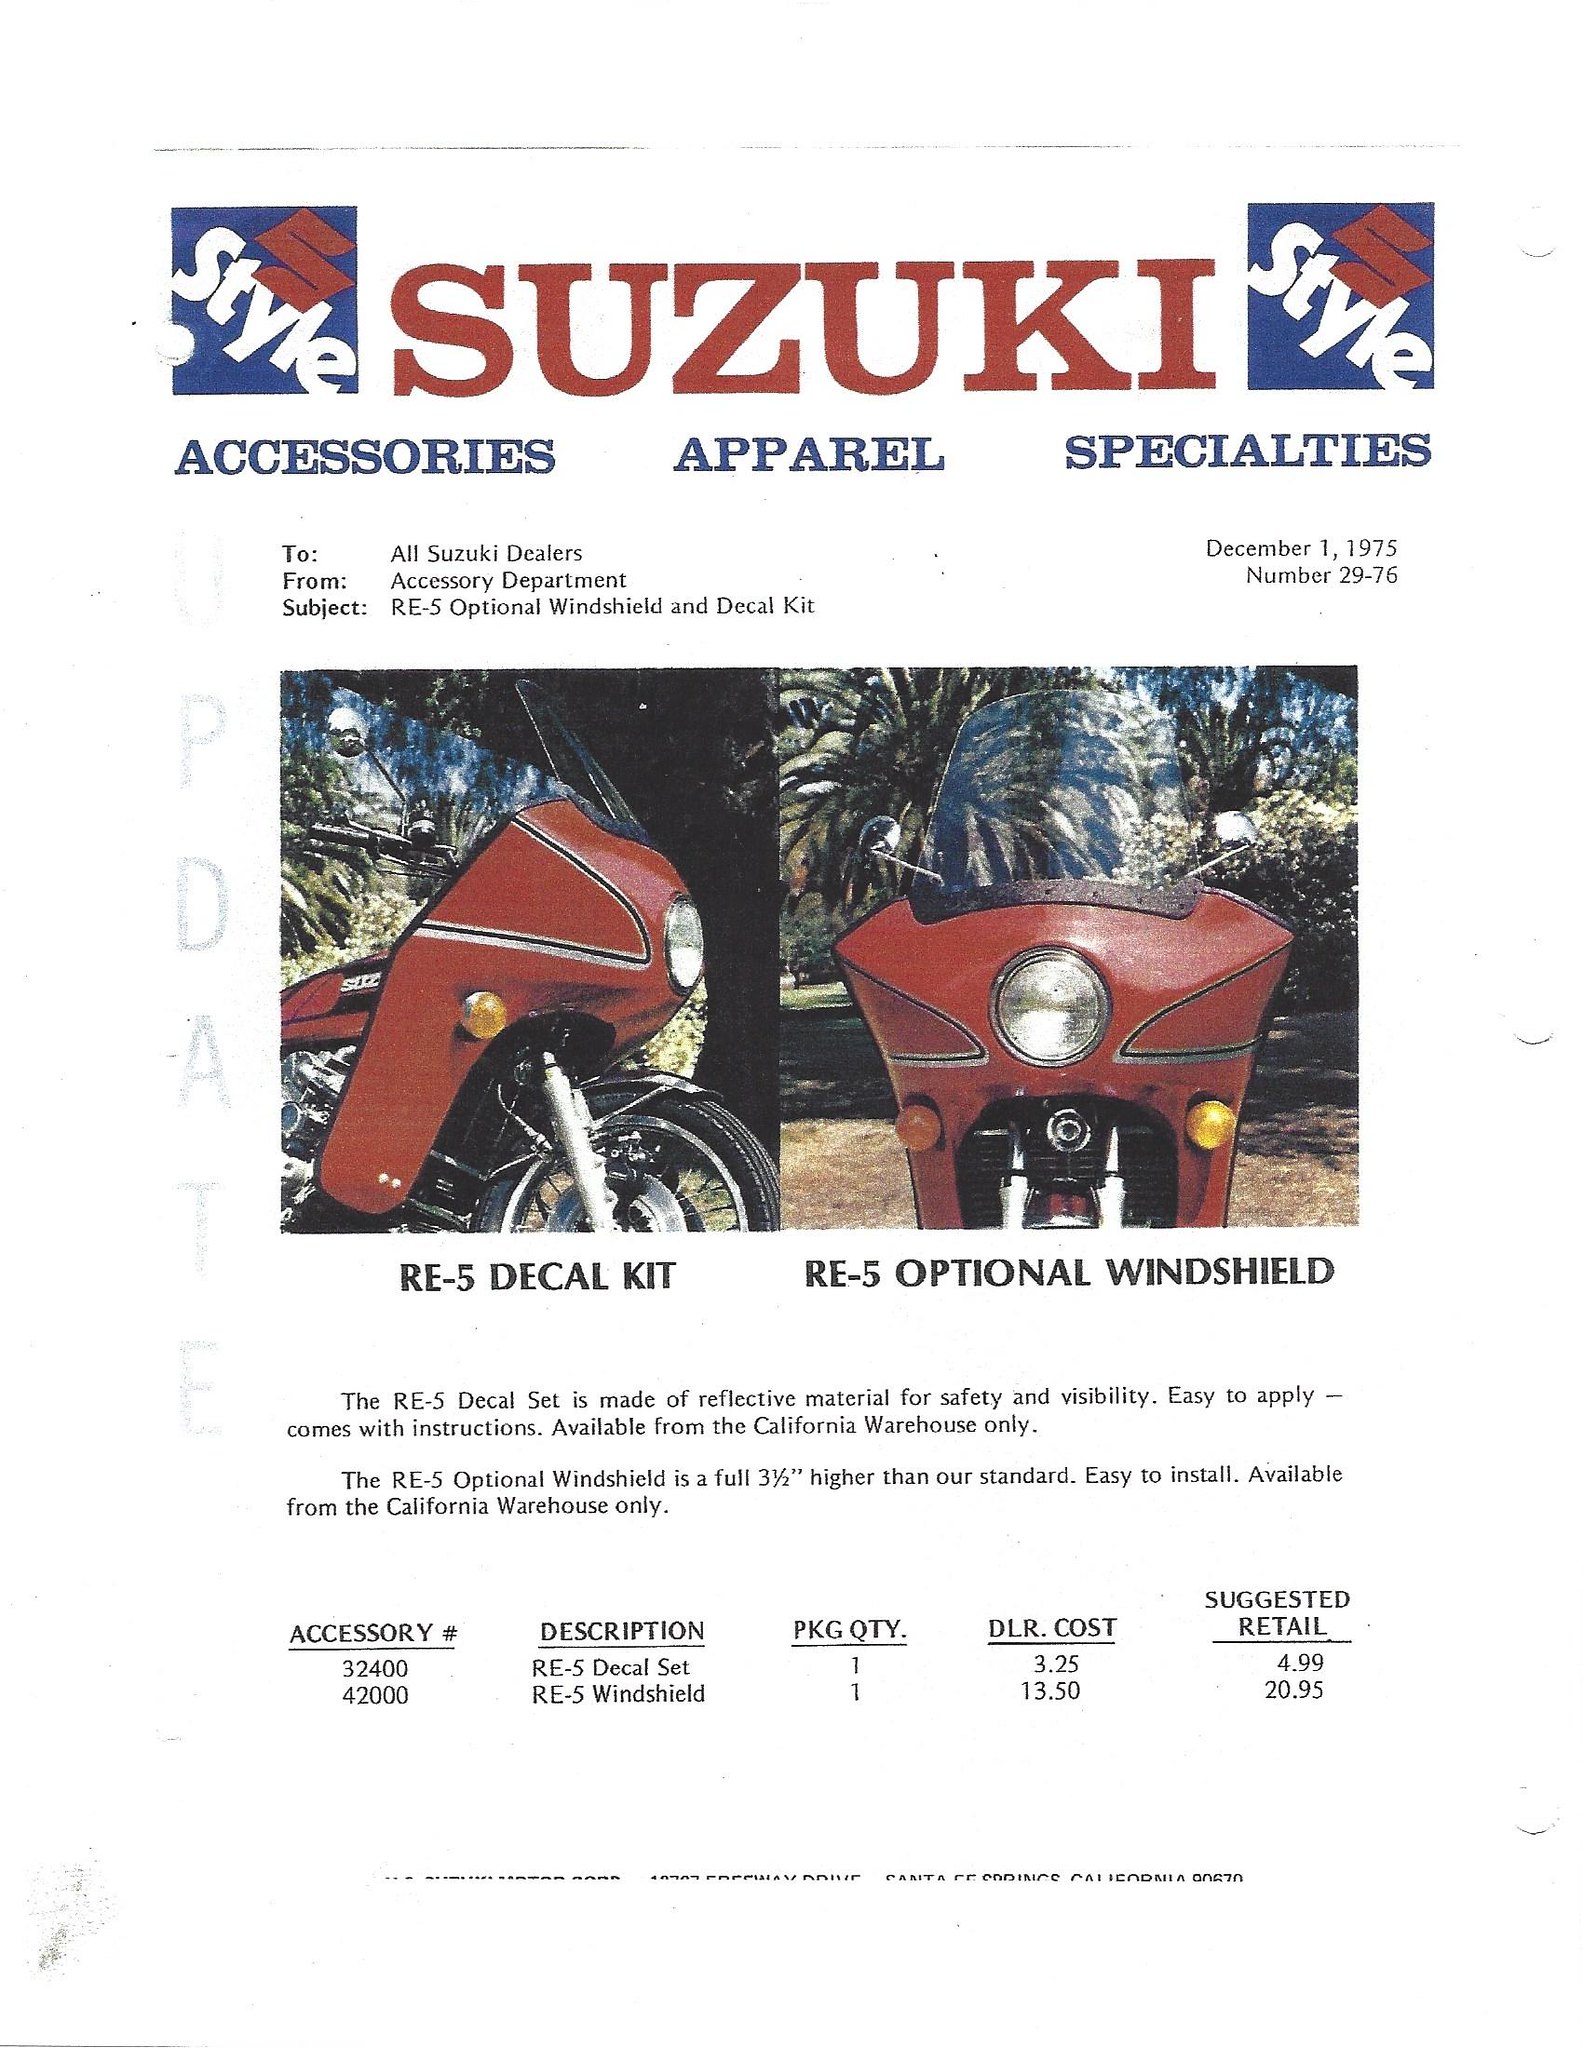
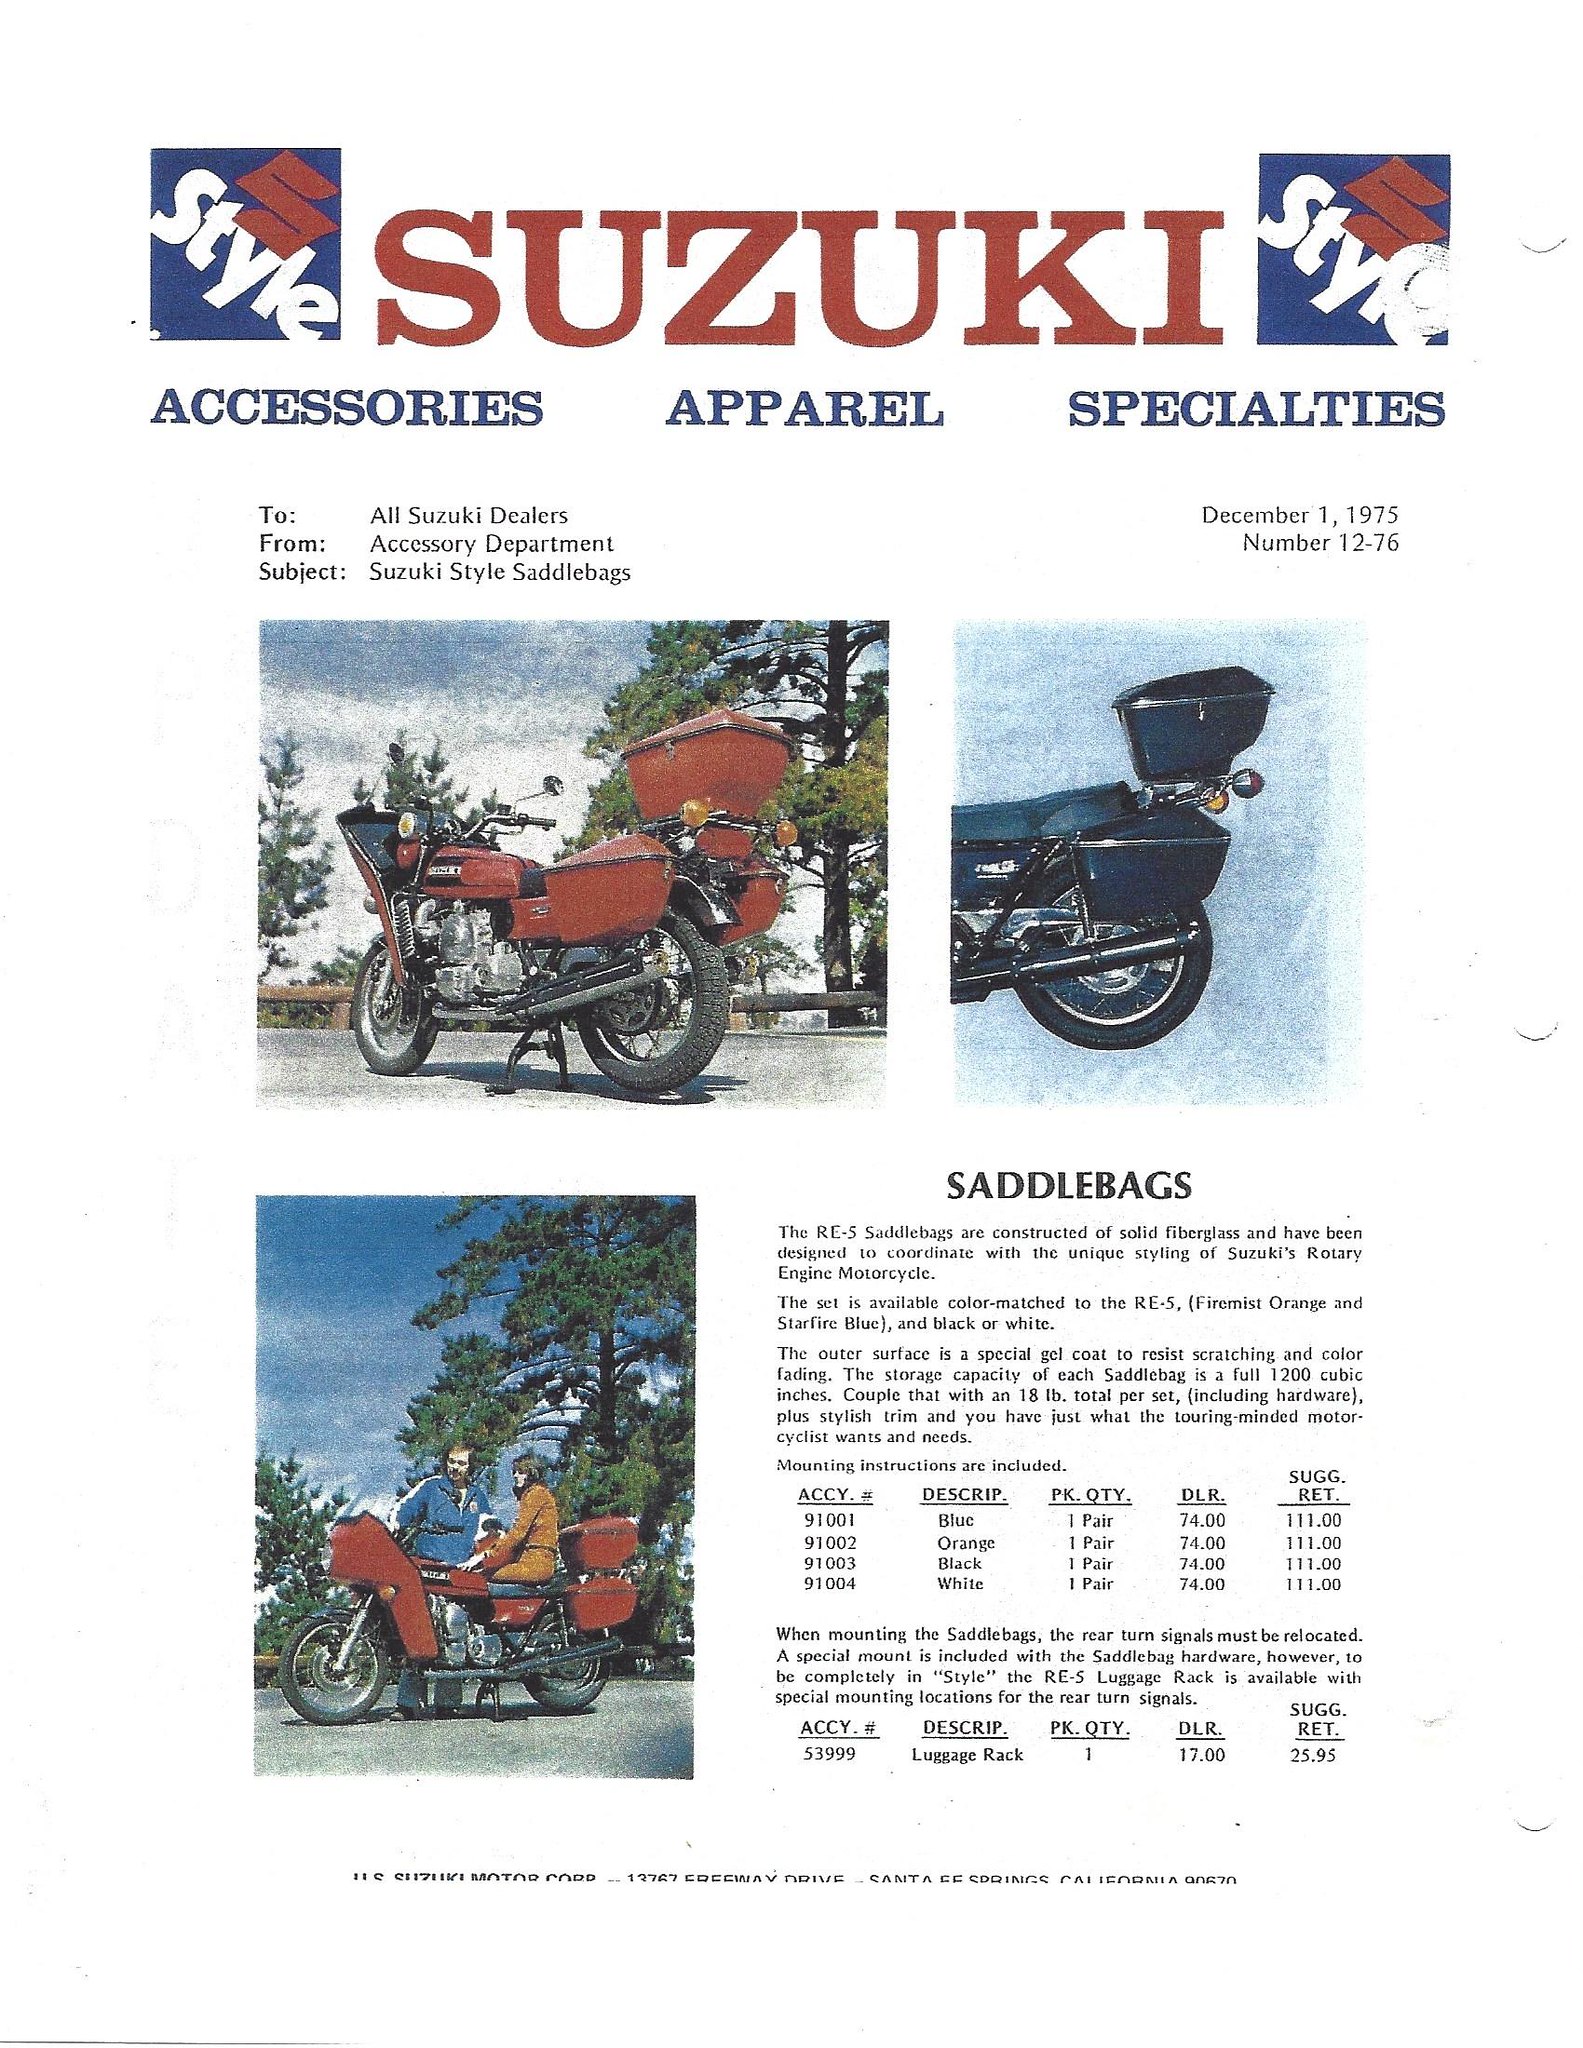
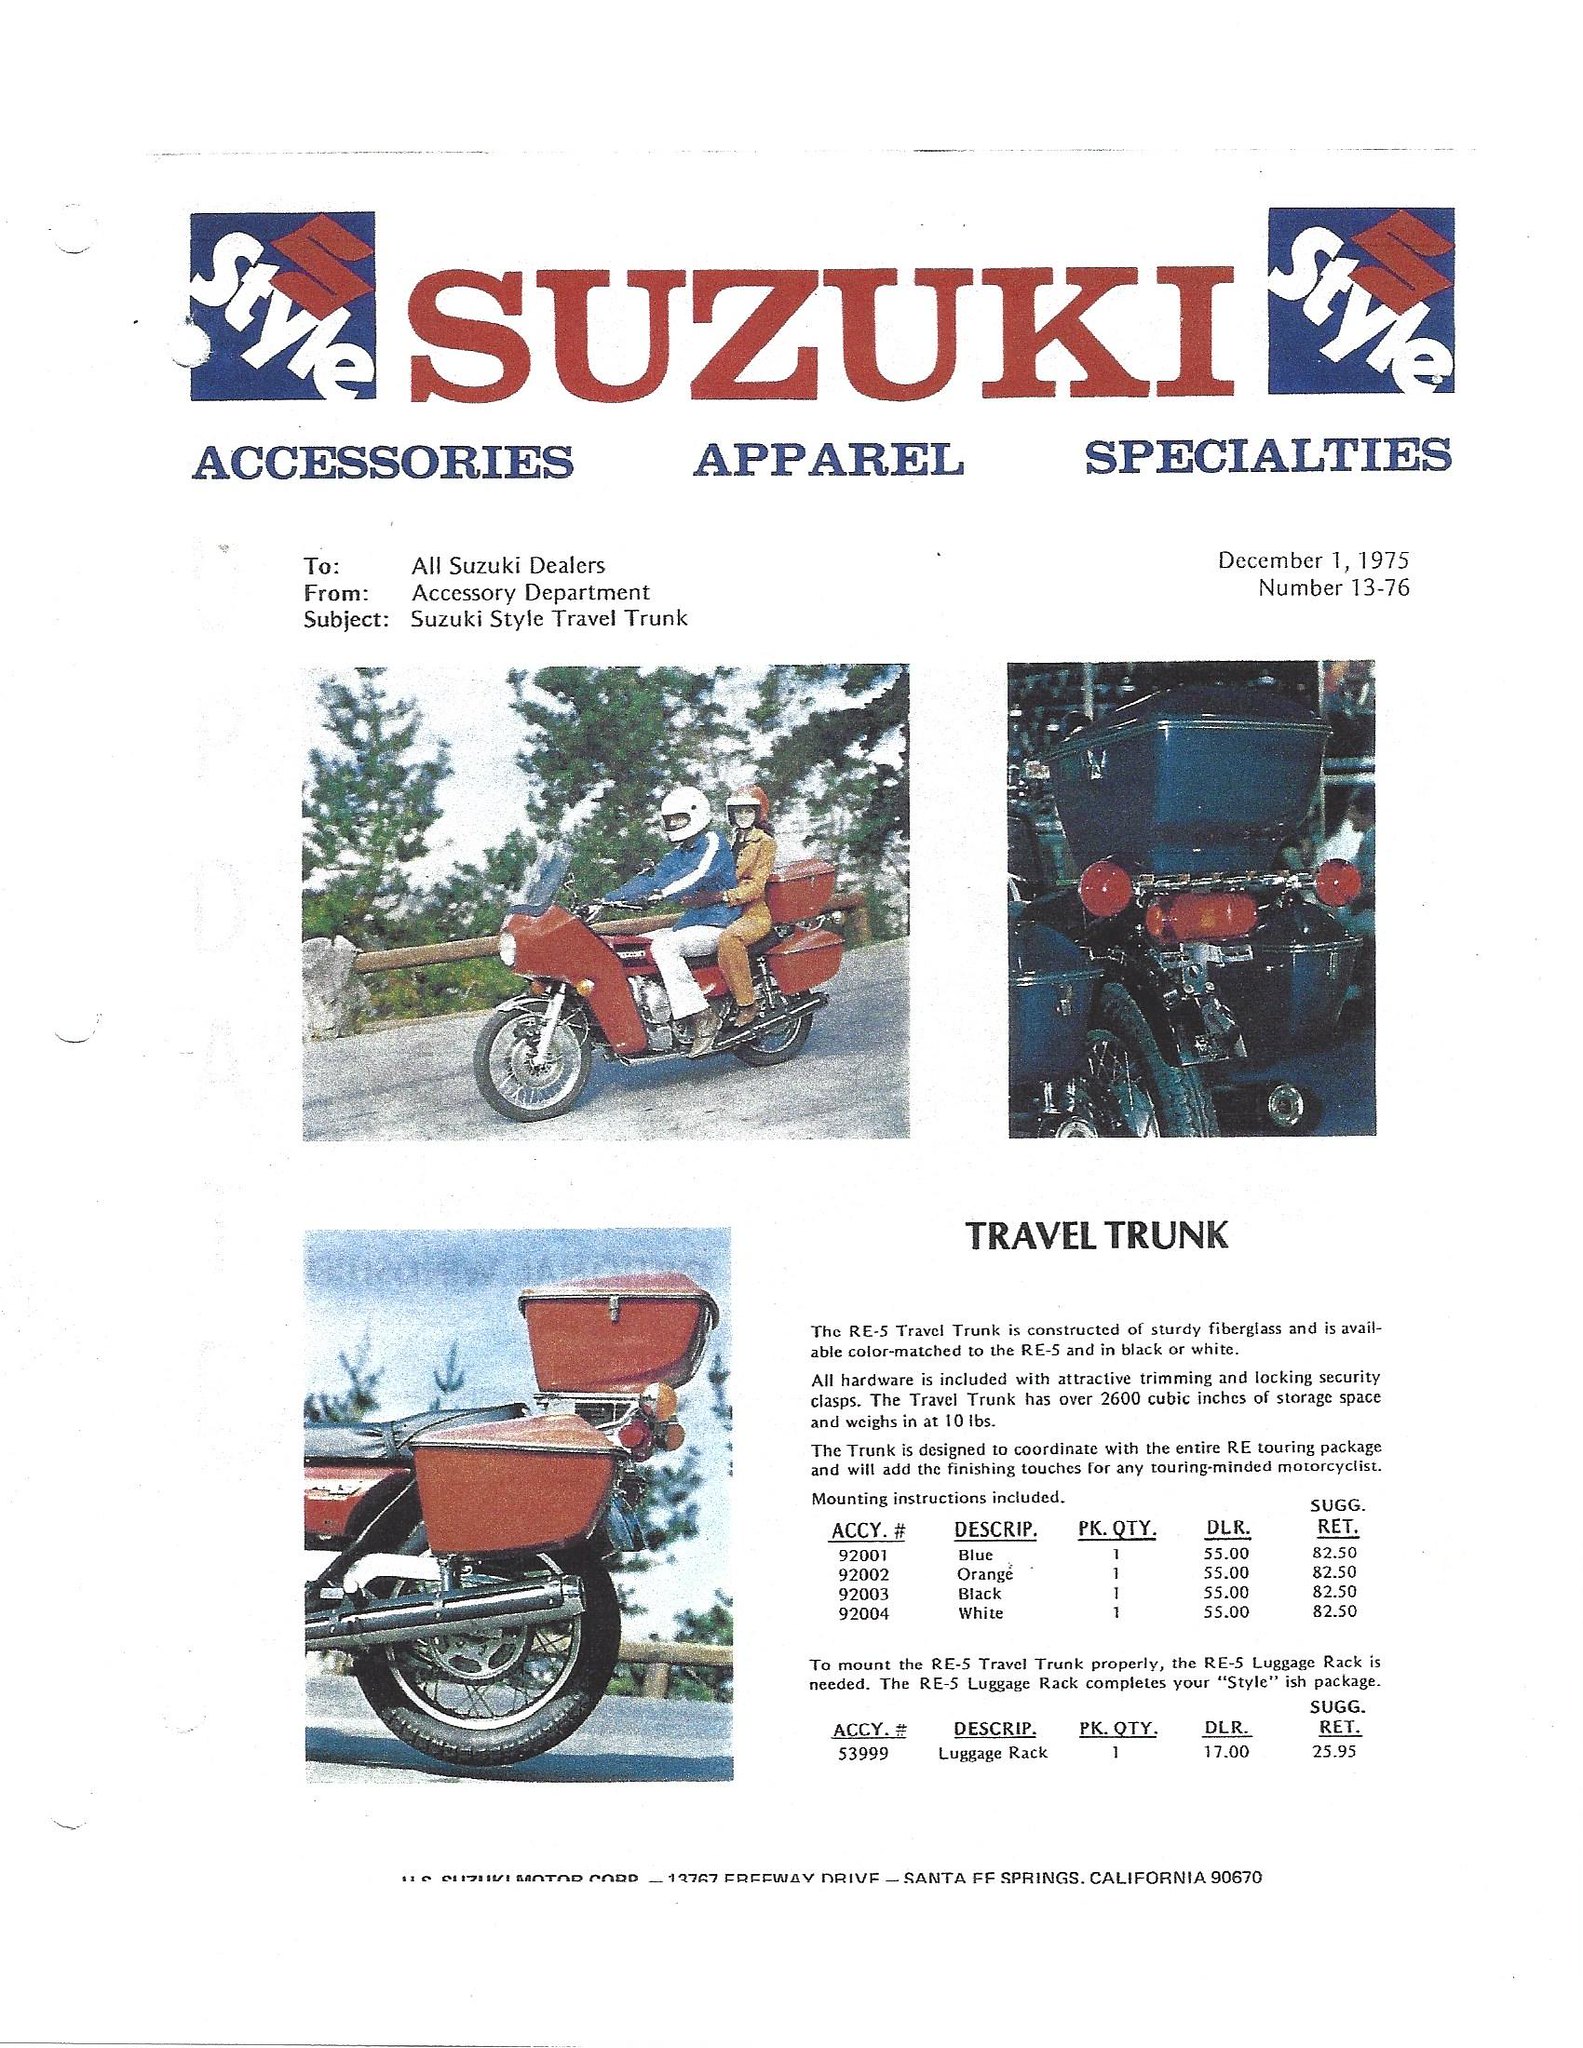
Brian has also contributed scans of his fairing brochures:

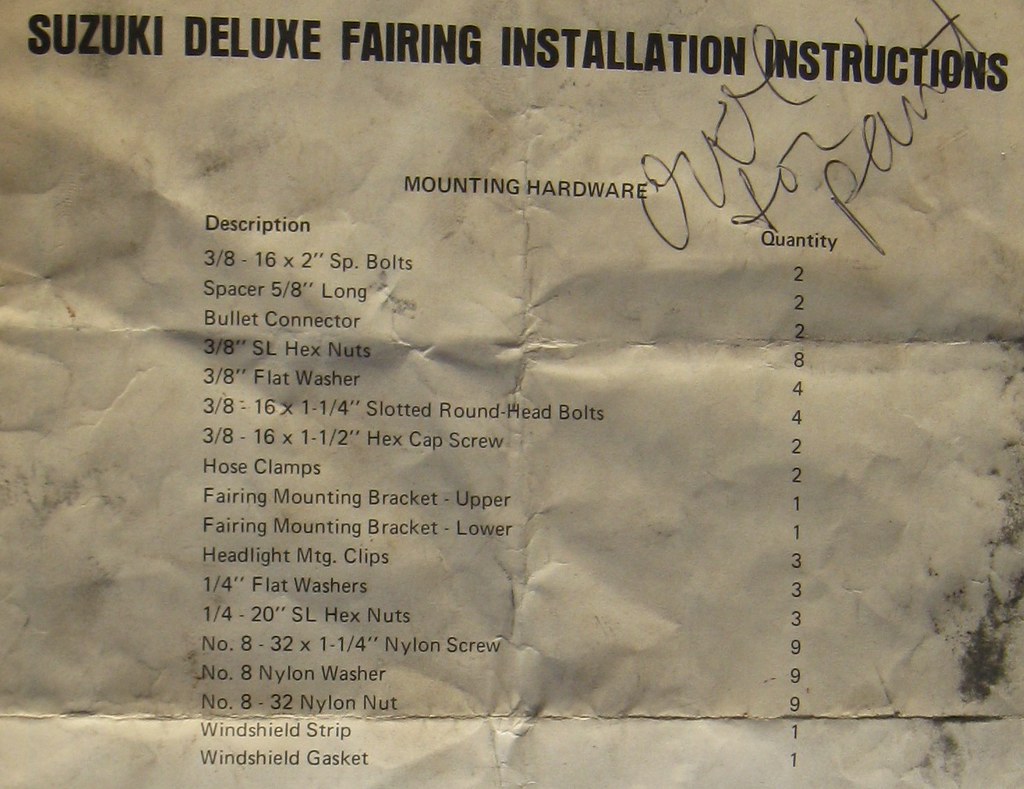
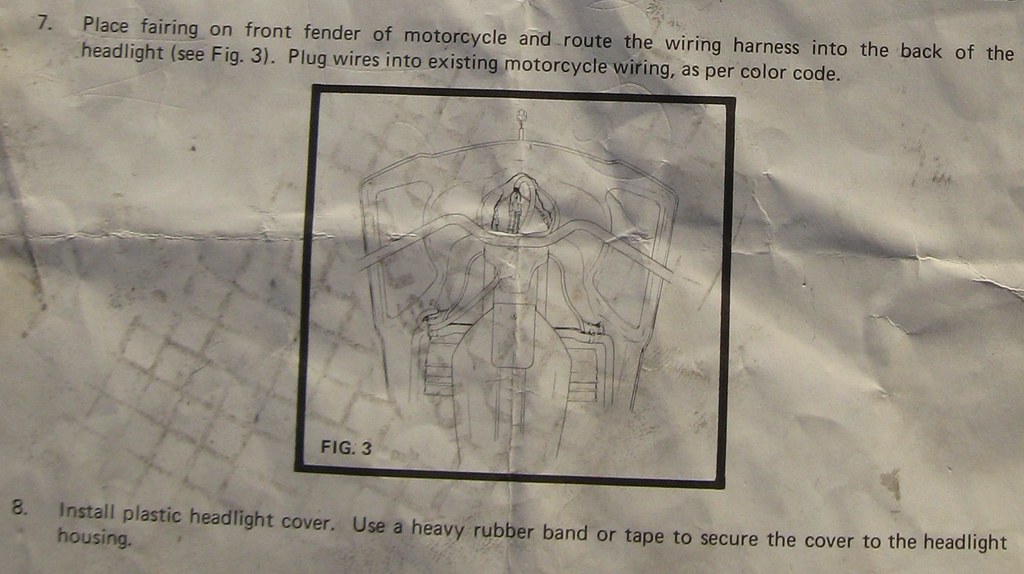
Member Tim TIMPA contributed these original installation instructions (love the bootprint!).



Here's another contemporary Suzuki Brochure featuring the M model fairing and bags. Below that, a Rotary Recycle museum A model display bike showing the black version. Rotary Recycle advise around 200 tour kits were made.
Detail pictures of fairing and bag mounts follow. If you have any specific questions not answered below, PM me.
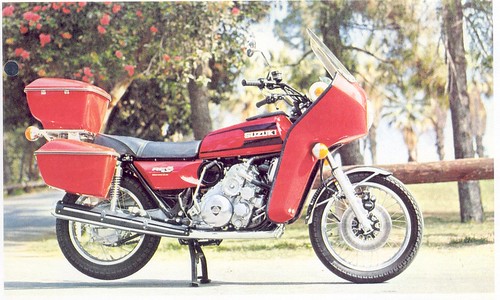
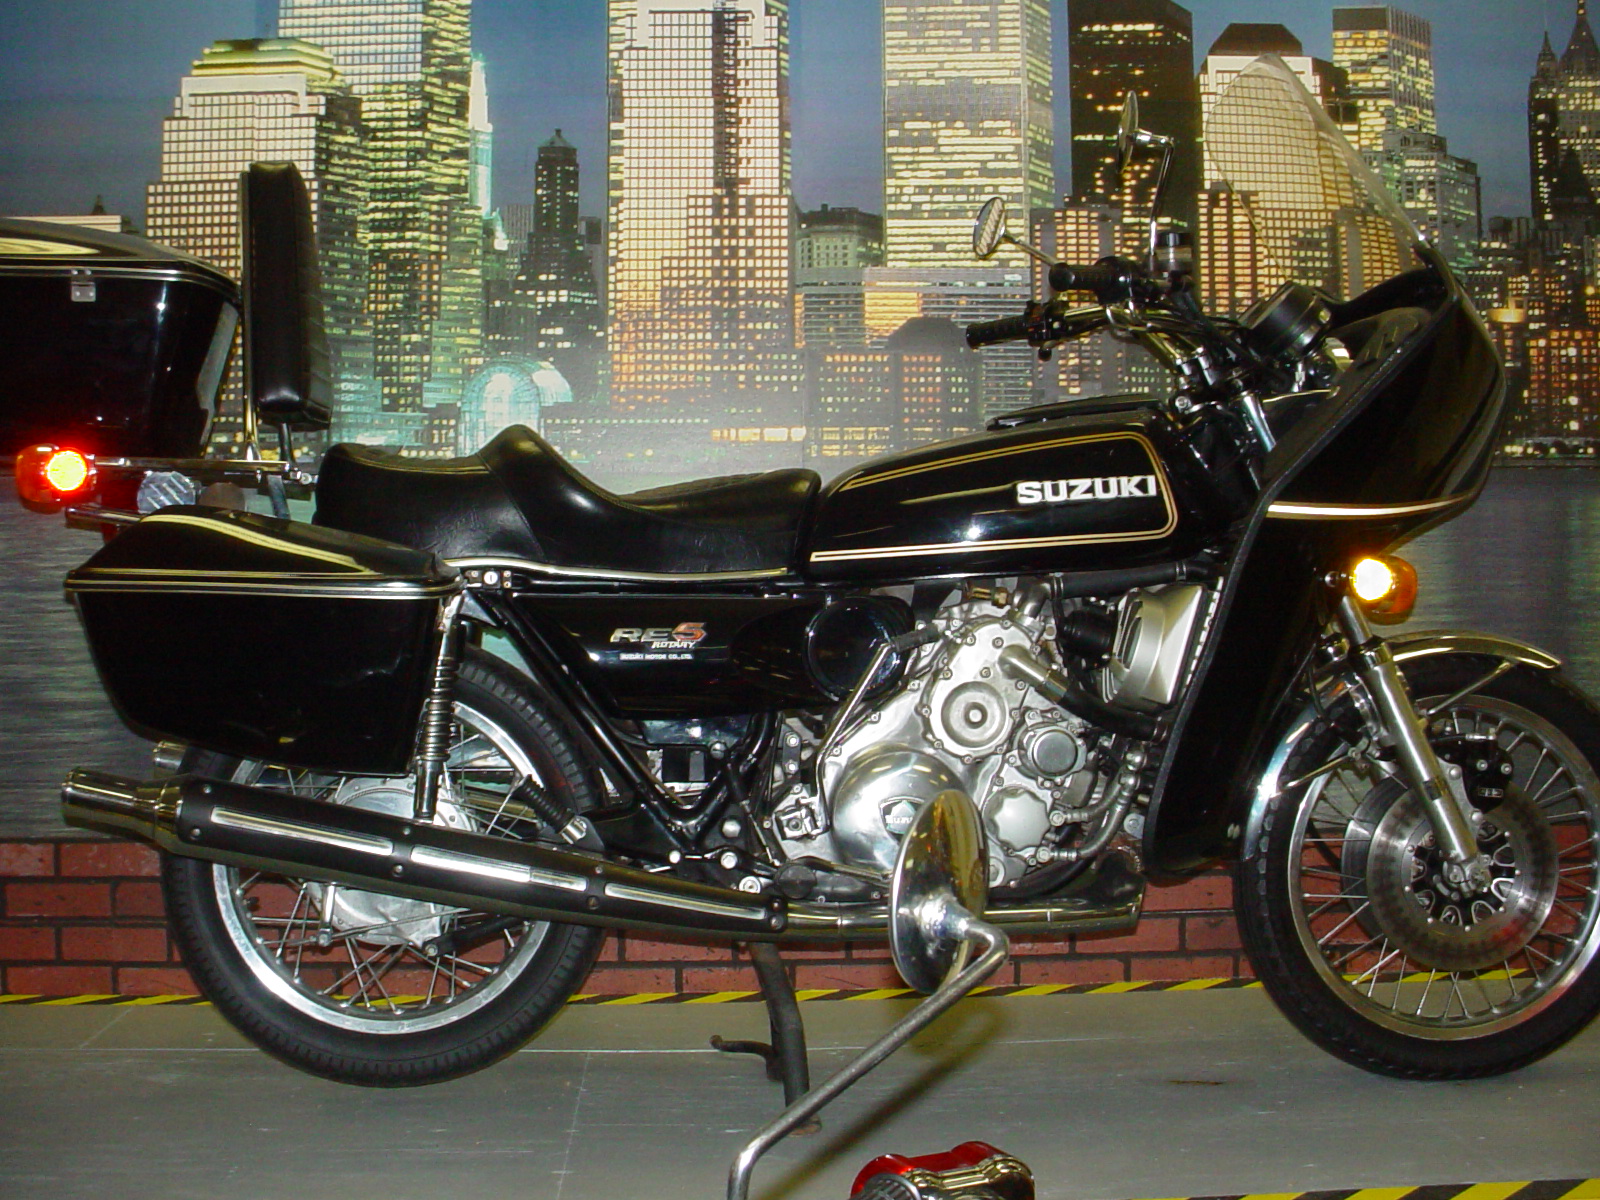
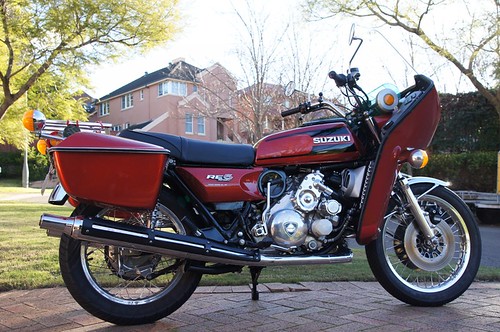
Full tour kit A model as it appeared in the Rotary Recycle Museum in Ohio (with the optional AM seat). Photo courtesy of Sam Costanzo. Note also the exhaust extensions which were later supplied to owners of the tour kit.
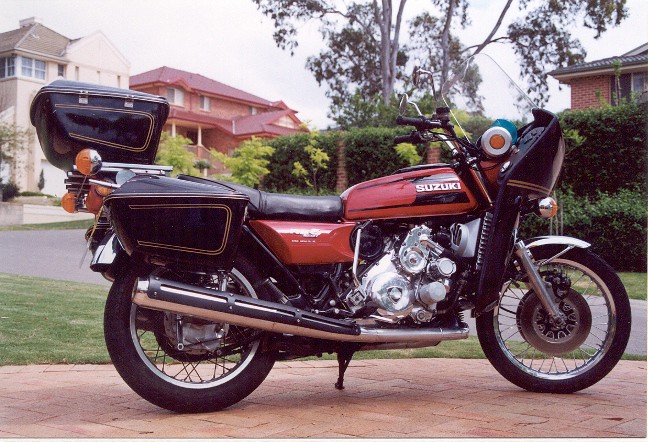
Another version of the A model paint scheme showing stripes on the bags. The stripe kits were available as an accessory item from the dealerships.
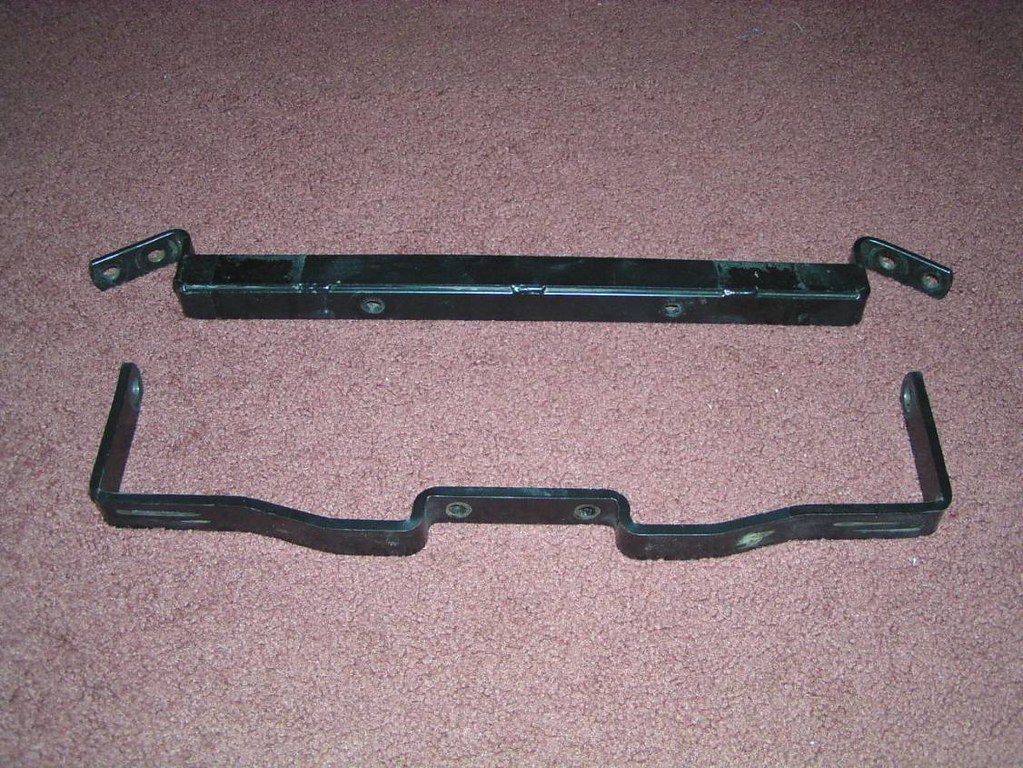
Fairing Mounts: I've been asked a couple of times about the design of the fairing mounts so these may help.
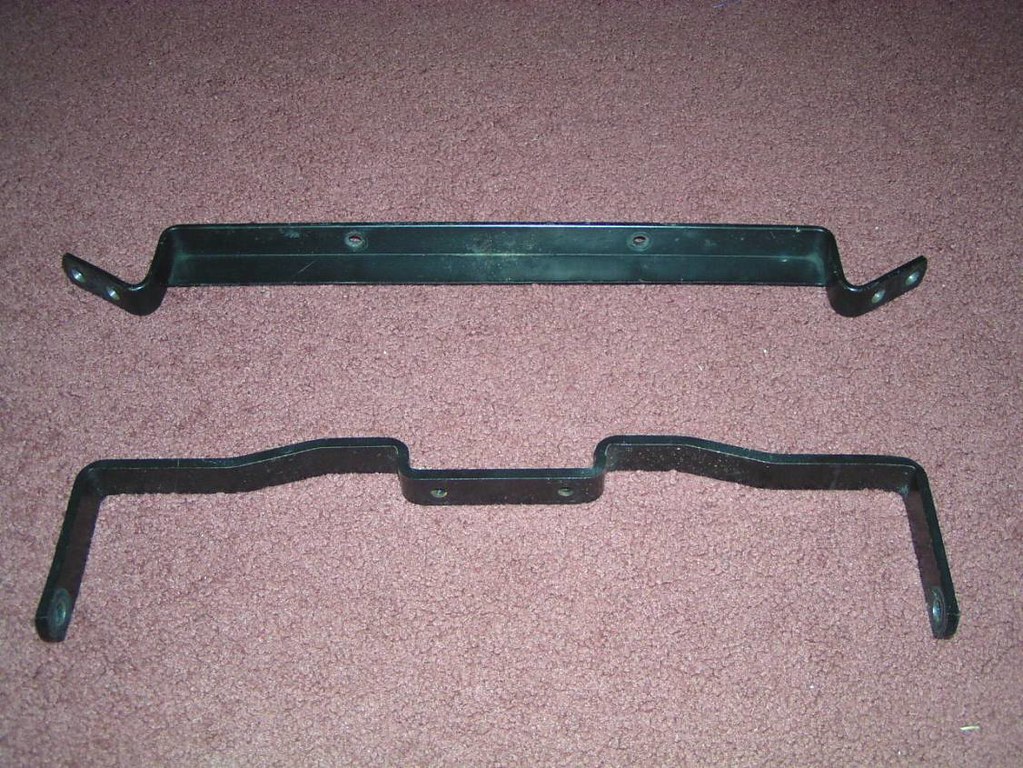
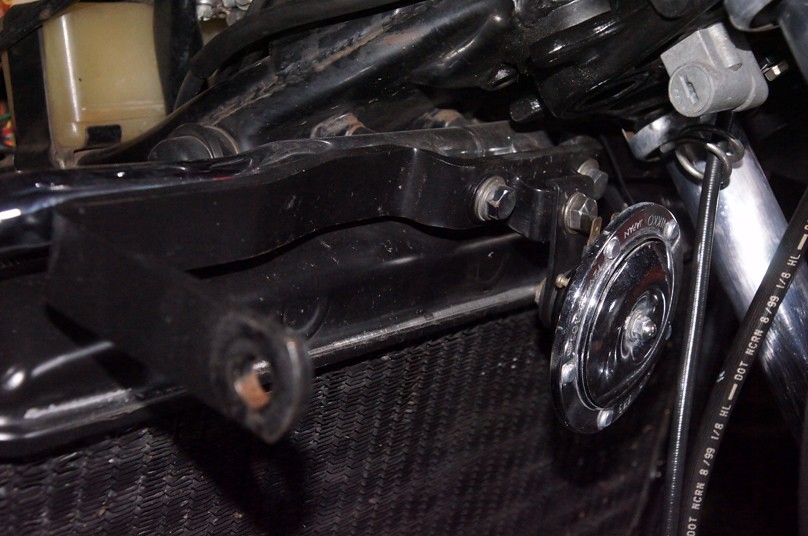
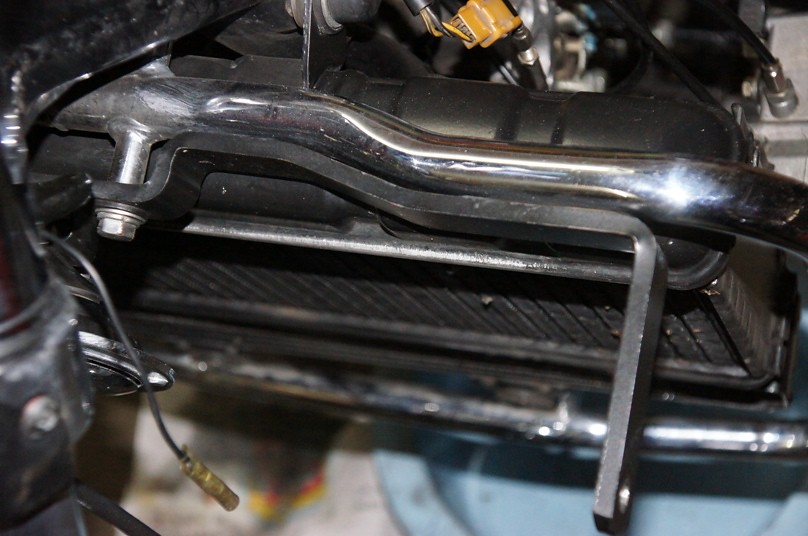
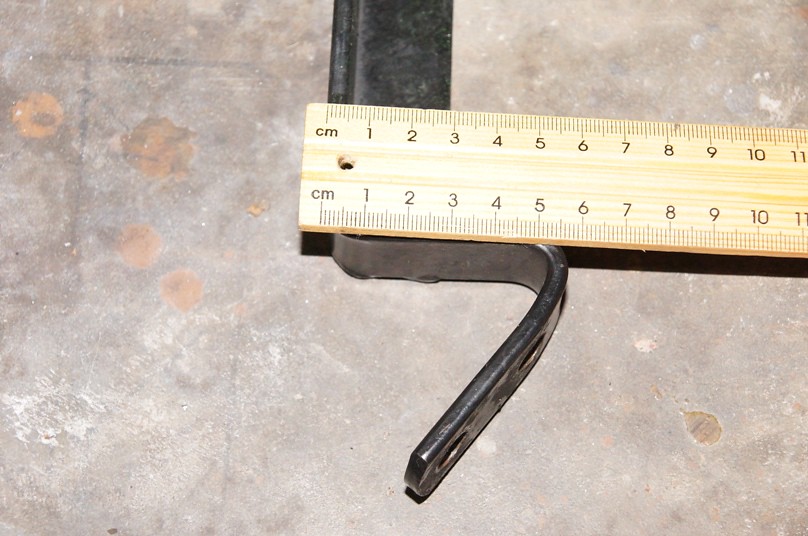
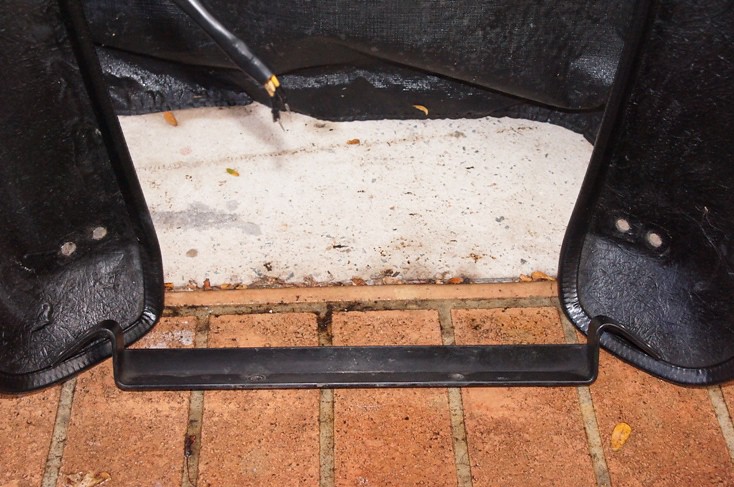
In the photo below, this is the correct orientation of the bar shown in the background. This is the lower bar and it has a built in stone guard which replaces the one at the lower oil cooler mounts.
Member Timpa136 has pointed out to me that what appears to be just a "stone guard" on the lower mount is crucial reinforcement. He had a fairing back in the day and the supplied lower mount didn't have the "stone guard" section. The fairing moved about so much when riding that he was advised by the dealer to add the extra section to reinforce the lower mount.
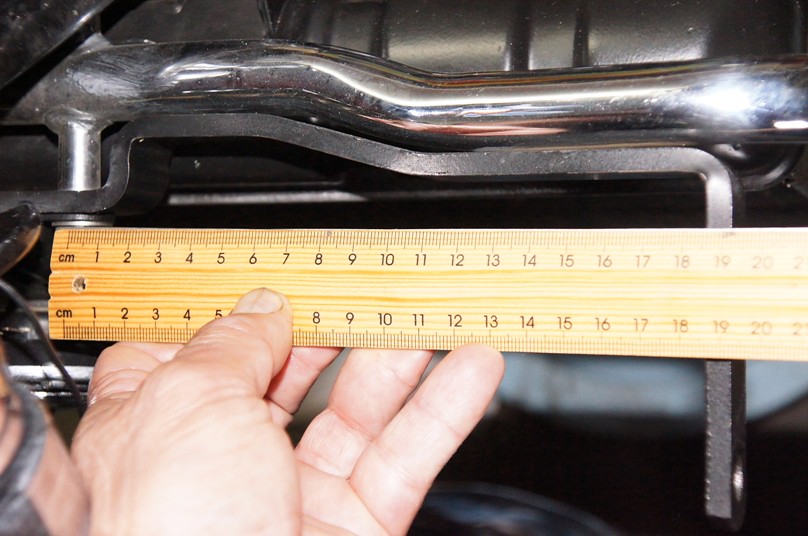
Thickness of the top bar is 1/4", total width is 451 mm (ie, the width of the inside of the fairing where the top bar mounts. Blinkers/Flashers are removed from the headlight and are used at the top bracket to mount the fairing.
Width of the lower bar before the angled bends (ie, the "L" section with the built in stone guard/reinforcing plate) is 417 mm.
\
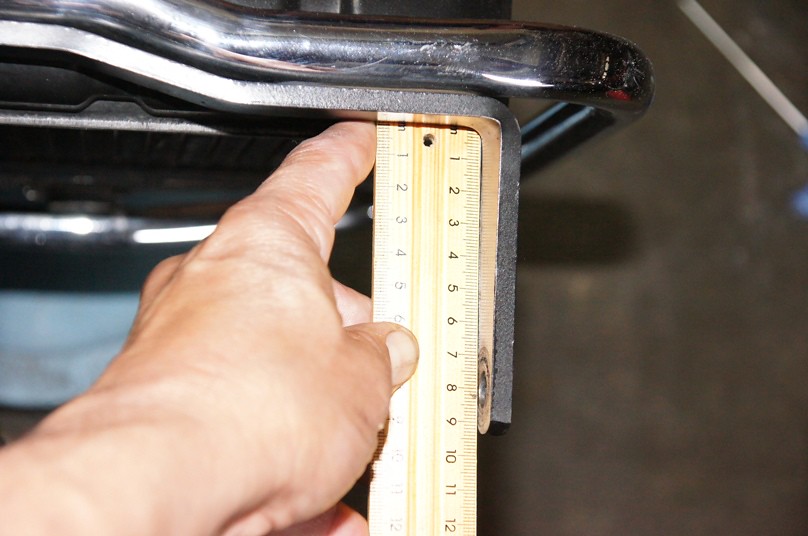
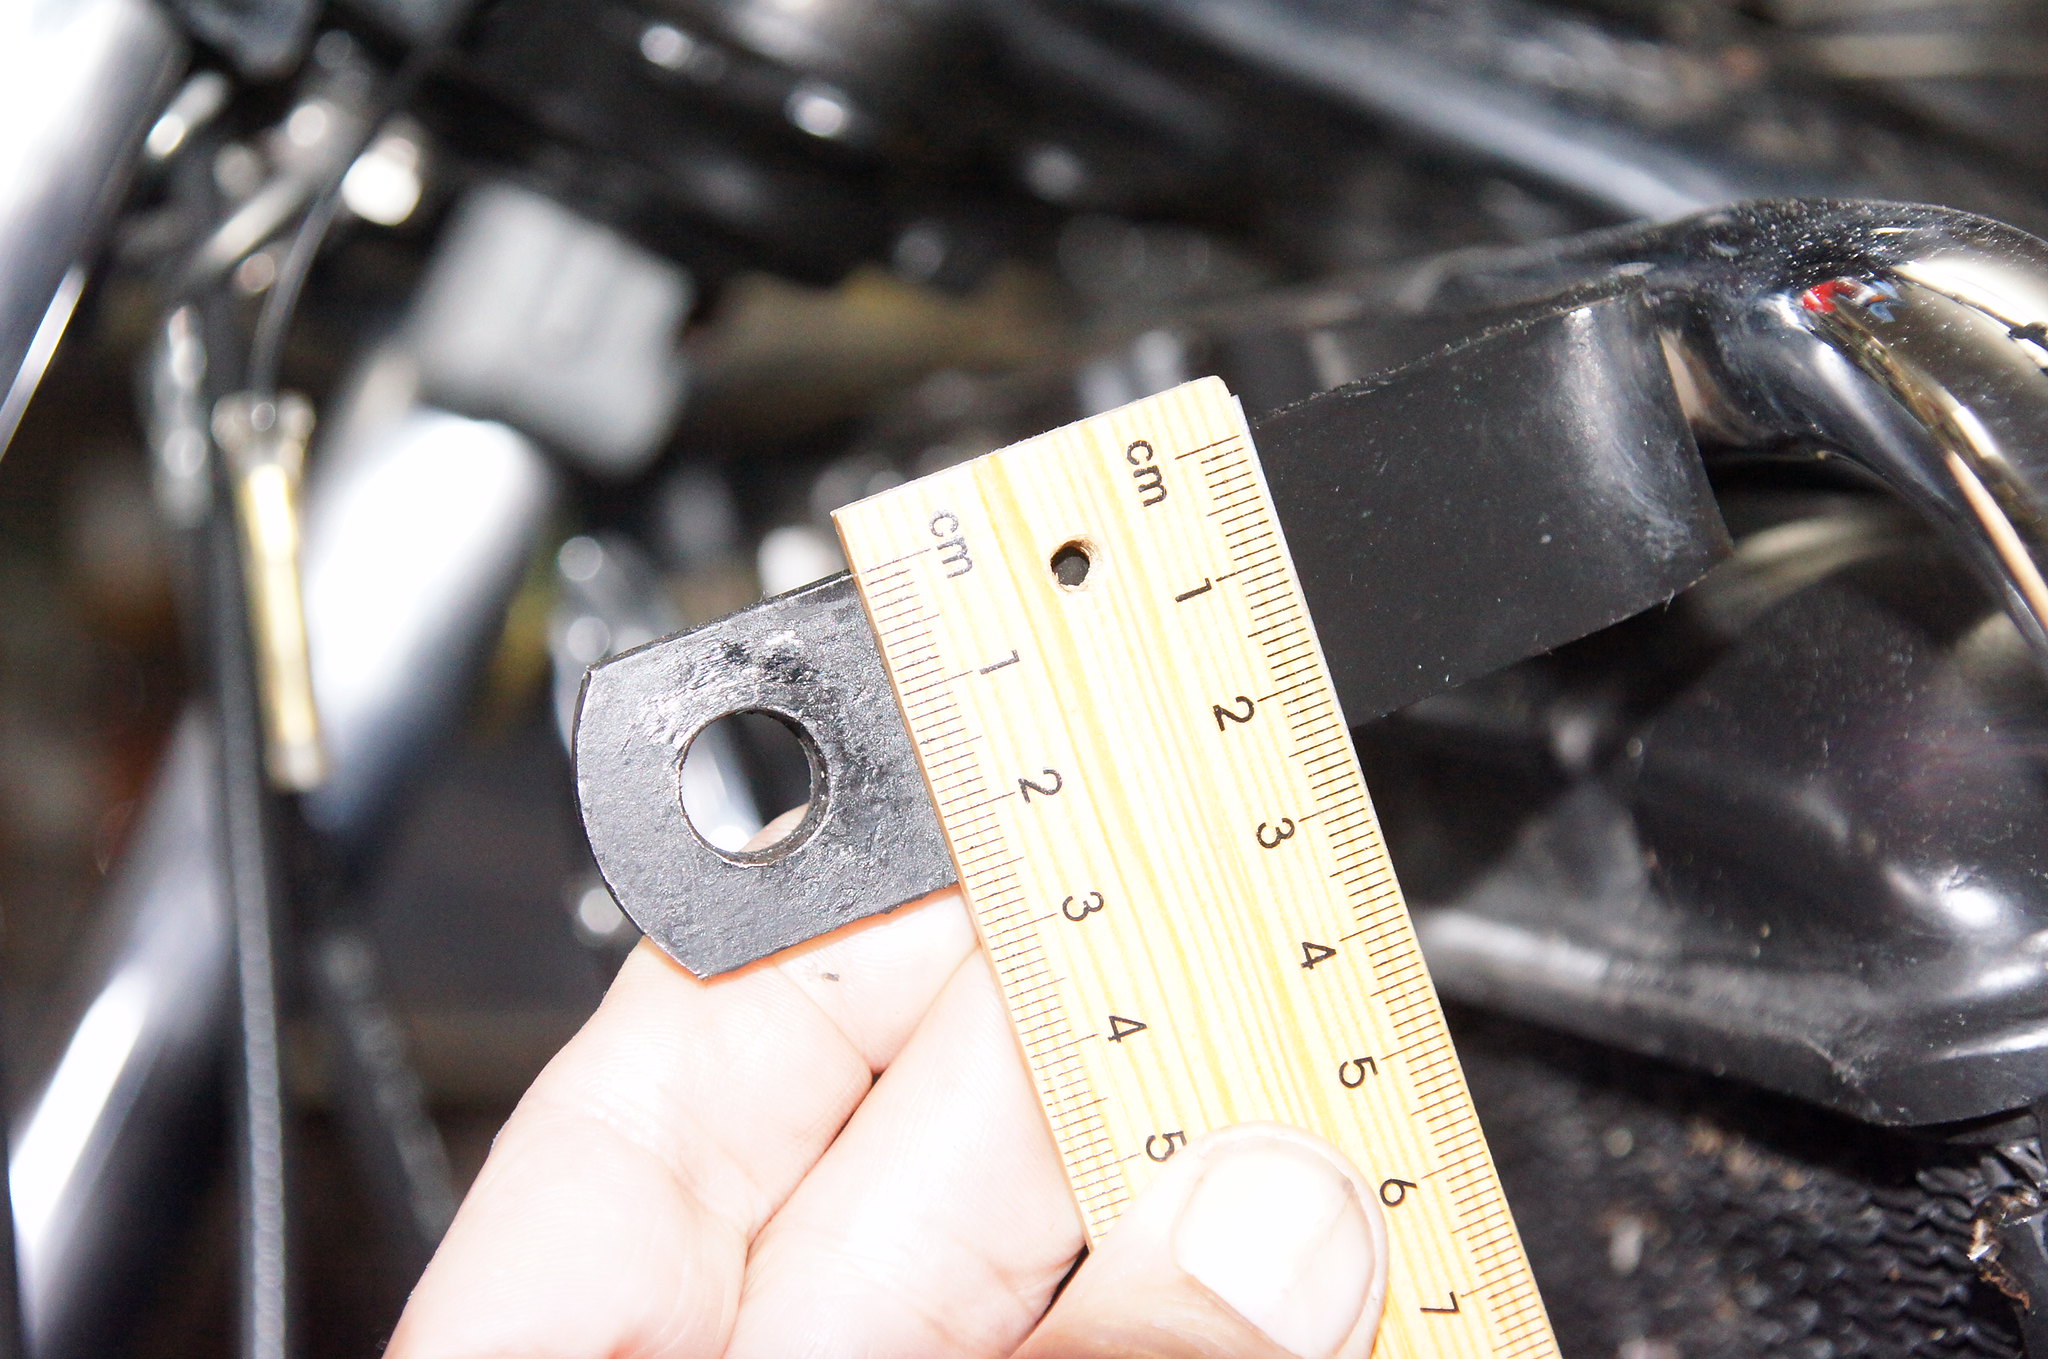
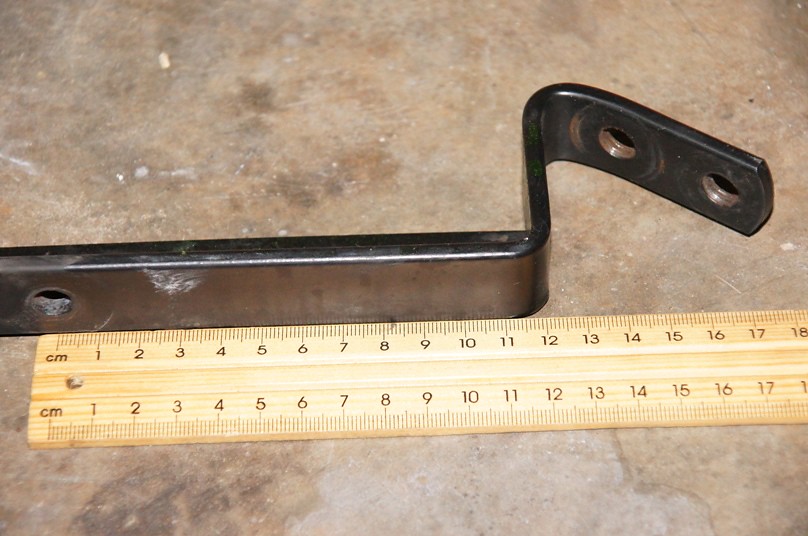
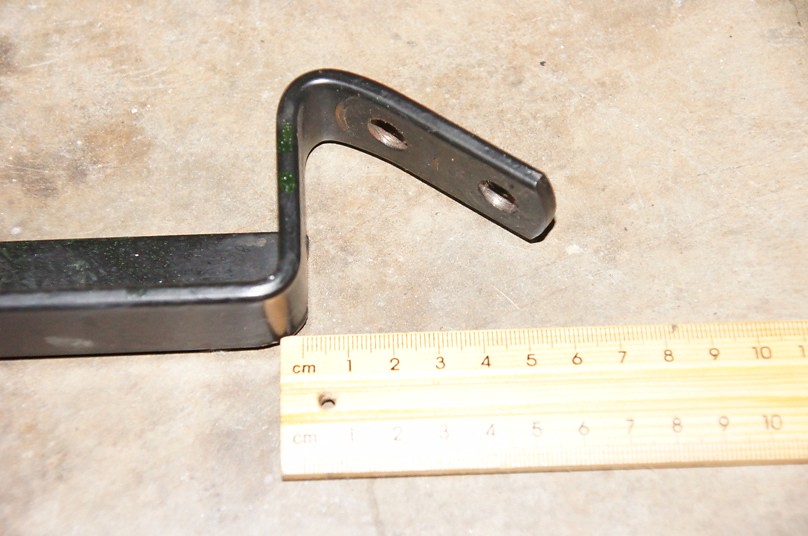
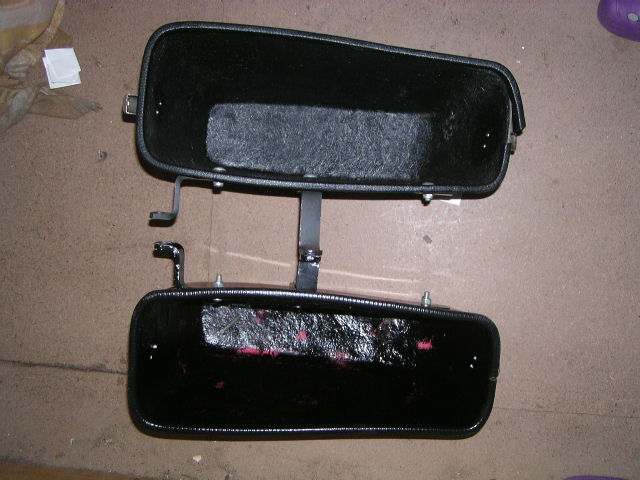
Bag mounts. The bags themselves turn up now and then but apparently it's the mounts that are hard to come by. These bags only need a tiny modification where the vertical bar meets the horizontal bar to allow them to fit the GT750. I've used the same bag and mounts on both bikes.
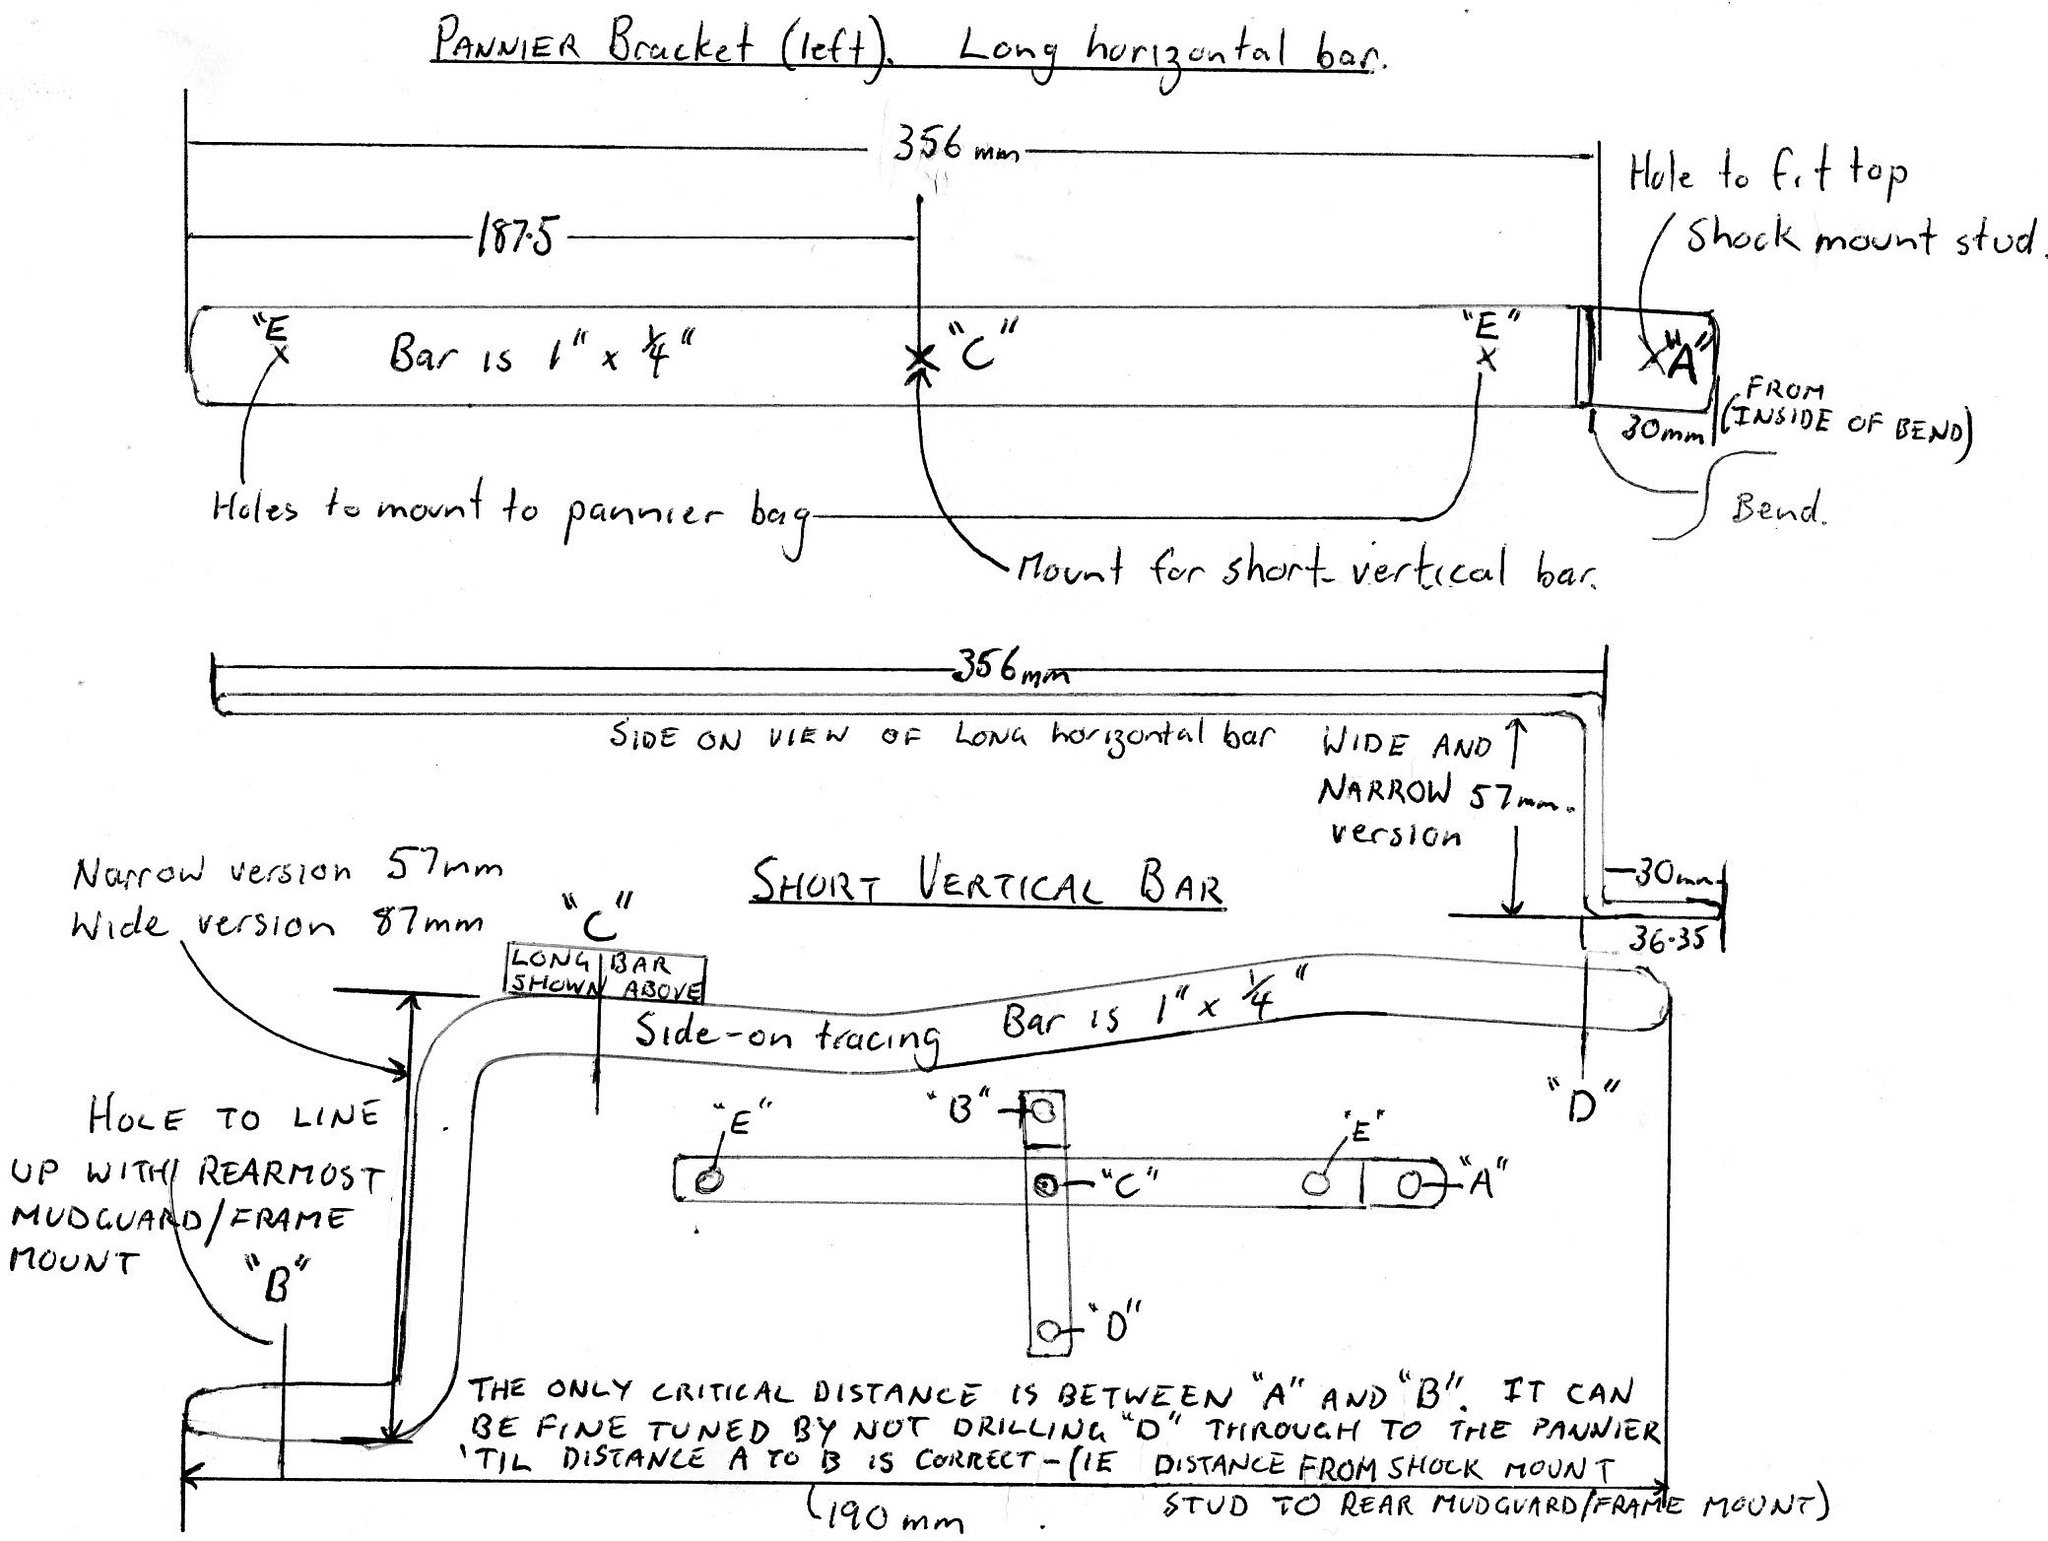
There are at least two types of bag mounting frames. A "narrow" set and a "wide" set. The former only allows the seat to be opened halfway but gives a neat look to the panniers. The latter allows the seat to be fully opened. All dimensions and photos of the red bags are for the narrow bag mounts. The wide bag mounts only differ in one dimension which is the length of the bend between hole "B" and "C". It's shown in the diagram below as 57 mm. In the "wide" brackets, this length is 87 mm. The last photo compares "narrow" (bottom of picture) and "wide" bag mounts.
I'm no draftsmen (as you can tell), but reference this drawing to the pictures, it'll all make sense. The position of holes "D" and "E" are not critical. There is some latitude to "C" but the distance between holes "A" and "B" are defined by the top shock stud and the rear mudguard mount.
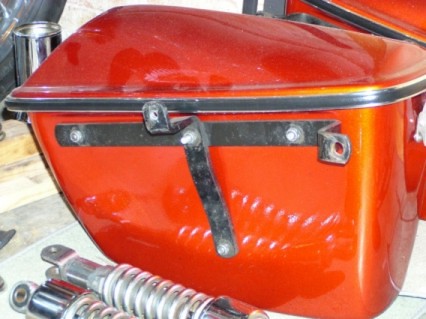
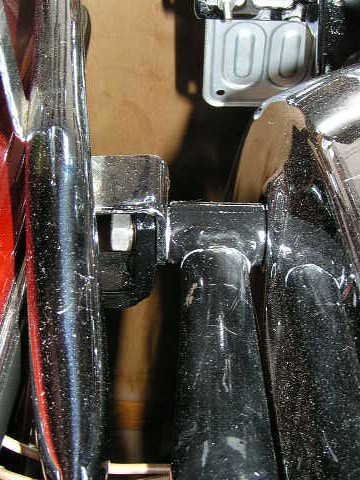
This picture shows where hole "B" is used to mount to the rear mudguard/frame mount:
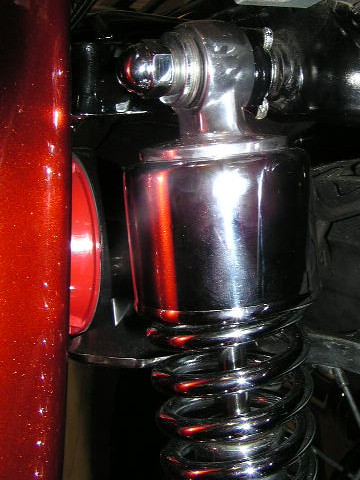
Where hole "A" mounts to the upper shock stud:
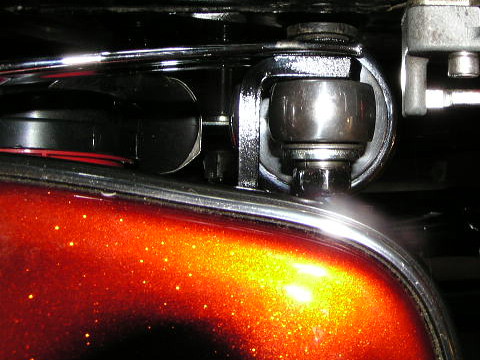
Another view of the hole "A" mount:
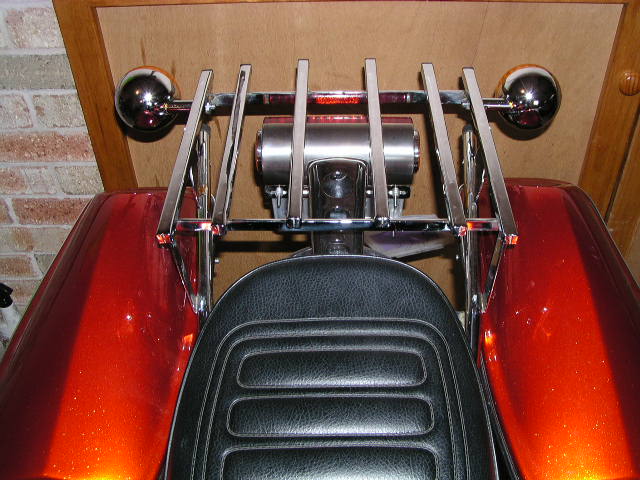
This is how the "narrow" bracket set sits on the bike. It's tidy, but the seat can only be opened half way. Enough to remove the toolkit or check fuses etc.
Comparison between narrow and wide mounts. Only the length of the bar in the middle of the bag changes:
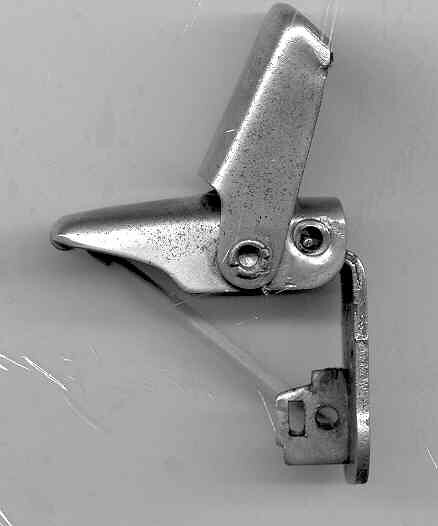
As a final note, these are the curious little keyed casement locks fitted to the panniers. They engaged with short "L" shaped brackets fixed to the pannier lid. At the very top of the picture and just out of view inside that component is a little "tooth" on the lock which engaged with a small slot in the foot of the "L" bracket and pulls the lid down snug. I haven't been able to source them new.
After a recent exchange on FB I did some research and a reviewed information I already had in an attempt to establish a timeline and history for the tour kit.
Here's what I believe is the story, none of it is speculation unless specifically noted, none of it is drawn from internet sources. The following comes from magazine articles printed back in the day and more recent magazine interviews. Also from notes and emails sent directly to me by people who worked for Suzuki back in the day.
The RE5 motorcycle fully equipped with a swag of touring accessories was envisioned by the manufacturer from early on. Witness to this was the first unveiling of the bike to the world markets. Sam Costanzo (Rotary Recycle) was not only trained as a mechanic at the Japanese Factory school, he acted as a fill-in instructor over a 12 month period. He made multiple trips to Japan and got to know the engineers and R&D guys personally (he reveals this in a VJMC magazine interview, April/May 2007). He was contracted by Suzuki to assist them with the introduction of the RE5 and provided the following paraphrased information:
"Simultaneous showings were held in September 1974 in Belgium, Germany, England, France, Spain and the US. The states had such a big market that there were 6 showings. Rotary Recycle was present at the #2 Hilton Hotel showing in Las Vegas. On display were three RE5s, a yellow, a firemist red and a silver grey "Road King" tourer in full regalia with the fairing and bags."
The first deliveries of the RE5 were delayed until January 1975. However, there's no record of tour kitted bikes being available at this time. In May 1975 an article by motorcycling journalist Bob Anderson appeared in the US Road Rider Magazine. To quote "Suzuki will have a test bike ready.......I was astride a shiny new RE5......the test machine had an additional 60 pounds of Suzuki touring accessories on it.......Yup. Suzuki saddlebags. And fairing. And scoot boot.". Further on Bob comments "What I had on the test machine was the second set to come out of the molds - prototypes."
Bob goes on to mention a number of improvements he envisaged for the touring kit. This was considered "...a long test on the Suzuki Rotary." and the article goes on for 8 pages.
Board member Brian Hudson who was an employee of Suzuki back in the day supplied the dealer brochures featured in the first post of this thread. These are scans of original hard copies that belonged to board member Steven Silvestri and salvaged from the dealership where he worked for 40 years. Note the earliest date on the brochures is December 1st 1975. They detail all of the tour kit accessories and part numbers including dealer prices and RRP's. Note, these are not customer brochures but for dealers in the Suzuki network. The first post also shows front and back views of a customer brochure. According to an interview with Sam Costanzo in the April/May 2007 issue of VJMC magazine (North America) "...Suzuki only made 200 or so of them."
At some point after this, and according to Sam Constanzo in private communications to me, Suzuki supplied the exhaust extensions to all owners of the tour kits. This was to stop the hot gasses from burning the bottoms of the panniers. However, I have no information on how these were supplied, distributed or whether they were free of charge or not.
Now I'm speculating. It seems abundantly clear that the touring version of the RE5 was a factory "vision" for the bike. It's possible that the first tour kit out of the molds was the one shown at the unveiling in September 1974. Given the problems and delays in the initial deliveries, it seems that the tour kit was placed on the back burner. By the first quarter of 1975, Suzuki found time to fit the second tour kit out of the molds to a new RE5 and present it to Road Rider magazine. Who knows what caused the kits to take so long from that early '75 test 'til their formal release in December 1975. I'd say the factory had a number of more serious issues on their mind.
Finally the tour kits hit the Suzuki RE5 dealers (not all dealers were authorised to sell RE5's). I have heard directly from one 1975 customer who bought his bike brand new off the showroom floor of a Suzuki dealer fully equipped with all the touring accessories. Another board member who worked in a dealersip at the time recalls they sold a new bike similarly equipped.
The kits were manufactured in the USA. However, they are not After Market accessories by any means. You could only buy them at a Suzuki Dealer. It's also pretty clear that there was a Suzuki initiated production time line for the tour kits, from the US unveiling, to the motorcycle magazine test of the prototypes to final release late in 1975. As to the contrary argument that says "...they weren't built in the factory", there's quite a lot of every manufacturer's bike that isn't built in the factory. They're subcontracted out. But it doesn't make the finished product any less a factory produced Suzuki or Honda.
By the end of 1975, it was becoming clear that the RE5 was not selling. By 1976 the end was in sight. I would speculate that if the bike had been successful, distribution of the tour kits would have progressed to other markets such as the UK, Europe and Australia. The most common reaction I hear is "...I never saw these fairings in XXXX (insert any country other than USA). This has come to mean for many "the tour kit is not a genuine Suzuki accessory". Clearly it is, refer to the dealer brochures themselves.
And no, it's definitely not a Craig Vetter Windjammer............
Member Brian Hudson contributed the following useful and informative research:
Just some information about the Suzuki Factory accessory fairing. The windshields are available from Gustafsson Plastics in St. Augustine Florida. It was started in 1968 by Leif Gustafsson specializing in all motorcycle wind screens. I spoke with Leif and he is certain the fairings were made by Calafia. They have the pattern for the optional 3 ½ inch taller (21 inch tall) mentioned in the Suzuki accessories papers. They also have the standard 17 ½ inch windshield that came with the fairing and both can be made in any of the colors they have, as well as clear. In addition, they have a pattern for the outer trim at the bottom of the windshield, the texture is not identical but probably better that some of the 40 year old ones out there. (Contact, Zach 904-824-3443 or check out their website.)
I have the Suzuki Dealer accessory papers with dealer and retail prices. In addition to the Firemist Orange and Blue it shows White and Black also with a date of December 1 1975 which may explain why the magazines didn’t mention the touring kits during their tests. One page is dated June 4 1976 to cover the A model. The gentleman that passed the papers onto me said he remembered there being mounting kits offered for these fairings to fit the first GS 750.
The papers also mention a bracket to relocate the rear turn signals when installing the saddle bags without using the accessory rack. I have one of these brackets which is simply a 1 X ¼ inch flat bar with 90 degree bends at the ends ( 12 ¾ wide X 3 inches rearward at bends) mounts to the license plate holder on tail light. Of the kits I’ve seen, the stock M front turn signals were used to mount the fairing were done by removing the stem and a 2 inch long X 3/8 coarse thread bolt with a hole drilled thru the center for the wire to pass through and a 5/8 long crude spacer. All the hardware and brackets I’ve seen for the touring kits have been in inch dimensions as per U.S. production would indicate.
Brian has also contributed scans of his fairing brochures:


Member Tim TIMPA contributed these original installation instructions (love the bootprint!).


Here's another contemporary Suzuki Brochure featuring the M model fairing and bags. Below that, a Rotary Recycle museum A model display bike showing the black version. Rotary Recycle advise around 200 tour kits were made.
Detail pictures of fairing and bag mounts follow. If you have any specific questions not answered below, PM me.


Full tour kit A model as it appeared in the Rotary Recycle Museum in Ohio (with the optional AM seat). Photo courtesy of Sam Costanzo. Note also the exhaust extensions which were later supplied to owners of the tour kit.

Another version of the A model paint scheme showing stripes on the bags. The stripe kits were available as an accessory item from the dealerships.

Fairing Mounts: I've been asked a couple of times about the design of the fairing mounts so these may help.
In the photo below, this is the correct orientation of the bar shown in the background. This is the lower bar and it has a built in stone guard which replaces the one at the lower oil cooler mounts.
Member Timpa136 has pointed out to me that what appears to be just a "stone guard" on the lower mount is crucial reinforcement. He had a fairing back in the day and the supplied lower mount didn't have the "stone guard" section. The fairing moved about so much when riding that he was advised by the dealer to add the extra section to reinforce the lower mount.
Thickness of the top bar is 1/4", total width is 451 mm (ie, the width of the inside of the fairing where the top bar mounts. Blinkers/Flashers are removed from the headlight and are used at the top bracket to mount the fairing.
Width of the lower bar before the angled bends (ie, the "L" section with the built in stone guard/reinforcing plate) is 417 mm.


\


Bag mounts. The bags themselves turn up now and then but apparently it's the mounts that are hard to come by. These bags only need a tiny modification where the vertical bar meets the horizontal bar to allow them to fit the GT750. I've used the same bag and mounts on both bikes.
There are at least two types of bag mounting frames. A "narrow" set and a "wide" set. The former only allows the seat to be opened halfway but gives a neat look to the panniers. The latter allows the seat to be fully opened. All dimensions and photos of the red bags are for the narrow bag mounts. The wide bag mounts only differ in one dimension which is the length of the bend between hole "B" and "C". It's shown in the diagram below as 57 mm. In the "wide" brackets, this length is 87 mm. The last photo compares "narrow" (bottom of picture) and "wide" bag mounts.
I'm no draftsmen (as you can tell), but reference this drawing to the pictures, it'll all make sense. The position of holes "D" and "E" are not critical. There is some latitude to "C" but the distance between holes "A" and "B" are defined by the top shock stud and the rear mudguard mount.


This picture shows where hole "B" is used to mount to the rear mudguard/frame mount:

Where hole "A" mounts to the upper shock stud:

Another view of the hole "A" mount:

This is how the "narrow" bracket set sits on the bike. It's tidy, but the seat can only be opened half way. Enough to remove the toolkit or check fuses etc.

Comparison between narrow and wide mounts. Only the length of the bar in the middle of the bag changes:

As a final note, these are the curious little keyed casement locks fitted to the panniers. They engaged with short "L" shaped brackets fixed to the pannier lid. At the very top of the picture and just out of view inside that component is a little "tooth" on the lock which engaged with a small slot in the foot of the "L" bracket and pulls the lid down snug. I haven't been able to source them new.




 [/url]