|
|
Post by wayne on Mar 6, 2011 0:22:54 GMT -5
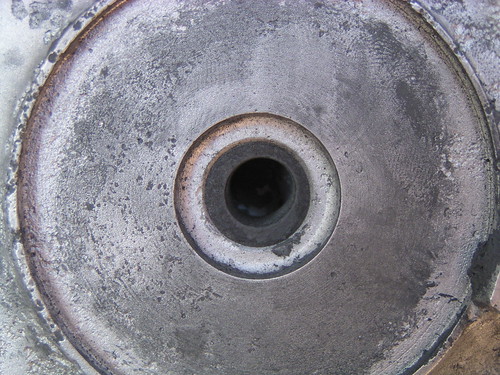
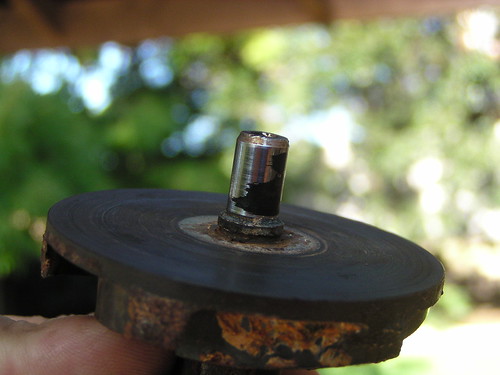
Just bringing your attention to a problem with, as far as I can see, all RE5's. The first shot is a typical water pump tip bearing. I've seen 5 bearings over the last year or so and only 1 has been in good condition (a 4,000 mile original bike). All the others exibited some form of damage.  The second shot is the important bit, the water pump shaft itself. Note that the shaft has "picked" up bearing material. When I cleaned this off, I found that the metal on the shaft itself had worn away and bearing material had filled the depression.  It takes about a day of work to replace a water pump shaft and involves some big gaskets (you have to remove the clutch cover). It takes 30 to 60 minutes to replace a tip bearing with one of Rotary Recycles new design. My tip bearing was nowhere near as bad as the one in the shot, however, everytime I rode, there was always evidence that some coolant had leaked out of the tell tale. Since replacing the bearing, this leak has stopped. Wayne |
|
|
|
Post by ziggystardust on Mar 6, 2011 5:26:07 GMT -5
H Wayne,
I've looked at a few outer bearings and always noticed some wear, not too much on the ones I've seen to give a serious problem but yes it does happen.
I've seen some photos of a German attempt to replace the bearing with another material, don't know if it was phosphor bronze or brass? Anyway it elongated badly and also ruined the shaft, I have no details as to why.
We covered this a couple of years ago and I remember that the original bush is made from a self lubricating material but I can't remember it's name.
This brings me to the photo of your impeller, I can see scale on the impeller blades, the engine that you removed it from has it been using distilled water and an anti freeze mix and lubricant i.e. Barr's or alternative?
New owners note. This would help to lubricate the bearing and keep the engine cooling path cleen and scale free.
|
|
|
|
Post by wayne on Mar 6, 2011 5:51:33 GMT -5
Hi Ziggy,
Unfortunately, I don't know what exactly was in it. When I drained the bike it had a fluid in it that looked like commercial premixed coolant but I can't be sure. However, the bike has had a hard life so I doubt that the previous owners had been diligent enough to add the Bar's Leaks.
I've seen wear this bad on two bearings, another a little ovaloid, my M model which has been well looked after wasn't ovaloid but had enlarged and one was okay. From this small sampling I'd imagine it to be very common.
Also notice the severely pockmarked appearance of the alloy of the waterpump cover. This is the worst condition that I've seen in the water pump alloy. I'd imagine that the bike has been lucky to have proper coolant in it at any time.
Thanks for the note about the replacement bearing. With this in mind, I'll monitor the condition of mine every 1,000 miles.
Wayne
|
|
|
|
Post by kettle738 on Mar 6, 2011 6:41:29 GMT -5
Hi Wayne / Lee, what exactly has Jess produced to overcome the problem, are there any fitting issues or is it straightforward?
Mick..............Kettle738
|
|
|
|
Post by ziggystardust on Mar 6, 2011 9:30:31 GMT -5
Hi Mick,
I believe Jess has had some bushes made up, don't know the material. He may come along and fill us in on the subject?
Removing this bush is simple, screw a tap of the correct size down the bush and as it bottoms it will lift the bush out but don't let it scar into the aluminium, drop something in the hole.
Fitting a new bush is also easy, heat up the cover in the oven and the new bush should drop in or at least tap in with a small rubber hammer.
|
|
|
|
Post by Jess on Mar 6, 2011 12:39:21 GMT -5
I did a significant amount or research before choosing the material as I have seen some disasters with a "bronze" replacement.
I was not aware, but there are hundreds of different grades of bronze/brass. I also was smart enough to defer to material experts about the enviroment that this part would be subjected to before I spent the money to have them produced.
My bushing is made of a oillite bronze that is supposed to be designed to work in the enviroment of the water pump. It also is specifically reamed to size as drilling phosphor bronze destroys some of it's self lubrication capabilities.
Any owner who uses one of my bushings should also use a water pump lubricant, such as Bars, as the system needs lubrication. This should not be an issue, as Suzuki used a Lubricant material (bars) from the factory.
I have been using one of this exact material in my personal bikes for many years with no issue... Does that mean that I can gaurentee that no one will not have a failure? Nope...
Remember, the bushing should have no side loads... it is simply a stabilizer for the shaft. There also is the variable of the shaft bearing. In my experiance, that is the bearing that starts problems with the pump shaft... Just my two cents.
We beleive everything we make are better quality than the original. However, I am not an engineer or material specialist.
I think is it very prudent to take the cover off every thousand miles to check what is going on... It is expensive and getting hard to find the shaft if it becomes damaged.
Again, just my two cents... Hope that helps.
Best,
|
|
|
|
Post by wayne on Mar 6, 2011 15:08:47 GMT -5
Mick,
Regarding removal of the bearing, while Ziggy and others have used the tap and unscrew method, I've tried this on 3 bearings and it has failed to work every time. Eadh time the taps just stripped the threads that had been cut inside the bearing as it was too tight to remove.
If the tap method doesn't work, just get a small drill bit, about 1.5 mm and drill into the circumference of the bearing material until you bottom on the alloy. If you penetrate the alloy slightly, it is no big deal. Put 2 holes in the circumference 180 degrees apart.
I then use slightly larger drills to enlarge the holes until I can get a scriber tip in and a little bit of side force will break the bearing material. Do the same on both sides and the whole lot will fall out.
I've installed 3 of the RR bearings and in all cases, freezer for bearing, oven for water pump cover and the bearings have dropped in with no force but if it doesn't, the small soft hammer suggestion will do it.
Wayne
|
|
FC Zach
3rd Gear
   Eagleville, TN
Posts: 335
|
Post by FC Zach on Mar 6, 2011 23:19:42 GMT -5
Have you tried to remove the bushing hydraulically with grease and a dowel close to the inner diameter of the bearing. I would attempt that before drilling.
|
|
|
|
Post by wayne on Mar 7, 2011 5:45:54 GMT -5
Can you detail this method FC ? I'm interested in how this works for future removals.
Do you fill the inner diameter with grease and then force it down with a dowel to lift the bearing from underneath ?
Wayne
|
|
FC Zach
3rd Gear
   Eagleville, TN
Posts: 335
|
Post by FC Zach on Mar 7, 2011 8:08:46 GMT -5
Yep exactly, here is a video I found on YouTube
|
|
|
|
Post by kettle738 on Mar 7, 2011 15:22:12 GMT -5
The grease method is brilliant, so simple and so effective, however it can only work if the hole in the bush is still circular, so it's good to have several suggestions.
I think I'm in for a couple of replacement bushes in my next RR parts request, cheap insurance as I see it and way simpler than interfering with that transmission cover.
Mick...........kettle738
|
|