|
|
Post by wayne on Nov 23, 2010 21:01:55 GMT -5
Just opened up my Master cylinder rebuild kit. Correct part number for RE5 M is 59600-31827. Noticed that new one from Suzuki is -45811. A number of components are different. Has anyone used one of these newer kits ? Having a look at the picture, have I got the sequence of parts correct ? 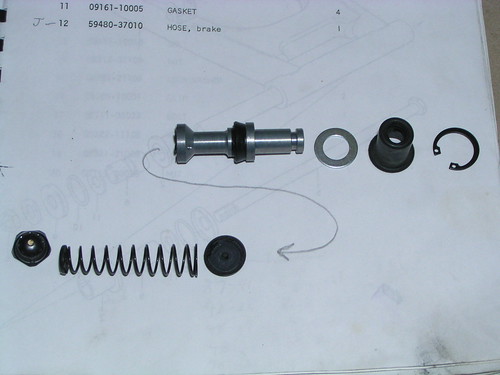 www.flickr.com/photos/waynefromoz/5203205730/ www.flickr.com/photos/waynefromoz/5203205730/ |
|
|
|
Post by SuzukiRE5 on Nov 23, 2010 22:27:59 GMT -5
I modified the post to get the picture with the post. I hope that's what you wanted. To see how I did it, click modify post on your post. If you don't change anything, just back out of the page so it doesn't show the page being modified again.
To get the picture web address, click the 'share this' link above your picture on flickr, click where it says grab html/bbc code and a link will come up. Right click on the link text and copy into computer memory. You will have to delete a lot of the link. All you need is where it starts with http and ends with .jpg.....Put that link into your post and highlight it, then click the insert image button above the smileys where you are preparing your post on this site. Preview the post to see if the pic works.
If this doesn't work for you, let me know.
|
|
|
|
Post by wayne on Nov 24, 2010 0:19:31 GMT -5
Thank you Admin. Appreciate your help, will let you know if it works for me next image.
Wayne
|
|
|
|
Post by supersaki on Nov 24, 2010 11:48:26 GMT -5
If you compare the piston with the old one you will notice that its different,however you can use the new kit but on assembly,you need to leave out the silver coloured washer because the new style piston does not clear the relief port when the washer is fitted.
The order of assembly is correct as shown in the picture apart from
the rubber boot.Starting from the inside it should start with the valve,spring,seal,piston ,NO WASHER,circlip then the boot.A very light wire circlip retains the boot.NOT SHOWN.
Hope this helps regards Roy
|
|
|
|
Post by wayne on Nov 24, 2010 16:07:31 GMT -5
Yes, it does help, very much so. That fine wire clip was not in the kit and glad that you told me to exclude the washer. Much appreciated.
Thanks,
Wayne
|
|
Crit
1st Gear

Posts: 45
|
Post by Crit on Aug 2, 2013 9:59:01 GMT -5
If you compare the piston with the old one you will notice that its different,however you can use the new kit but on assembly,you need to leave out the silver coloured washer because the new style piston does not clear the relief port when the washer is fitted. The order of assembly is correct as shown in the picture apart from the rubber boot.Starting from the inside it should start with the valve,spring,seal,piston ,NO WASHER,circlip then the boot.A very light wire circlip retains the boot.NOT SHOWN. Hope this helps regards Roy Supersaki, is this what you mean by the pistons being different and not reusing the washer? 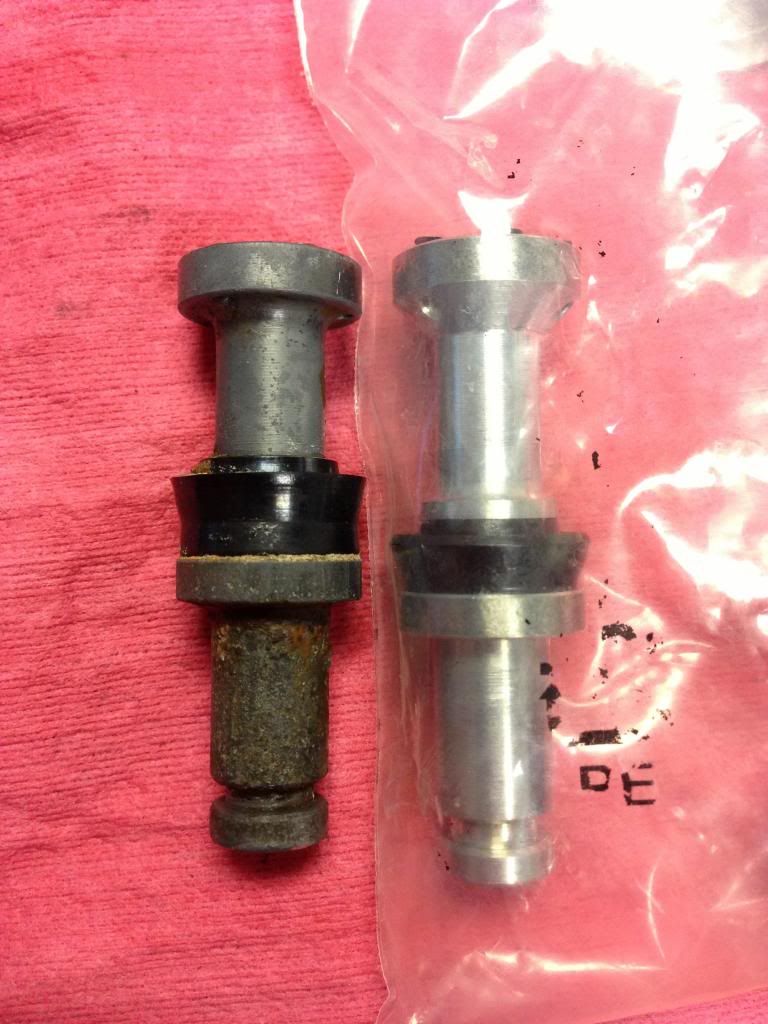 |
|
|
|
Post by wayne on Aug 2, 2013 18:36:00 GMT -5
This is quite an old thread, hopefully Supersaki will answer your question Crit.
In the meantime though, I took his advice, left out the washer and my rebuilt master cylinder works perfectly.
|
|
Crit
1st Gear
Posts: 45
|
Post by Crit on Aug 3, 2013 12:32:12 GMT -5
I did the same, Wayne but haven't been able to finish my build. The UV fading on the reservoir is killing me, so I'm waiting on a new reservoir to arrive. This has raised another question, though. For the life of me, I can't get the reservoir off my original master cylinder. From the exploded views, it looks to be a press-fit with the o-ring underneath but I can't get it off with the screws and lower plate removed. I don't want to pull or twist with excess force until I have the replacement reservoir in-hand and can verify that it should work. I've got a local Mazda rotary beer night coming up on Tuesday and hoping I can get the bike running and safe by then, so I'm trying to minimize my risk of broken parts along the way.
If anyone can tell me for sure how to remove the reservoir without breaking it, I'd much appreciate it. If it matters, the master cylinder had previously failed, as had the right side caliper seals. The fluid has long since drained, dried, and left me with lots of dried sludge, so everything's requiring more force than usual in order to get it apart.
Regarding digging up an old thread - I figured it was better than starting a redundant one. I figured it was worth bringing back since I was looking at the fresh parts in real time and had the same question. Hopefully I can confirm that it works without the washer given the photos above if anyone else comes along with the same question.
|
|
|
|
Post by Jess on Aug 3, 2013 16:22:50 GMT -5
It is press fit... It will come off with a little persuasion...
Best,
Jess
|
|
|
|
Post by wayne on Aug 4, 2013 4:18:03 GMT -5
No worries at all, I wasn't criticising your use of an old thread, just noting that Supersaki may not be around anymore to help you. You're worried about the fading on your M/C ? You poor man. You're obviously a member of a rather small club. The OC rotary owner. I know of one or two  . The original colour is usually preserved under the rubber boot where the sun has been off it. I paint mine and then use Dot 5 silicon fluid to keep it from ever crazing. |
|
Crit
1st Gear
Posts: 45
|
Post by Crit on Aug 26, 2013 12:53:57 GMT -5
I've made the same switch to DOT5 after rebuilding everything, to included honing the master cylinder with a 5/8 flex-hone prior to rebuilding. It was enfuriating to completely rebuild the system and have absolutely no feel in the brake lever (later realized I was still seating the pads). Now that I'm bled and the pads are against the rotor, the front brake sure is soft on mine. I can nearly bottom out the lever against the grip, and even then the rear brake has a lot more bite than the front. Is this normal?
|
|
|
|
Post by wayne on Aug 26, 2013 21:27:03 GMT -5
No, this is not normal (in my experience). I hone the cylinder as you did and use Dot 5 in all my vintage bikes including the RE5. I also have a GT750 with near identical braking system and a GS which is similar. Also rebuilt another RE5 with Dot 5. All have firm levers and strong braking.
I can lock the front Metzeler laser tech tyre on my RE5 with just two fingers and I'm not a strong guy. Still plenty of room with max braking for my other fingers between the lever and the grip.
I have always found that it takes several days for me to get all the air out of the system.
Pads make a big difference to braking performance but don't explain a spongy lever.
|
|
Crit
1st Gear
Posts: 45
|
Post by Crit on Aug 27, 2013 8:53:25 GMT -5
Wayne, are you saying that you bleed your system multiple times over a few days, or that the air bubbles settle over a few days and bleed out on the second bleed?
|
|
|
|
Post by wayne on Aug 27, 2013 23:48:08 GMT -5
A bit of both really. No matter how much I try on the initial bleed, I never seem to get them all out.
I usually leave it for a day, sometimes with the bars turned full left to have the right caliper nipple vertical, give the caliper itself a couple of gentle taps with a rubber mallet when I think of it. Same on the left.......bars all the way right and a light tap on the caliper. Then after 24 to 48 hours I'll do another bleed and I inevitably get a couple more bubbles out. Then after the first one or two rides, I'll do another bleed and will often score another bubble or two and then usually it's good after that.
I've also read on another forum people finding a bubble trapped right up at where the banjo joins the master cylinder. I beleive that was on GS bikes but they are very similar. I personally haven't had this problem but you never know.
|
|
|
|
Post by pmcburney on Aug 28, 2013 2:50:00 GMT -5
re (SWIDT?) getting the last vestiges of air out...
Tie the lever in tight with a zip-tie or equivalent and leave it overnight.
In the morning, release the lever and bleed the system once more and you'll get those last recalcitrant bubbles out and you'll have a nice, firm lever.
|
|


 .
.