quawk
2nd Gear

Posts: 150
|
Post by quawk on Jun 1, 2022 14:00:11 GMT -5
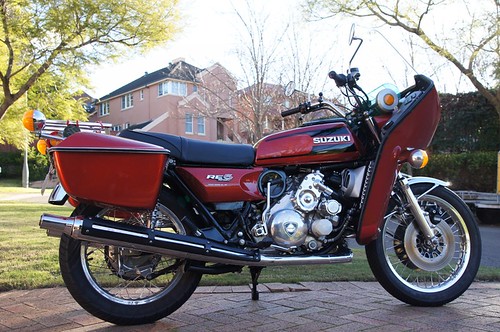
I have asked in another post if anyone has a pic of the original clips provided in the parts package to install the headlight into the recess on the optional fairing. I have completed installation of my fairing to my bike except for the headlight installation. I am, at this point, puzzled as to how you can mount the headlight because there is no access to the back of the 3 mounting holes in the headlight recess because of the inner ABS plastic wall being attached around the perimeter of the fiberglass outer wall of the fairing. In other words you can't get around to the back of any fastener protruding through the 3 holes to put a nut/washer on it. There isn't even any room between the headlight rim/ring and the wall of the recess to get a screwdriver in between. My bike is a '76 A model and I realize the '75 headlight housing is different so I don't know if the headlight is also different and maybe that makes a difference, but I have seen these fairings mounted to a '76. I'm guessing I'm missing something obvious here and as they say " a picture speaks a thousand words" and to be able to look at a pic of one that is already installed would show what I'm not seeing here. Any advice or help would be appreciated.
|
|
quawk
2nd Gear
Posts: 150
|
Post by quawk on Jun 1, 2022 14:32:59 GMT -5
Okay, I think I may have just answered my own question that I posed in the previous post. After staring at this headlight mounting issue for too long, I went out and looked at my '75 M model which has a Vetter fairing mounted to it and after looking at it, I'm guessing that you access the back of the headlight mounting holes in the recess of the fairing by opening the storage compartment lids and reaching in through there to access the back of the mounting holes. Duhh! Although kinda inconvenient, if you have long arms and fingers (I do) you can reach in to the back of the mounting holes. If this isn't how you're supposed to do it, that's how I am going to try to. I would still like to see a pic of the original clips that came in the parts pack to mount the fairing.
|
|
|
|
Post by wayne on Jun 1, 2022 18:36:54 GMT -5
I'm out most of today with appointments so can't post a pic as yet.
It looks impossible but it's not. You reach in through the glove box pockets and you can just reach the screws to put nuts on and do them up.
Basically you attach three screws to the headlight, insert them through the holes in the fibreglass fairing. Reach through the glovebox pockets and attach screws with your fingers. I'm only a smallish guy so maybe that helped.
EDIT: saw your post that you'd figured it out. I was more in a rush to give you some hope than fully read your post as I've gotta go right now....
|
|
|
|
Post by wayne on Jun 2, 2022 5:37:08 GMT -5
|
|
quawk
2nd Gear
Posts: 150
|
Post by quawk on Jun 2, 2022 8:23:11 GMT -5
Wayne, thanks so much for the pics. Before I figured out how to access the back of the mounting holes, I visualized needing a clip something like those pictured but when I couldn't think how I could get a nut on the back, I was thinking less about making some kind of clip/stud and more about how I could get to the back of the mounting holes to attach the nuts. Is the bucket (as I'll call it) of the headlight assembly different between '75 and '76? It looks like the stand that the adjuster screw threads into is different on yours than on mine. When trying to set the assembly up to the recess to eyeball how it would fit in it seems that the adjuster stand screw will hit on the lower right (looking from the front toward the front of the fairing) protrusion/bulge that the hole is drilled into. I'm guessing the fairing is designed so that doesn't happen, but it looks like, at this point anyway, that it may hit there. (Edit to above) I have gone out to my shop and compared my headlight assembly ('76) to the one in the pics which I assume is for your '75 and the outer chrome ring and bucket, as I called it, are somewhat different. I assume the fairing was designed to accept either year's headlight assembly.
|
|
|
|
Post by wayne on Jun 2, 2022 18:58:26 GMT -5
You're right, that's an M headlight assembly but it came out of a fairing that was on an A model. It's now in an M fairing (they're the same thing but my "M" fairing is red firemist with metal flake in the gelcoat, not painted so originally intended for the first model). So no difference in fairings. Either headlight should fit in any fairing. And yes, the whole headlight glass and surround assemblies are different between M and A. Inside the bucket on the fairing the parts that accept the mounting screws of the headlight are moulded so they stand proud of the surface of the bucket. Should be the same on yours. So there's room for the adjuster screw to fit inside the moulded hemisphere while the mounting screw fits into its own moulded mount. Should be the same (apologies for the bug splatter, Aussie summer's just over and I haven't done any cleaning):  |
|
quawk
2nd Gear
Posts: 150
|
Post by quawk on Jun 2, 2022 20:26:49 GMT -5
Again, thanks Wayne. The pic of your fairing looks just like mine, as I expected. But,,, I have spent a good part of today, studying my headlight assembly and comparing it to yours, making some clips/brackets/studs and trying to fit it to the fairing. At this point I have still not succeeded. I made and used the simple L shaped bracket/stud as shown in your pics, that works for the top/center attachment, but the two tabs where you would attach the bottom two brackets are off-set from the through holes in the molded hemispheres. I was able to overcome that by creating off-set brackets, but as I suspected and mentioned in my previous post, the issue is the adjuster stand and screw that threads through it hits the lower right raised hemisphere as it is only slightly less than 3/8" apart from the stud in that bracket. When making the brackets, I kept that mind and tried to make them in such a way that the adjuster stand and screw would clear, but it simply doesn't. As it is, it looks like the assembly would center perfectly in the opening with all three studs aligning with the holes, except it will not seat far enough into the opening because of the adjuster screw hitting. Do you happen to have an A model headlight assembly, because that would be the best way to understand what my problem is. I suppose it would be best to try to post a pic, but after reading others have had trouble trying to post pics, I'd guess I would also have trouble, but I may give it a shot. In your top pic of your assembly your thumb happens to be in the way so I can't tell for sure, but does your M model assembly have two adjuster screws? My A model assembly, as you may know, only has the one adjuster stand and screw. I know these fairings have been mounted to A models so someone has figured out how to make this work. Guess I'm just a "drongo". Before throwing in the towel I went out to my M model (in the chook shed??) and was going to rob the headlight assembly off of it, but it has a Vetter fairing mounted to it and the PO has installed a totally different (not M nor A) headlight in it, so that was no help.
|
|
|
|
Post by wayne on Jun 2, 2022 22:54:53 GMT -5
On the chance that this may help, another photo. The orientation is at it would be mounted in the fairing. The mount screw at the top of the photo would go into the top mount in the fairing. The headlight adjuster at the 2 O'clock position is well clear of any obstructions but the one at the 7 O'clock position is very close to the moulded bulge in the fairing. As you can see, this one has the two adjusters. My A model is away on loan at the moment. 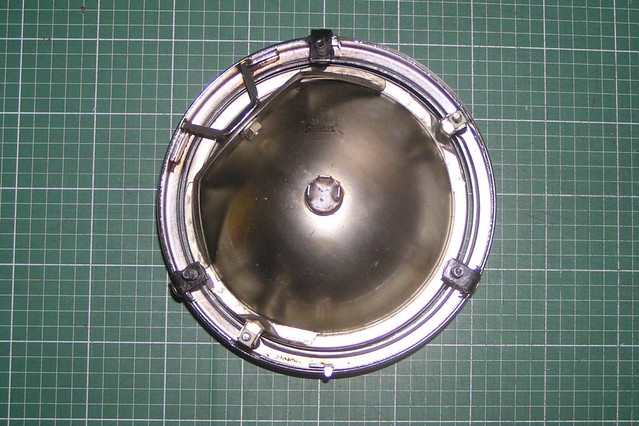 |
|
quawk
2nd Gear
Posts: 150
|
Post by quawk on Jun 3, 2022 6:53:30 GMT -5
If I were to be able to post a pic of my headlight assembly in the same position as you have posted yours, you could plainly see what my problem is. The adjuster at the 7 O'clock position on yours is, you say, close to the molded bulge, but it is not nearly as close as on my A model assembly, and as I mentioned previously, that's my problem. If I were to remove the adjuster stand/tower and screw from the headlight back ring and hold it in adjustment in some other way (maybe wedges?), that would allow the assembly to be installed into the fairing recess. But, I'm reluctant to butcher a perfectly good original ring, because it is seemingly hard/impossible to find a replacement. Realistically, I'll probably never, or rarely, ride this bike at night, so headlight adjustment probably isn't that much of an issue, but were I ever to decide to I'd like to be able to return it to original.
|
|
|
|
Post by wayne on Jun 3, 2022 17:26:16 GMT -5
Email me the picture, I'll post it for you: appleblue@aapt.net.au
Could you carefully cut away part of the bulge in the fairing to clear the adjust while still leaving the mount hole? Wouldn't be visible from front or behind.
Would two mounts be enough to hold the headlight and remove the obstructing bulge completely if the above idea won't work?
|
|
quawk
2nd Gear
Posts: 150
|
Post by quawk on Jun 3, 2022 23:11:09 GMT -5
After more thought, tinkering, and tweaking I have finally came up with a solution. I removed the adjuster screw and the nylon nut that the screw threads into. The top of the stand that the nylon nut slides into happens to be the same height as the base of the bracket with the nylon nut and screw removed. In lieu of the adjuster I used a small piece of aluminum to sort of bridge across from the stud over to the adjuster stand. Put a small screw through the hole in the top of the stand where the nylon nut was removed, and through the "bridge" piece. With this set up it allows the headlight assembly to seat properly into the fairing recess and even winds up being adjusted evenly around the perimeter of the retainer ring. I really appreciate you hanging in there and helping with suggestions to solve this problem. I was able to take the bike for its' first ride with the fairing mounted and am so glad I went ahead with the addition. It's so much more enjoyable, to me anyway, to ride behind the fairing. Thanks again, Wayne.
|
|
|
|
Post by wayne on Jun 4, 2022 6:45:35 GMT -5
Great news! I ride year round with the fairing, love it. I use some preload in the forks but that's not essential. It's awesome in the cold!
|
|
quawk
2nd Gear
Posts: 150
|
Post by quawk on Jun 4, 2022 9:11:17 GMT -5
I can't help but think that this fairing was designed for use with the first year (75) headlight assembly, and maybe they assumed the second year headlight would be the same or similar enough there would be no problem with it. The second year assembly simply will not fit with the provided hardware listed in the installation kit, without modification of the assembly and/or the fairing. I am ignorant of your country's winter temperature extreme. In other words, how cold does it get? I assume you've never seen snow. You may be tougher than I am, but I'm fairly certain you would not ride year round where I live. Snow, sleet, ice, and temps as low as 10 to 20 degrees below O F. in the dead of winter. I envy those that can ride year round. In a previous post I inquired if anyone had attempted to make their own windshield. You mentioned you had a local shop make a replacement for you. When you installed it did it originally use #8-32 nylon machine screws, washers, and nuts as the through fasteners? If so did you re-use them? I believe that's what's called out in the parts list for the fairing/windshield. My fairing and what little was left of the windshield had a few of these fasteners, but some had been replaced with #10 steel machine screws and some were missing altogether. The latter part of this message maybe should have been a separate post, but I've started now, so,,, I have ordered, received, and installed a replacement extra tall windshield from Gustafsson Plastics. As they state on their website, you do have to fit and drill the holes yourself. A special drill bit is included to be able to successfully drill the acrylic, but it is 1/4" diameter. This is several sizes larger in diameter than the original #8-32 machine screw size. Before I looked at the original parts list, that you have shown in a pic, and I saw what the original fastener size was, I had already drilled for the 1/4" size fasteners. I eventually found 1/4" nylon screws (slotted head), washers and nuts to use as through fasteners. I sent Gustafsson a message to ask if they intended for the customer to switch to the larger fastener but have not gotten a response. The windshield is now installed so it may be irrelevant but thought I'd ask if you used the original size fasteners. To me, the original size fasteners are undersized but seemingly Calafia deemed them adequate. The smaller fastener heads do give you a "cleaner" look, which I would have preferred, but as they say, it's too late now, and maybe irrelevant. I believe I saw a previous post where timpa has installed a tinted, and then a clear Gustafsson windshield so maybe I will message him.
|
|
|
|
Post by timpa136 on Jun 4, 2022 10:13:21 GMT -5
I had a 76 or GT Suzuki fairing with an automotive style bucket riveted in place. Typical 60s
looked similar to automotive where you pull that spring around the chrome ring for attachment.
The rest of it was missing and I no longer have.
Also riding in rain often times would pull out my exhaust studs.
|
|
quawk
2nd Gear
Posts: 150
|
Post by quawk on Jun 4, 2022 10:23:15 GMT -5
Timpa136, if you happen to see the addition to my above post maybe you could respond to the windshield fastener size question. Also why would riding in the rain cause the exhaust studs to pull out?
|
|