|
|
Post by hudson on Nov 11, 2020 1:33:21 GMT -5
 I've put 4,500 miles on it before adding the accessories and another 1,500 with the fairing kit this summer all on 200 to 300 mile day trips. I've put 4,500 miles on it before adding the accessories and another 1,500 with the fairing kit this summer all on 200 to 300 mile day trips. I converted the saddle bags lids to hinge at the front instead of lifting off. From all the damage to the lids that I had to repair, I would have to say they blew off a few times and may have been run over also. I converted the saddle bags lids to hinge at the front instead of lifting off. From all the damage to the lids that I had to repair, I would have to say they blew off a few times and may have been run over also.

The latches are Franzen that required the wedge blocks between the boxes and latches. Each block was custom made because each box was a slightly different angle and required different block thickness.

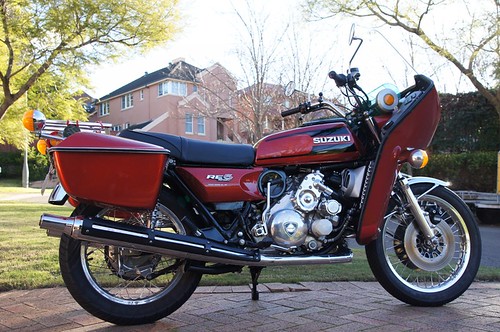
I made the rack to look like the factory accessory but tried to improve some of the weaknesses. Bottom tube is thicker and the bend was moved back behind the mounting point to avoid the weak spot at the bend from breaking. The rear mount was moved from the flimsy license plate mount to a forward location inside the taillight mount. And NO taillights were harmed in the installation, the holes used are already there.

The rack is also 1 inch narrower to allow the lids to be hinged. It looks like in the picture it won't clear the rack, but it does. The saddle bag mounts were modified slightly to move them in a little also.
There was a lot of measuring to get everything straight because the left rear shock is mounted 6mm further out from the center line of the chassis for chain & guard clearance. The saddle bag mounts must have been designed from the left side as the right mount was tipped in 6mm at the front.

This fairing came from e-bay and was in very good condition, except for the two holes cut for gauges, so that's why the gauges. There was also some holes were I mounted the GPS, so I didn't feel to bad about adding it.

Volt gauge is a N.O.S Suzuki marine unit made by Faria and they have a matching clock, but no Suzuki logo in the clock. Hidden USB power for the GPS and phone charging.

Custom made headlight bucket cover and a quick disconnect for the fairing wiring.

I did this set of signals in brushed chrome, I don't think they ever came this way as all I've seen is either brushed aluminum with clear lacquer or polished chrome which I did on the other set I ran without the touring kit. These do match my gauge and tail light housings.

 Also converted a H4 motorcycle headlight to fit the unique RE5 M model mount required for the fairing. Also converted a H4 motorcycle headlight to fit the unique RE5 M model mount required for the fairing.
The touring kit restoration work probably accounts 30% of the time it took to do this project and confirmed my deep hatred of fiberglass work.
The bike is very different to ride with the fairing as there is much more engine noise and a lot warmer which is a good thing this time of year.
Brian |
|
|
|
Post by rotoryguy on Nov 11, 2020 4:36:42 GMT -5
Beautiful job, Brian.
I have questions!!
I thought I knew that bridge in your first pic, but not sure. Where is that?
Did you do the painting and all of the metalwork? It's very well done - down to the "S" Suzuki in the rack.
Was the bike a basket case when you obtained it or did you go thru an entire resto?
Outstanding Brother!
|
|
|
|
Post by don07tncav on Nov 11, 2020 4:49:04 GMT -5
Really looks excellent.
|
|
|
|
Post by hudson on Nov 11, 2020 10:33:36 GMT -5
Beautiful job, Brian.
I have questions!!
I thought I knew that bridge in your first pic, but not sure. Where is that?
Did you do the painting and all of the metalwork? It's very well done - down to the "S" Suzuki in the rack.
Was the bike a basket case when you obtained it or did you go thru an entire resto?
Outstanding Brother!
The bridge is between Pasco and Kennewick Washington over the Columbia river.
I did everything from the internals of the rotor housing to the gauge cluster assembly. I also did all the painting except the blue ( No powder coat ) all polished aluminum is coated with Cerakote which I also did. I lost count of the number of pieces painted after 200. I have more of the " S " logos if anyone is interested. They are machine engraved and the originals were stamped with a die. Most of the aluminum polishing I did send out as I soon realized that I hated that almost as much as the fiberglass work that I did do.
You can see what I started with under my post " Completed Restoration "
Brian |
|
|
|
Post by wayne on Nov 11, 2020 16:50:36 GMT -5
That is just stunning Brian. Love the headlight bucket seal. Funny how many small differences there were. My rack is a little different to that. Same style, same logos but framework a little different I think. To see the whole restoration, go HERE. And for those of you contemplating a restoration, here's what Brian started with: ![]()  |
|
|
|
Post by hudson on Nov 11, 2020 17:12:34 GMT -5
Wayne,
The rack is 1 of the 2 that I made from scratch. There is more time in that rack than I want to admit.
The goal was to look stock , but a better design and fit.
Brian
|
|
|
|
Post by wayne on Nov 11, 2020 17:36:25 GMT -5
Okay, that makes me feel better. It was obviously a better rack.
|
|
|
|
Post by rotoryguy on Nov 12, 2020 5:53:49 GMT -5
Thank you Brian for answering! The bridge looked initially to me like the Indian River Bridge around Rehoboth MD, but the tops of the towers weren't right!
I am also a believer in Cerakote. I used the clear on all the aluminum parts as well and the glacier silver on the exhaust headers (Goldwing resto). "Losing count of pieces". Hilarious! I know exactly what you mean.
Although the RE5 I am restoring now is a survivor of neglect, your appears to have started as a discarded soul. Kudos for excellent work.
|
|
|
|
Post by decotriumph on Nov 16, 2020 11:26:36 GMT -5
Wow, Brian, that is beautiful! Really well done!
|
|
|
|
Post by goandy on Nov 19, 2020 1:27:46 GMT -5
Awesome.
|
|
|
|
Post by janski on Nov 19, 2020 5:54:47 GMT -5
Inspirational, just shows what can be achieved, thank you Brian.
|
|