|
|
Post by steve on Feb 5, 2012 19:01:58 GMT -5
HELP!!! I am trying to change the waterpump seals on my RE5 and am having trouble removing the distributor. I have removed the points plate, outer cam and the 3 screws that hold the retainer for the bearing . Won't come out. The manual says to "extract" the shaft. Do I need a puller or could the bearing be stuck with tarnish? any help would be appreciated Thanks Steve   |
|
|
|
Post by wayne on Feb 5, 2012 19:35:18 GMT -5
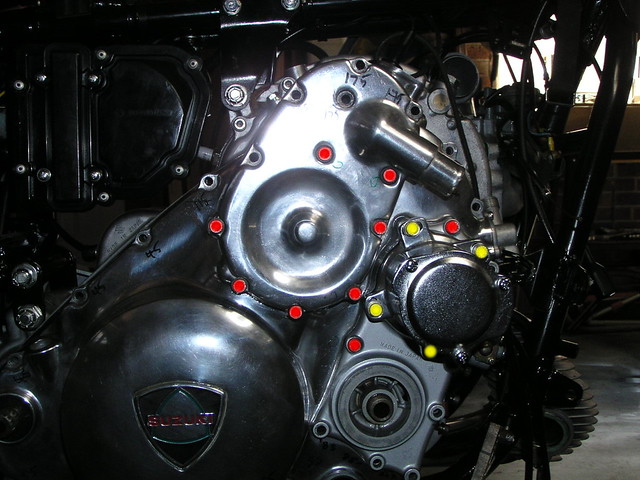
Unfortunately, to remove the distributor in total, the clutch cover needs to come off. However, to change the water pump seals you DO NOT have to remove the distributor. Removing the clutch cover is not as intimidating as it looks. Here is a picture showing which bolts DON'T have to be removed to take off the clutch cover. Red and yellow don't have to be removed but obviously to service the waterpump those red bolts on the pump cover will have to come off eventually. You don't really need to touch the distributor at all.  Once all the bolts are out, the cover can be a bit difficult to remove only because it remains "glued" in place by the old gasket. A simple spreader device can be made from junk in your shed which will break that "seal" and I'll try and post a pic here. Once apart, the gear on the end of the waterpump shaft can be removed and the whole water pump can be slid out. You don't need to separate the impellor from the shaft either. While your at it, inspect the tip bearing which is the black plain bearing in the waterpump cover. These are almost always unevenly worn and will contribute to early failure of your water pump seal. Jess at Rotary Recycle sells upgraded versions and I've fitted 3 of them and they seem to work very well. A 1000 mile inspection showed the new bearing in perfect condition and no leaks. Wayne |
|
|
|
Post by wayne on Feb 5, 2012 20:02:20 GMT -5
Okay, once all the bolts are out (and make sure that you really did get them ALL out), the clutch cover can be a bugger to budge. This is crude, but simple and it works:  Small piece of threaded rod, two nuts wound onto the rod until flush with rod ends, something to brace against (the little bit of angle alloy screwed into existing gooseneck hole and another bit against the engine case to spread the load and not damage the casing). Then just wind one of the nuts off and it will spread pushing the clutch cover away from the engine support frame. You can see the gap created in the photo. You only need a millimetre or two and once it's going it's easy to get apart. But here's the quickest and easiest way: See that gap between the alloy gooseneck tube and the black frame tube?  Fold a leather glove, shove it down that gap, stick a Jimmy bar in there or maybe a tyre lever and 1 second later the clutch cover is separated:  Hope this helps. Wayne |
|
FC Zach
3rd Gear
   Eagleville, TN
Posts: 335
|
Post by FC Zach on Feb 5, 2012 23:43:44 GMT -5
Wow Wayne, I usually just use one of these:   Yeah, like Wayne said its not that bad of a job to remove the cover just a messy one. Don't forget to drain the oil and DO NOT forget to align the distributor gear and motor upon reinstalling and everything will be ok. I also recommend replacing the impeller shaft bushing as well, cheap insurance! |
|
|
|
Post by wayne on Feb 6, 2012 0:25:32 GMT -5
I've never had success with a hammer.....never found anywhere suitable to belt it against, not enough lips or edges. Even used a long thin bit of hardwood and belted from the other side against the only lip I could find but still couldn't budge them.
How did you seamlessly embed that image ??
EDIT - problem with my display, I can now see the hammer is in a frame but previously it magically floated in the body of the message. I was in awe Zach, in awe......
|
|
FC Zach
3rd Gear
   Eagleville, TN
Posts: 335
|
Post by FC Zach on Feb 6, 2012 7:17:38 GMT -5
|
|
|
|
Post by steve on Feb 6, 2012 9:55:04 GMT -5
Thanks a lot! the great pictures and info!!
Now I can go back at it and put the large hammer back in the drawer. ;D
|
|