
Post by wayne on Jan 11, 2017 16:47:57 GMT -5
The following thread was originally posted by West Australian member Goandy (formerly Andynogo).
The number of people rebuilding RE5 proper units outside of the factory that we know about can be counted on one hand so the following is invaluable. This thread is reproduced from Andy's original, some points have been rearranged and comments and/or questions from others omitted. The original posting can be found HERE.
Andy notes the requirement for a thin walled 40mm or 41 mm socket. Easy to obtain from ebay or your local toolshop (Peugot front hub nut is 40 mm so may help narrow your search). He also notes that the manual states that it's a 41 mm nut but subsequently found that Suzuki used both 40 mm and 41 mm nuts EDIT: confirmed, Andy had a 40 mm nut, another stripdown by a contact I had was 41 mm, engine #12401.
In the thread are notes about the special tools required for disassembly and the dimensions for the sealing O rings.
Andy notes that if the Oil control seals are out of spec they can be reground and the apex seals are available from www.nsu-ro80.de/
All rubber o rings are obtainable and the coolant jacket seals will be made up out of o ring cord and joined together.
GoAndy takes over:
Well I've decided to bite the bullet and get stuck into rebuilding a proper unit for my bike. I have two bikes- one complete and one totally stripped down. The complete bike has blown coolant seals so needs to be sorted. As I don't know the condition of the stripped down bike I'll rebuild that unit first.
Yes I'm aware of the difficulty level but I've rebuilt more Mazda rotaries than I care to remember so am confident in taking this on. My buddy Steve who lives a few minutes away is getting a set of the reassembly tools made as we will also be rebuilding one or two of his.
I'll keep the thread going with regular updates and photos as I'm sure a few will be interested to see how it goes!
Here is the bare unit straight off the shelf:


One counterweight removed. I found the best way for me was a few sharp taps on the outside flat surface of the counterweight with a decent sized hammer. Pops straight off. Pullers can be used I guess but may break the weight as they are brittle. EDIT*** This should be the last resort. A steering wheel puller works well and is preferable.
Taking the port valve assembly off. Nut on end of shaft and undo the two hex nuts.

There will be more progress early next week when I've got my hands on a 40mm socket for the other counterweight nut. The other counterweight nut is 32mm. Naturally I have 32 then the next one up is 46mm...
***Update: The engine rebuild manual says to use the 41mm special tool but a 41mm socket is too loose for my liking on the nut. I will be buying a 40mm long reach and turning it down on the lathe to fit.
Ok, 40mm socket arrived- in a huge box! Had to machine it a little on the lathe as it was quite thick.

If you don't have a 1/2 inch rattle gun like this Makita- go and get one! They are amazing. Took the nut off easily.

I used a steering wheel puller to get the counterweight off, then again for the side housing. The gods must be smiling on me- the coating all looks really good on this engine.


The rotor housing surface as well is excellent. The only downers so far are coolant seal blown (getting replaced anyway- probably why the bike was shelved all those years ago) and the main oil control ring on the rotor is worn past the service limit. I may be stuck with just putting new rubbers in it and seeing how we go, unless I can make a Mazda one fit. (or Jess has any NOS oil control rings in stock? )
)
Here's a few more photos of the engine mostly pulled apart now.
What is the reason for this machined slot on the side plate? Oil return?

You can make out the "1" marked on thr rotor- each tip is numbered which makes it easy for keeping all the seals together. I also put a "L" in the balacing recess just for my info. I use spray brake cleaner to clean the carbon off- with a brass brush. Gentler than a steel wire brush.


The rotor housing looks excellent:

Rotor itself is good as well

Here are most of the seals set out for re-assembly:

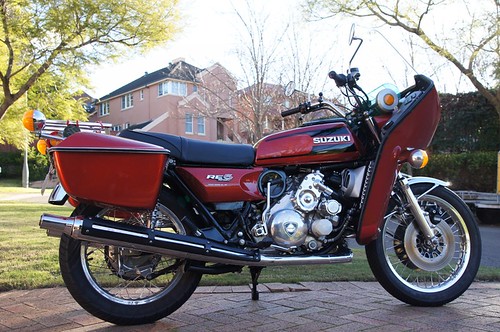
Poor old bike patiently awaits some love

These are Steve's seal ring compressors- beautifully laser cut and thanks to Tonny for having the drawings for them on his website!

Cleaned up rotor

and side plates

Hand engraved date in the rotor gear- September 1973

Another example of the stamped numbers identifying rotor tips

Nasty rough edges on the inlet ports...

and exhaust port...

These ports will get cleaned up a little as I don't like those little loose bits of metal- looks like welding splatter but may be from the chrome depositing process? The grooves in the surface of the rotor housing are cosmetic- you can't even feel them with your fingernail.
Wow. Did some careful die grinding to clean up the ports. I'm used to Mazda rotary housings which are very easy to grind... But these Suzuki ones are HARD! It almost feels like solid hard chrome it's that difficult to smooth up.


I also have to consider what to do about the oil control rings now. We can't buy new ones, so the only option open to us is to use Mazda ones. They are different- wider, deeper (6mm as opposed to 4mm) and have a 1.5mm larger diameter***EDIT: Wrong, my stuff up. They are smaller so can't be used easily. I might have to manufacture some.**** This would require machining the ring slot on each side of the rotor and also inserting a spacer to mate up with the inside of the Mazda ring. Certainly not impossible- this is what Hurley engineering does to NSU rotors when rebuilding them I believe. I'll get my machining expert over some time and have a chat- but for now I'll probably rebuild this motor with new rubbers on the oil control rings and see how bad it ends up.
UPDATE: Oil control rings. Can't buy them, so I had to explore options. I intend to try making some, using a cylinder liner (spun cast iron) of the correct diameter- just over 5 inches. In the meantime I reground the scraping surface profile on them. They look ok but no telling how they'll work until I run the engine.


Next up is get the viton oil control ring rubbers and enough viton cord to make the coolant seals. Naturally the seal companies here in Perth don't have any and at the prices they charge, it's sadly cheaper to get it even from Scotland! Crazy.
I've made up viton coolant seals (from viton cord I had for Mazda rotary rebuilds) and have ordered some viton seals for the oil control rings.
re5norway has kindly supplied the dimensions for o rings that he uses in his rebuilds:
For a unit rebuild I use the following stock listed Viton o-rings:
2x 1.78mm x 120.37mm for the rotor side seals
8x 1.6mm x 13.1mm for the side housings
For sealing of the side housings I order custom made glued Viton seals:
2x 282mm x 2.0mm for the outer groves
2x 224mm x 2.00mm for the inner groves
The point where the rings are glued, is to be placed at the coldest point of the housing, which are in the middle of the inlet port.
I ordered the oil control o rings from:
simplybearings.co.uk/shop/product_info.php?products_id=512628
I haven't taken many photos of the reassembly- but it's not too bad if you have the right special tools. Without them it's just about impossible!
Just a hint- when putting the seals, springs etc back in the rotor, use plenty of vaseline or sticky grease to hold everything in place as you have the move the rotor assembly around a bit when installing it into the side plates/housing.
This is the rotor into the bottom plate, with housing on. I had an issue with getting the top plate on (I think the special tool was a bit too thick at around 2.5mm- needs to be about 1.5). I wasn't able to get the seal ring proud of the tool the way the rotor was sitting down in the housing, so the solution was to lift the eccentric shaft up a few mm- not too far or you'll pop the bottom seal ring out of the bottom plate, and maybe dislodge some side/corner seals as well.
I found the perfect tool for lifting the shaft and managed to get the plate on fine:


Trolley Jack!


How cool is that? A perfectly functional mini trolley jack! (Don't tell my son I used one of his toys!)
Well I was putting the last plate on the motor, retracting the special tool that compresses the seal ring...... PING! I managed to snag one of the rotor side seals whilst I was withdrawing the tool. Snapped an inch off one end.
Luckily the Mazda side seals (from an early 12A) are the same thickness(1mm)- just different depth and length, so I've spent the last hour modifying the Mazda one as a replacement. Just thought some people would get a chuckle out of this!
Jeez, didn't have these problems putting Steve's proper unit back together!
We need to establish if using the "undersized" o rings [smaller diameter] on this list for the oil control rings could let oil pass into the chamber, I used this list to rebuild mine and have noticed since that you can see with the naked eye they are smaller than Suzuki used,Do we know of other members that have used this size on rebuild ?
Just asking !.From your post; these are the best fit afaik:+ = am not buying a pair of jeans !
Aah ok. When I was researching bits, I couldn't find a closer match in size. These fit ok and on two engine rebuilds don't seem to have noticeable excess smoke. If you find a better fit, let us know as I have one more proper unit waiting for a rebuild as a shelf spare.
The number of people rebuilding RE5 proper units outside of the factory that we know about can be counted on one hand so the following is invaluable. This thread is reproduced from Andy's original, some points have been rearranged and comments and/or questions from others omitted. The original posting can be found HERE.
Andy notes the requirement for a thin walled 40mm or 41 mm socket. Easy to obtain from ebay or your local toolshop (Peugot front hub nut is 40 mm so may help narrow your search). He also notes that the manual states that it's a 41 mm nut but subsequently found that Suzuki used both 40 mm and 41 mm nuts EDIT: confirmed, Andy had a 40 mm nut, another stripdown by a contact I had was 41 mm, engine #12401.
In the thread are notes about the special tools required for disassembly and the dimensions for the sealing O rings.
Andy notes that if the Oil control seals are out of spec they can be reground and the apex seals are available from www.nsu-ro80.de/
All rubber o rings are obtainable and the coolant jacket seals will be made up out of o ring cord and joined together.
GoAndy takes over:
Well I've decided to bite the bullet and get stuck into rebuilding a proper unit for my bike. I have two bikes- one complete and one totally stripped down. The complete bike has blown coolant seals so needs to be sorted. As I don't know the condition of the stripped down bike I'll rebuild that unit first.
Yes I'm aware of the difficulty level but I've rebuilt more Mazda rotaries than I care to remember so am confident in taking this on. My buddy Steve who lives a few minutes away is getting a set of the reassembly tools made as we will also be rebuilding one or two of his.
I'll keep the thread going with regular updates and photos as I'm sure a few will be interested to see how it goes!
Here is the bare unit straight off the shelf:
One counterweight removed. I found the best way for me was a few sharp taps on the outside flat surface of the counterweight with a decent sized hammer. Pops straight off. Pullers can be used I guess but may break the weight as they are brittle. EDIT*** This should be the last resort. A steering wheel puller works well and is preferable.
Taking the port valve assembly off. Nut on end of shaft and undo the two hex nuts.
There will be more progress early next week when I've got my hands on a 40mm socket for the other counterweight nut. The other counterweight nut is 32mm. Naturally I have 32 then the next one up is 46mm...
***Update: The engine rebuild manual says to use the 41mm special tool but a 41mm socket is too loose for my liking on the nut. I will be buying a 40mm long reach and turning it down on the lathe to fit.
Ok, 40mm socket arrived- in a huge box! Had to machine it a little on the lathe as it was quite thick.
If you don't have a 1/2 inch rattle gun like this Makita- go and get one! They are amazing. Took the nut off easily.
I used a steering wheel puller to get the counterweight off, then again for the side housing. The gods must be smiling on me- the coating all looks really good on this engine.
The rotor housing surface as well is excellent. The only downers so far are coolant seal blown (getting replaced anyway- probably why the bike was shelved all those years ago) and the main oil control ring on the rotor is worn past the service limit. I may be stuck with just putting new rubbers in it and seeing how we go, unless I can make a Mazda one fit. (or Jess has any NOS oil control rings in stock?
 )
)Here's a few more photos of the engine mostly pulled apart now.
What is the reason for this machined slot on the side plate? Oil return?
You can make out the "1" marked on thr rotor- each tip is numbered which makes it easy for keeping all the seals together. I also put a "L" in the balacing recess just for my info. I use spray brake cleaner to clean the carbon off- with a brass brush. Gentler than a steel wire brush.
The rotor housing looks excellent:
Rotor itself is good as well
Here are most of the seals set out for re-assembly:
Poor old bike patiently awaits some love
These are Steve's seal ring compressors- beautifully laser cut and thanks to Tonny for having the drawings for them on his website!
Cleaned up rotor
and side plates
Hand engraved date in the rotor gear- September 1973
Another example of the stamped numbers identifying rotor tips
Nasty rough edges on the inlet ports...
and exhaust port...
These ports will get cleaned up a little as I don't like those little loose bits of metal- looks like welding splatter but may be from the chrome depositing process? The grooves in the surface of the rotor housing are cosmetic- you can't even feel them with your fingernail.
Wow. Did some careful die grinding to clean up the ports. I'm used to Mazda rotary housings which are very easy to grind... But these Suzuki ones are HARD! It almost feels like solid hard chrome it's that difficult to smooth up.
I also have to consider what to do about the oil control rings now. We can't buy new ones, so the only option open to us is to use Mazda ones. They are different- wider, deeper (6mm as opposed to 4mm) and have a 1.5mm larger diameter***EDIT: Wrong, my stuff up. They are smaller so can't be used easily. I might have to manufacture some.**** This would require machining the ring slot on each side of the rotor and also inserting a spacer to mate up with the inside of the Mazda ring. Certainly not impossible- this is what Hurley engineering does to NSU rotors when rebuilding them I believe. I'll get my machining expert over some time and have a chat- but for now I'll probably rebuild this motor with new rubbers on the oil control rings and see how bad it ends up.
UPDATE: Oil control rings. Can't buy them, so I had to explore options. I intend to try making some, using a cylinder liner (spun cast iron) of the correct diameter- just over 5 inches. In the meantime I reground the scraping surface profile on them. They look ok but no telling how they'll work until I run the engine.
Next up is get the viton oil control ring rubbers and enough viton cord to make the coolant seals. Naturally the seal companies here in Perth don't have any and at the prices they charge, it's sadly cheaper to get it even from Scotland! Crazy.
I've made up viton coolant seals (from viton cord I had for Mazda rotary rebuilds) and have ordered some viton seals for the oil control rings.
re5norway has kindly supplied the dimensions for o rings that he uses in his rebuilds:
For a unit rebuild I use the following stock listed Viton o-rings:
2x 1.78mm x 120.37mm for the rotor side seals
8x 1.6mm x 13.1mm for the side housings
For sealing of the side housings I order custom made glued Viton seals:
2x 282mm x 2.0mm for the outer groves
2x 224mm x 2.00mm for the inner groves
The point where the rings are glued, is to be placed at the coldest point of the housing, which are in the middle of the inlet port.
I ordered the oil control o rings from:
simplybearings.co.uk/shop/product_info.php?products_id=512628
I haven't taken many photos of the reassembly- but it's not too bad if you have the right special tools. Without them it's just about impossible!
Just a hint- when putting the seals, springs etc back in the rotor, use plenty of vaseline or sticky grease to hold everything in place as you have the move the rotor assembly around a bit when installing it into the side plates/housing.
This is the rotor into the bottom plate, with housing on. I had an issue with getting the top plate on (I think the special tool was a bit too thick at around 2.5mm- needs to be about 1.5). I wasn't able to get the seal ring proud of the tool the way the rotor was sitting down in the housing, so the solution was to lift the eccentric shaft up a few mm- not too far or you'll pop the bottom seal ring out of the bottom plate, and maybe dislodge some side/corner seals as well.
I found the perfect tool for lifting the shaft and managed to get the plate on fine:
Trolley Jack!
How cool is that? A perfectly functional mini trolley jack! (Don't tell my son I used one of his toys!)
Well I was putting the last plate on the motor, retracting the special tool that compresses the seal ring...... PING! I managed to snag one of the rotor side seals whilst I was withdrawing the tool. Snapped an inch off one end.
Luckily the Mazda side seals (from an early 12A) are the same thickness(1mm)- just different depth and length, so I've spent the last hour modifying the Mazda one as a replacement. Just thought some people would get a chuckle out of this!
Jeez, didn't have these problems putting Steve's proper unit back together!
We need to establish if using the "undersized" o rings [smaller diameter] on this list for the oil control rings could let oil pass into the chamber, I used this list to rebuild mine and have noticed since that you can see with the naked eye they are smaller than Suzuki used,Do we know of other members that have used this size on rebuild ?
Just asking !.From your post; these are the best fit afaik:+ = am not buying a pair of jeans !
Aah ok. When I was researching bits, I couldn't find a closer match in size. These fit ok and on two engine rebuilds don't seem to have noticeable excess smoke. If you find a better fit, let us know as I have one more proper unit waiting for a rebuild as a shelf spare.


