
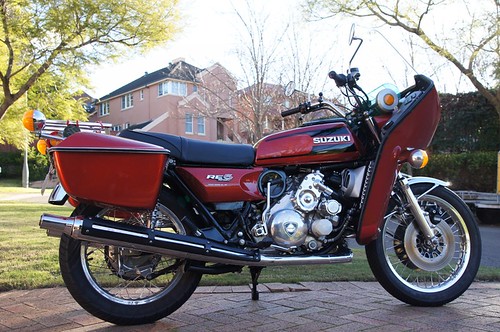
First start, starting an RE5, engine check, proper check.
Jan 4, 2020 21:45:43 GMT -5
SuzukiRE5, ap951, and 2 more like this
Post by wayne on Jan 4, 2020 21:45:43 GMT -5
The information below has been prepared from posts on the board and with the personal scrutiny of a couple of RE5 mechanics, a respected RE5 engine rebuilder and a few spannermen who have serviced RE5's for decades.
Special thanks to Tim J, Roger M. (HGH770N), Steve P. and member JESS from Rotary Recycle.
First Start:
Get yourself digital copies of the Owner’s manual and Suzuki Service manual:
re5rotary.proboards.com/thread/379/re5-parts-service-manuals-online
Can you turn the bike over?
Remove the spark plug.
To turn the bike over, do it via the 17mm bolt that’s behind the “Suzuki” badge on the left side generator cover. The kick start is highly geared, you’ll have more control this way. The engine’s normal rotation is clockwise as you face the generator cover.
Remove the U shaped alloy air inlet horn from the carby.
Make up some premix in a spray bottle. 1 part oil (Castrol GTX is recommended) and 100 parts fuel. Squirt it through the open carb and try and turn the rotor over slowly.
If the engine is reluctant to turn over then there is a chance the side plates have oxidised and Rotor tips rusted in. Turning the rotor on corroded plates may lift the inlay and you’ll have destroyed the casings. One of our UK rebuilders has stripped many units down with corrosion on side plates and seized corner seals.
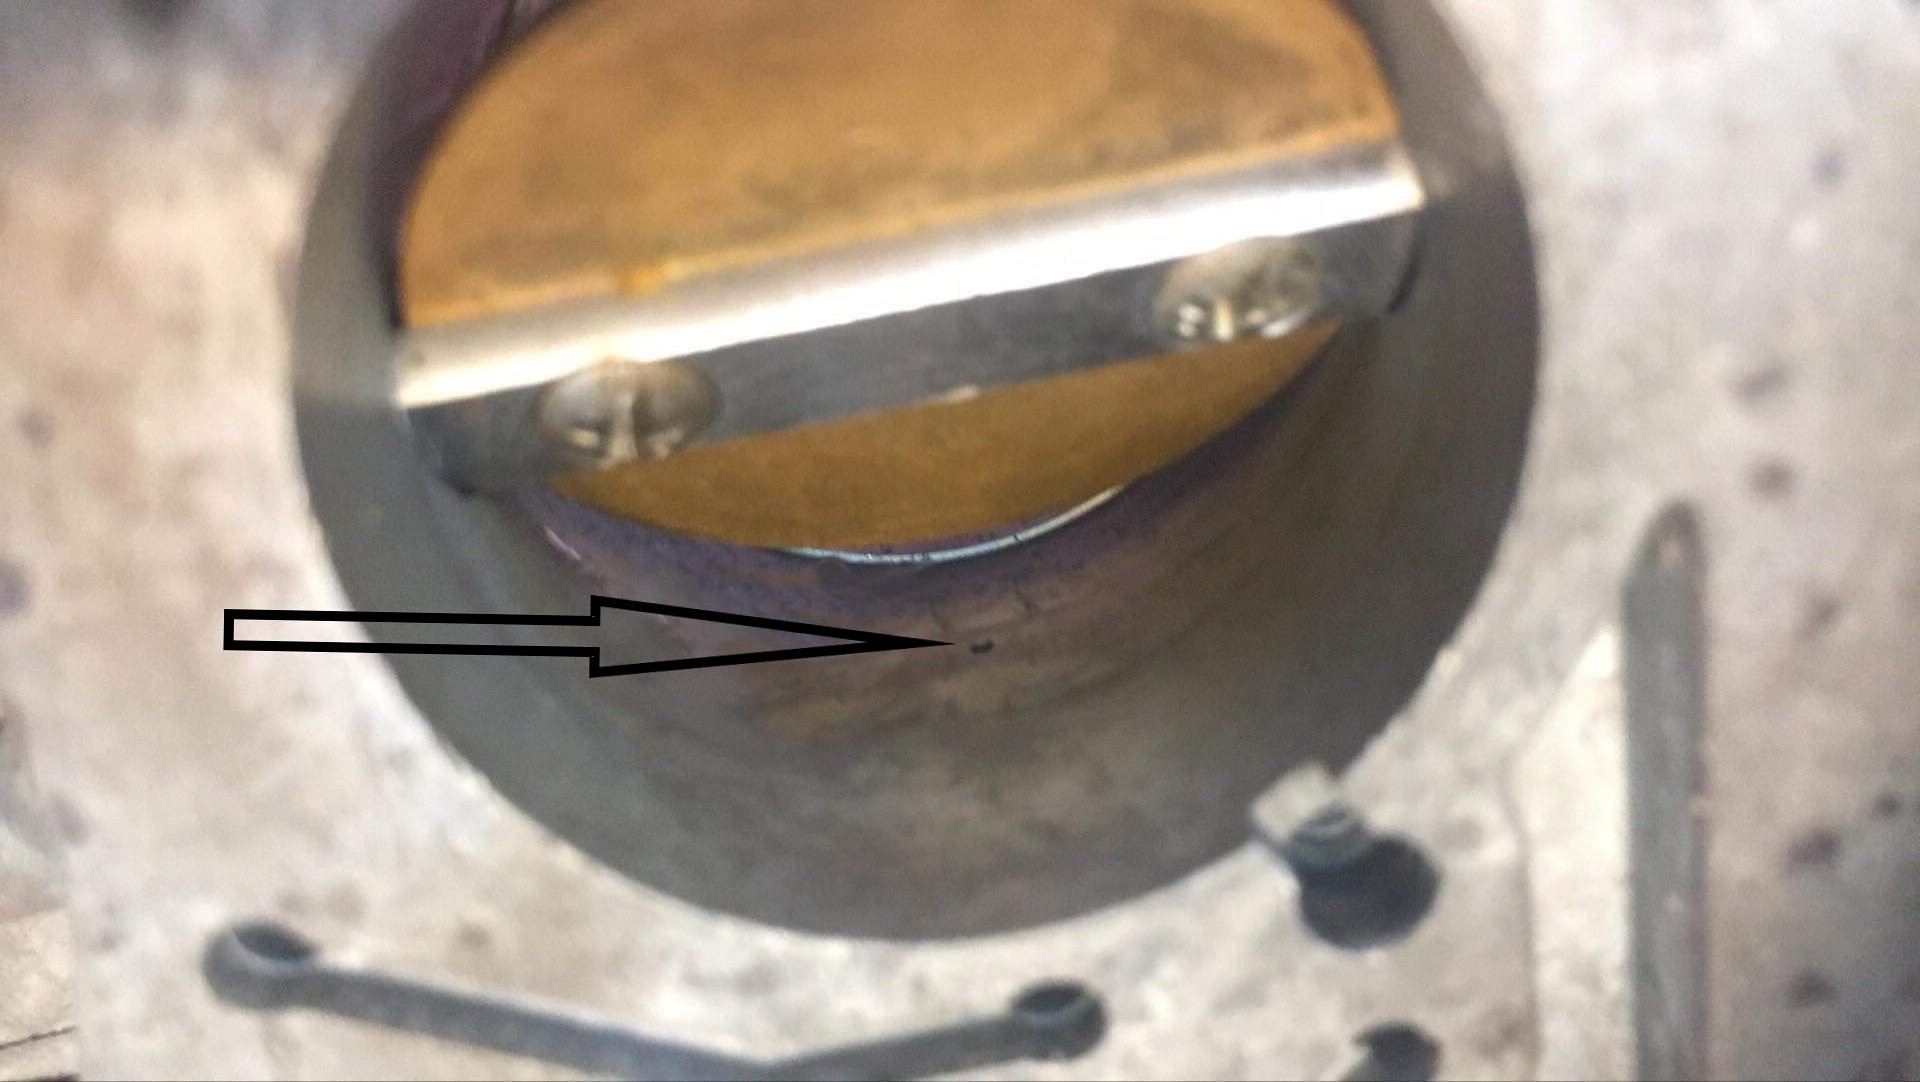
A Borescope is useful up the exhaust manifold to see. These are Borescope pictures of damage to the side plates and the outer casing surface. The spirograph pattern is normal, it’s factory plating. The very early bikes were fully plated and don't have this pattern.


If you don’t have access to a borescope, remove the exhaust pipes and the finned exhaust manifold. Spray some GTX mix into the chamber. If the point of a rotor tip is visible through the exhaust port, spray it and then get a wooden dowel and see if you can push the apex seal in. There should be a small amount of give as it bounces on its spring. Keep doing this in an attempt to free up the seal. Remember that a single sticking Apex seal will rob compression from two of the three chambers.
Get as much spray into the chamber as possible. Fill up the spark plug hole with some petrol/oil mix. The hole isn’t into the combustion chamber directly. It goes into a small cylindrical pre-ignition chamber which has a hole at the bottom. Filling it with fuel/oil mix will allow some to drip into the chambers. Open the throttle and Spray lots of the mix into the carb inlet throat.
Keep doing this and trying to turn the engine over even if it takes a few days. If you don't have success, you can block off the exhaust and start filling it with Diesel (which is essentially Penetrene. Rotate the engine every few days so that each Apex seal gets a turn at pointing straight down and hopefully awash with Diesel.
If it doesn’t free up, start searching for another proper unit or you could consider you’re closest rebuilder:
AU- re5rotary.proboards.com/thread/2767/engine-rebuild-australia
EU- re5rotary.proboards.com/thread/2772/engine-rebuild-europe
NZ- re5rotary.proboards.com/thread/2771/engine-rebuild-new-zealand
UK- Contact member HGH 770N by private message to discuss your issues and consider options.
USA- member JESS may be able to help you with a compression tested good used proper unit (engine). Send him a PM.
If the rotor does turn over, keep spraying oil into it and turn it over by hand several times.
Ideally, you should do a compression test to save yourself working on an engine that's past its use-by date. Rotaries will start and run with compression so low that they'd be useless on the road. As a rough guide, anything over 100 psi is viable but engines have been known to run with as little as 60 psi (barely rideable). Here's a guide to compression testing:
re5rotary.proboards.com/thread/2645/compression-testing-video-jess
OILS:
Remove and replace the oil filter:
A Suzuki option is part #06510-05A00. Member KANONKOPDRINKER remembers this advice from Sam Costanzo himself. David (the member) has been using these without any problem for years. Sam told him the only thing they didn’t have was the emergency by-pass valve that the O.E. had, but as this only opened at some ridiculous pressure, it was as good as useless!!
They are black, against the O.E. silver.
Other options are: AU/NZ Ryco Z386 (has the bypass valve), UK Royal Purple 10-2840, USA Toyota Corolla short can part no. 90915 03001, K&N HP-1003
Drain the engine SUMP oil and check it for any coolant/water. Below the oil filter, undo the large hex head bolt and withdraw the goose neck tube. Clean the fine mesh filter. It also should have an O ring (#15 in the diagram below). The position of the O ring is incorrectly shown in the parts book, it should be just on the engine side of the flange. The spring should press up against the flange, not the O ring. The O ring seals the tube against an internal casing. Refit the tube.
The dipstick is calibrated to read the oil level when pushed in but not screwed in. Refill with Castrol GTX ‘til oil reaches the “F” mark on the dipstick. You can recheck by dipstick once it’s running as oil level will drop due to the new oil filter.

Drain the gearbox oil. Refill with 1600 cc of fresh oil. Some people use straight gear oil (80 wt) or any suitable 20-40 weight motorcycle oil will work.
You can’t be sure what the previous owner had in the under seat tank. Drain it by disconnecting the rubber tube at the metering oil pump (front lower right of engine, it should have an alloy cover over it). This way you can check that the pipe is free and oil is flowing. Once the under seat tank is empty and you’ve confirmed oil flows freely to the metering pump, refit the rubber pipe at the metering pump.
Fill the underseat tank with Castrol GTX. Undo the Phillips head air bleed screw (see photo). Oil will gravity feed until all air is bled out. When only Oil comes out of the bleed screw, tighten it.
The metering pump has an oil line that feeds the carby and a separate line that oils the drive chain at half the rate. This second line may have been removed and the feed hole plugged with a regular screw and gasket. It’s most important to check that the carby line is fitted to the correct output which is the lower of the two. Check that the throttle cable line to the metering pump is correctly calibrated. At full throttle, a punched line on the crank arm should align with a line stamped into the alloy casing.

CARBY:
The carb will likely be gummed up. At this stage, if all you want to do is get the bike running, do a quick clean. Remove carb. If you have a later model carb you will have a large hex bolt on top of the fuel inlet (see photo). Undo it and clean out the fine mesh filter screen before reassembly. If you have an early carb, you'll need to remove the float bowl to access this filter.

Carefully remove the top of the carb bowl but don't turn the carby upside down. Remove the jets noting that the marked jet in the picture below is NOT removable. It should also have a fine brass needle in it. Remove the needle, put it aside and you’re now free to manipulate the carb any way you like. If the needle is missing, send a PM to HGH770N, he makes quality replacements (you won’t need it for a first start).
Note also that there are two brass hex bolts on the outside of the carby. Behind these are the primary and secondary jets. There is also a small jet on the engine side of the carby (the mating face between carb and inlet manifold). Use compressed air to blow out all the passages and make sure the main valve is not stuck closed. Replace the needle, the jets and reassemble the carb. Take note of the two rubber pipes on the top and ensure they are connected as per the picture. Gently wind the angled brass screw on the carb top all the way in then back it off 1 full turn. This is a rough starting point. Return the carb to the bike.
Cable adjustment is not critical at the moment but make sure the throttle opens the primary butterfly valve all the way. Ensure that at rest, the primary butterfly is cracked slightly open (use the idle screw on top of the carby to do this). Ensure that the choke lever in the down position does move the choke butterfly to the closed position and that raising it also opens the choke.
If it’s visually obvious that the carb is full of varnish and gum, you may as well do a proper clean and rebuild. That will be covered elsewhere.

Correct Vacuum Hose routing:

FUEL:
Drain all fuel from the tank. Inspect the inside of the tank and flush as required. Fill with fresh fuel and add oil at the rate of 1 unit of Castrol GTX for 100 units of fuel (10 ml oil per litre of fuel). The bike was designed to run on lower octane fuels but essentially any unleaded, ethanol free fuel will do for a first start. Check fuel flow out of the petcock by placing the lever to the prime position (lever points to back of bike). Move the lever so it points down. This is “ON” but will not release fuel ‘til vacuum is supplied by the engine turning over. However, the system is usually faulty.
Suzuki taps do not have an “OFF”, fuel flow is stopped by a spring loaded valve and O ring whenever the engine is not running. Flow is enabled by vacuum from the inlet manifold opening the valve. Your petcock will almost certainly be faulty. Fuel will leak through the tap and likely flood your carby because your main valve may be similarly compromised and not stop the flow. This will result in fuel pooling in the inlet manifold and the first start attempt can flood the engine.
As you work towards getting the bike ready, it's best to clamp the fuel line to the carby or better still, disconnect it from the carb and plug it. When you’re ready for the first start, reconnect the line and use the prime position for your first attempts.
COOLANT:
Drain the coolant in two places. Firstly by removing the plastic bolt at the front lower left of the radiator tank and secondly by removing the hex drain bolt at the front of the proper unit itself, just left of the exhaust manifold (if you don’t have one of these, then you’ve got a very early model, the drain is still there but it’s under the proper unit and requires removal of the engine oil sump.
Check all the radiator hoses, once again, this is just a first start attempt so you decide if they’re good enough for that. It’s highly recommended to pop the “gooseneck” fitting off the right side engine casing. This is the alloy fitting to which the upper radiator hose is attached. Check for blockages in this area, they do happen and can result in a damaged impeller.
Ultimately you’ll almost certainly need to flush the radiator and replace all hoses. Fill with coolant suitable for alloy engines.
NB: you need to add 15 grams of “Bar’s Leaks” to the coolant. Not essential for a first start but you must add it ASAP.
ELECTRICAL:
Start with a known good battery and make sure that the electrical system is intact - no sparks flying or fuses blowing, etc. Do a lamp test. The first turn of the ignition key is a test position. The second click of the key is the start position and the CDI box should produce a high pitched whining noise. At the very least, make sure the oil pressure light comes on in both the test and start positions.
Check the ignition timing and set if necessary. The bike is not sensitive to timing. Setting it “close enough” is good enough at this stage:
Use the same bolt under the generator badge to turn the engine and check the timing.
1- Remove the timing mark inspection cover held in place with the two 10 mm hex heads on the left counter weight cover (approximately below the fuel petcock).
2- Remove the spark plug from the rotor housing.
3- Insert the spark plug into the plug cap and lay the spark plug by the timing mark inspection hole so that it’s threads are touching (earthing) any part of the alloy casings.
4- Turn the ignition key to the “Start” position (two clicks).
5- From the left side of the bike, rotate the engine clockwise while looking down the inspection cap at the timing marks. Listen for the distinctive “pop” of the spark plug firing and if it occurs anywhere between 5 and 10° BTDC, leave it, you’re good to go.
6- If it’s well outside of this, adjust the timing by gently loosening the four (4) allen head bolts holding the breaker point housing (right side of bike) and rotating the housing CCW to advance the timing or CW to retard. Do up the four allen bolts and recheck. When you tighten the bolts, it will change the timing slightly. Don’t worry about that for now. As long as it’s roughly between 5 and 10° you’ll be fine.
NB: The ignition timing should be set static. Do not adjust the breaker housing while the engine is running. Loosening the 4 bolts may aerate the oil pump.
SPARK PLUG:
If you have a plug adaptor, consult the manufacturer for the recommended type. For OEM plugs, use the pictures below to gauge the condition of your plug. These are brand new OEM plugs. Left is an A9 and right an AU10. Either type will work. If using an OEM plug, it’s highly recommended to use a brand new unit.
NB: Do not overtighten the plug, there's a danger of permanently damaging the engine casing. Suzuki issued a bulletin about this.

AIR FILTER:
Remove the air filter, take it out of its grid and clean it. Original RE5 filters may look okay sitting in the grid but breakdown in situ and then crumble into fine dust and are sucked through the system on first start up. The bike is sensitive to filters. Ultimately, get one that’s correct. Member “JESS” still sells suitable filters. Oil the filter with Castrol GTX before fitting using the smallest amount of oil possible. One idea is to oil it and then lay the filter between a few sheets of absorbent paper and squeeze as much oil out as you can before fitting.

STARTING:
Fully charge the battery and now you’re ready to go. Ideally have a fan placed at the front of the bike and blowing air over the radiator. Leave the spark plug out and turn the engine over with the starter. This’ll clear a lot of the oil and fuel you sprayed in when first checking the engine (note: the Oil Pressure light may not go out when spinning the engine with the plug out- not an issue for the short duration required).
Replace the plug. Do not go twisting the throttle (it's got a pump remember, you'll just flood the engine- tip from Michael D. Callahan on FB).
Connect the spark plug lead, reconnect the fuel line to the carby, move the petcock lever to “PRIME” (lever points to rear of bike), kill switch on right switchblock in the run position, ignition in the second click, CDI making a faint whining sound, choke fully down. Hit the starter.
Be prepared for a lot of smoke. This is not abnormal on a long layup bike.
Once the bike fires and runs, check the oil pressure light on the dash and make sure it’s extinguished and if not, shut the bike down immediately. After the bike has run for a little while, see if you can gently raise the choke lever to the half position and let it warm up. If the bike is reluctant to run off choke, you may still have a blocked bypass or primary pilot jet (see photo below).
Avoid revving the bike until the temp gauge reaches the first mark. Monitor temperature and shut the engine down if the needle rises too rapidly (it should take roughly 5 minutes for a reasonably sorted bike to reach the first mark on the gauge). At this stage, don’t let the temp gauge go past the half way mark.
NB: the bike’s cooling fan will not come on until the gauge is almost at the “H” side. Don’t let it get this hot whilst stationary.
Congratulations on a successful first start.
Before operating the bike on the road, there is more to do. Recheck your oil levels, particularly the engine sump. You need to check the operation of the one way valve that sits between the carby and the radiator. This is your oil feed line and if the valve is faulty (this is common), fuel will run back down the line into the metering oil pump and render it ineffective. You can check it by removing it, disconnecting the oil line and attaching a syringe. It should only allow air to be pushed via the syringe and not sucked.
You’ll also need to check the operation of the metering pump itself by referring to the Service Manual procedure. Once that’s been done, you can stop using premix in the tank.
If you haven’t already, thoroughly clean the carb (Ultrasonically). Fit new gaskets. Correct carby set up including float height, testing of the accelerator pump and synchronizing the port valve are also recommended.
Go back and fine tune the ignition by correctly gapping the points, greasing the cam and setting it to 8° BTDC (8.5 if you’re keen).
Do a thorough job on the cooling system including cleaning out the fine pipes that come off the alloy filler pipe that sits under the tank flap. They’ll need to be checked and cleaned manually, a radiator flush will not fix them if they are clogged (not uncommon).
And we haven’t even touched master cylinders and calipers, fork oils, chain and sprocket condition, rectifier, alternator, wheel bearings etc etc etc.
What're you waiting for? Get into it and get on the road. There’s nothing else like it.
Special thanks to Tim J, Roger M. (HGH770N), Steve P. and member JESS from Rotary Recycle.
First Start:
Get yourself digital copies of the Owner’s manual and Suzuki Service manual:
re5rotary.proboards.com/thread/379/re5-parts-service-manuals-online
Can you turn the bike over?
Remove the spark plug.
To turn the bike over, do it via the 17mm bolt that’s behind the “Suzuki” badge on the left side generator cover. The kick start is highly geared, you’ll have more control this way. The engine’s normal rotation is clockwise as you face the generator cover.
Remove the U shaped alloy air inlet horn from the carby.
Make up some premix in a spray bottle. 1 part oil (Castrol GTX is recommended) and 100 parts fuel. Squirt it through the open carb and try and turn the rotor over slowly.
If the engine is reluctant to turn over then there is a chance the side plates have oxidised and Rotor tips rusted in. Turning the rotor on corroded plates may lift the inlay and you’ll have destroyed the casings. One of our UK rebuilders has stripped many units down with corrosion on side plates and seized corner seals.
A Borescope is useful up the exhaust manifold to see. These are Borescope pictures of damage to the side plates and the outer casing surface. The spirograph pattern is normal, it’s factory plating. The very early bikes were fully plated and don't have this pattern.
If you don’t have access to a borescope, remove the exhaust pipes and the finned exhaust manifold. Spray some GTX mix into the chamber. If the point of a rotor tip is visible through the exhaust port, spray it and then get a wooden dowel and see if you can push the apex seal in. There should be a small amount of give as it bounces on its spring. Keep doing this in an attempt to free up the seal. Remember that a single sticking Apex seal will rob compression from two of the three chambers.
Get as much spray into the chamber as possible. Fill up the spark plug hole with some petrol/oil mix. The hole isn’t into the combustion chamber directly. It goes into a small cylindrical pre-ignition chamber which has a hole at the bottom. Filling it with fuel/oil mix will allow some to drip into the chambers. Open the throttle and Spray lots of the mix into the carb inlet throat.
Keep doing this and trying to turn the engine over even if it takes a few days. If you don't have success, you can block off the exhaust and start filling it with Diesel (which is essentially Penetrene. Rotate the engine every few days so that each Apex seal gets a turn at pointing straight down and hopefully awash with Diesel.
If it doesn’t free up, start searching for another proper unit or you could consider you’re closest rebuilder:
AU- re5rotary.proboards.com/thread/2767/engine-rebuild-australia
EU- re5rotary.proboards.com/thread/2772/engine-rebuild-europe
NZ- re5rotary.proboards.com/thread/2771/engine-rebuild-new-zealand
UK- Contact member HGH 770N by private message to discuss your issues and consider options.
USA- member JESS may be able to help you with a compression tested good used proper unit (engine). Send him a PM.
If the rotor does turn over, keep spraying oil into it and turn it over by hand several times.
Ideally, you should do a compression test to save yourself working on an engine that's past its use-by date. Rotaries will start and run with compression so low that they'd be useless on the road. As a rough guide, anything over 100 psi is viable but engines have been known to run with as little as 60 psi (barely rideable). Here's a guide to compression testing:
re5rotary.proboards.com/thread/2645/compression-testing-video-jess
OILS:
Remove and replace the oil filter:
A Suzuki option is part #06510-05A00. Member KANONKOPDRINKER remembers this advice from Sam Costanzo himself. David (the member) has been using these without any problem for years. Sam told him the only thing they didn’t have was the emergency by-pass valve that the O.E. had, but as this only opened at some ridiculous pressure, it was as good as useless!!
They are black, against the O.E. silver.
Other options are: AU/NZ Ryco Z386 (has the bypass valve), UK Royal Purple 10-2840, USA Toyota Corolla short can part no. 90915 03001, K&N HP-1003
Drain the engine SUMP oil and check it for any coolant/water. Below the oil filter, undo the large hex head bolt and withdraw the goose neck tube. Clean the fine mesh filter. It also should have an O ring (#15 in the diagram below). The position of the O ring is incorrectly shown in the parts book, it should be just on the engine side of the flange. The spring should press up against the flange, not the O ring. The O ring seals the tube against an internal casing. Refit the tube.
The dipstick is calibrated to read the oil level when pushed in but not screwed in. Refill with Castrol GTX ‘til oil reaches the “F” mark on the dipstick. You can recheck by dipstick once it’s running as oil level will drop due to the new oil filter.
Drain the gearbox oil. Refill with 1600 cc of fresh oil. Some people use straight gear oil (80 wt) or any suitable 20-40 weight motorcycle oil will work.
You can’t be sure what the previous owner had in the under seat tank. Drain it by disconnecting the rubber tube at the metering oil pump (front lower right of engine, it should have an alloy cover over it). This way you can check that the pipe is free and oil is flowing. Once the under seat tank is empty and you’ve confirmed oil flows freely to the metering pump, refit the rubber pipe at the metering pump.
Fill the underseat tank with Castrol GTX. Undo the Phillips head air bleed screw (see photo). Oil will gravity feed until all air is bled out. When only Oil comes out of the bleed screw, tighten it.
The metering pump has an oil line that feeds the carby and a separate line that oils the drive chain at half the rate. This second line may have been removed and the feed hole plugged with a regular screw and gasket. It’s most important to check that the carby line is fitted to the correct output which is the lower of the two. Check that the throttle cable line to the metering pump is correctly calibrated. At full throttle, a punched line on the crank arm should align with a line stamped into the alloy casing.
CARBY:
The carb will likely be gummed up. At this stage, if all you want to do is get the bike running, do a quick clean. Remove carb. If you have a later model carb you will have a large hex bolt on top of the fuel inlet (see photo). Undo it and clean out the fine mesh filter screen before reassembly. If you have an early carb, you'll need to remove the float bowl to access this filter.
Carefully remove the top of the carb bowl but don't turn the carby upside down. Remove the jets noting that the marked jet in the picture below is NOT removable. It should also have a fine brass needle in it. Remove the needle, put it aside and you’re now free to manipulate the carb any way you like. If the needle is missing, send a PM to HGH770N, he makes quality replacements (you won’t need it for a first start).
Note also that there are two brass hex bolts on the outside of the carby. Behind these are the primary and secondary jets. There is also a small jet on the engine side of the carby (the mating face between carb and inlet manifold). Use compressed air to blow out all the passages and make sure the main valve is not stuck closed. Replace the needle, the jets and reassemble the carb. Take note of the two rubber pipes on the top and ensure they are connected as per the picture. Gently wind the angled brass screw on the carb top all the way in then back it off 1 full turn. This is a rough starting point. Return the carb to the bike.
Cable adjustment is not critical at the moment but make sure the throttle opens the primary butterfly valve all the way. Ensure that at rest, the primary butterfly is cracked slightly open (use the idle screw on top of the carby to do this). Ensure that the choke lever in the down position does move the choke butterfly to the closed position and that raising it also opens the choke.
If it’s visually obvious that the carb is full of varnish and gum, you may as well do a proper clean and rebuild. That will be covered elsewhere.
Correct Vacuum Hose routing:
FUEL:
Drain all fuel from the tank. Inspect the inside of the tank and flush as required. Fill with fresh fuel and add oil at the rate of 1 unit of Castrol GTX for 100 units of fuel (10 ml oil per litre of fuel). The bike was designed to run on lower octane fuels but essentially any unleaded, ethanol free fuel will do for a first start. Check fuel flow out of the petcock by placing the lever to the prime position (lever points to back of bike). Move the lever so it points down. This is “ON” but will not release fuel ‘til vacuum is supplied by the engine turning over. However, the system is usually faulty.
Suzuki taps do not have an “OFF”, fuel flow is stopped by a spring loaded valve and O ring whenever the engine is not running. Flow is enabled by vacuum from the inlet manifold opening the valve. Your petcock will almost certainly be faulty. Fuel will leak through the tap and likely flood your carby because your main valve may be similarly compromised and not stop the flow. This will result in fuel pooling in the inlet manifold and the first start attempt can flood the engine.
As you work towards getting the bike ready, it's best to clamp the fuel line to the carby or better still, disconnect it from the carb and plug it. When you’re ready for the first start, reconnect the line and use the prime position for your first attempts.
COOLANT:
Drain the coolant in two places. Firstly by removing the plastic bolt at the front lower left of the radiator tank and secondly by removing the hex drain bolt at the front of the proper unit itself, just left of the exhaust manifold (if you don’t have one of these, then you’ve got a very early model, the drain is still there but it’s under the proper unit and requires removal of the engine oil sump.
Check all the radiator hoses, once again, this is just a first start attempt so you decide if they’re good enough for that. It’s highly recommended to pop the “gooseneck” fitting off the right side engine casing. This is the alloy fitting to which the upper radiator hose is attached. Check for blockages in this area, they do happen and can result in a damaged impeller.
Ultimately you’ll almost certainly need to flush the radiator and replace all hoses. Fill with coolant suitable for alloy engines.
NB: you need to add 15 grams of “Bar’s Leaks” to the coolant. Not essential for a first start but you must add it ASAP.
ELECTRICAL:
Start with a known good battery and make sure that the electrical system is intact - no sparks flying or fuses blowing, etc. Do a lamp test. The first turn of the ignition key is a test position. The second click of the key is the start position and the CDI box should produce a high pitched whining noise. At the very least, make sure the oil pressure light comes on in both the test and start positions.
Check the ignition timing and set if necessary. The bike is not sensitive to timing. Setting it “close enough” is good enough at this stage:
Use the same bolt under the generator badge to turn the engine and check the timing.
1- Remove the timing mark inspection cover held in place with the two 10 mm hex heads on the left counter weight cover (approximately below the fuel petcock).
2- Remove the spark plug from the rotor housing.
3- Insert the spark plug into the plug cap and lay the spark plug by the timing mark inspection hole so that it’s threads are touching (earthing) any part of the alloy casings.
4- Turn the ignition key to the “Start” position (two clicks).
5- From the left side of the bike, rotate the engine clockwise while looking down the inspection cap at the timing marks. Listen for the distinctive “pop” of the spark plug firing and if it occurs anywhere between 5 and 10° BTDC, leave it, you’re good to go.
6- If it’s well outside of this, adjust the timing by gently loosening the four (4) allen head bolts holding the breaker point housing (right side of bike) and rotating the housing CCW to advance the timing or CW to retard. Do up the four allen bolts and recheck. When you tighten the bolts, it will change the timing slightly. Don’t worry about that for now. As long as it’s roughly between 5 and 10° you’ll be fine.
NB: The ignition timing should be set static. Do not adjust the breaker housing while the engine is running. Loosening the 4 bolts may aerate the oil pump.
SPARK PLUG:
If you have a plug adaptor, consult the manufacturer for the recommended type. For OEM plugs, use the pictures below to gauge the condition of your plug. These are brand new OEM plugs. Left is an A9 and right an AU10. Either type will work. If using an OEM plug, it’s highly recommended to use a brand new unit.
NB: Do not overtighten the plug, there's a danger of permanently damaging the engine casing. Suzuki issued a bulletin about this.
AIR FILTER:
Remove the air filter, take it out of its grid and clean it. Original RE5 filters may look okay sitting in the grid but breakdown in situ and then crumble into fine dust and are sucked through the system on first start up. The bike is sensitive to filters. Ultimately, get one that’s correct. Member “JESS” still sells suitable filters. Oil the filter with Castrol GTX before fitting using the smallest amount of oil possible. One idea is to oil it and then lay the filter between a few sheets of absorbent paper and squeeze as much oil out as you can before fitting.
STARTING:
Fully charge the battery and now you’re ready to go. Ideally have a fan placed at the front of the bike and blowing air over the radiator. Leave the spark plug out and turn the engine over with the starter. This’ll clear a lot of the oil and fuel you sprayed in when first checking the engine (note: the Oil Pressure light may not go out when spinning the engine with the plug out- not an issue for the short duration required).
Replace the plug. Do not go twisting the throttle (it's got a pump remember, you'll just flood the engine- tip from Michael D. Callahan on FB).
Connect the spark plug lead, reconnect the fuel line to the carby, move the petcock lever to “PRIME” (lever points to rear of bike), kill switch on right switchblock in the run position, ignition in the second click, CDI making a faint whining sound, choke fully down. Hit the starter.
Be prepared for a lot of smoke. This is not abnormal on a long layup bike.
Once the bike fires and runs, check the oil pressure light on the dash and make sure it’s extinguished and if not, shut the bike down immediately. After the bike has run for a little while, see if you can gently raise the choke lever to the half position and let it warm up. If the bike is reluctant to run off choke, you may still have a blocked bypass or primary pilot jet (see photo below).
Avoid revving the bike until the temp gauge reaches the first mark. Monitor temperature and shut the engine down if the needle rises too rapidly (it should take roughly 5 minutes for a reasonably sorted bike to reach the first mark on the gauge). At this stage, don’t let the temp gauge go past the half way mark.
NB: the bike’s cooling fan will not come on until the gauge is almost at the “H” side. Don’t let it get this hot whilst stationary.
Congratulations on a successful first start.
Before operating the bike on the road, there is more to do. Recheck your oil levels, particularly the engine sump. You need to check the operation of the one way valve that sits between the carby and the radiator. This is your oil feed line and if the valve is faulty (this is common), fuel will run back down the line into the metering oil pump and render it ineffective. You can check it by removing it, disconnecting the oil line and attaching a syringe. It should only allow air to be pushed via the syringe and not sucked.
You’ll also need to check the operation of the metering pump itself by referring to the Service Manual procedure. Once that’s been done, you can stop using premix in the tank.
If you haven’t already, thoroughly clean the carb (Ultrasonically). Fit new gaskets. Correct carby set up including float height, testing of the accelerator pump and synchronizing the port valve are also recommended.
Go back and fine tune the ignition by correctly gapping the points, greasing the cam and setting it to 8° BTDC (8.5 if you’re keen).
Do a thorough job on the cooling system including cleaning out the fine pipes that come off the alloy filler pipe that sits under the tank flap. They’ll need to be checked and cleaned manually, a radiator flush will not fix them if they are clogged (not uncommon).
And we haven’t even touched master cylinders and calipers, fork oils, chain and sprocket condition, rectifier, alternator, wheel bearings etc etc etc.
What're you waiting for?
 Get into it and get on the road. There’s nothing else like it.


